
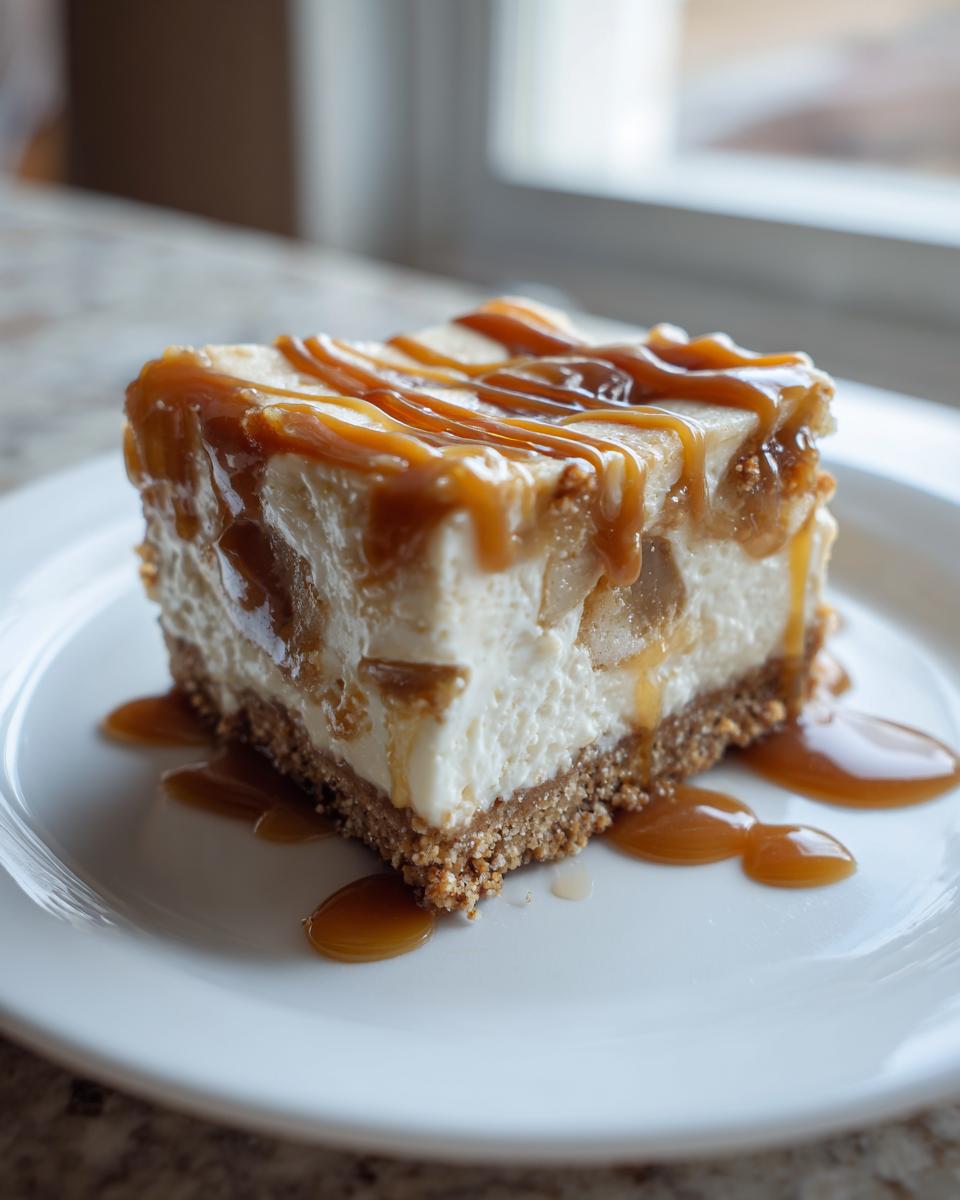
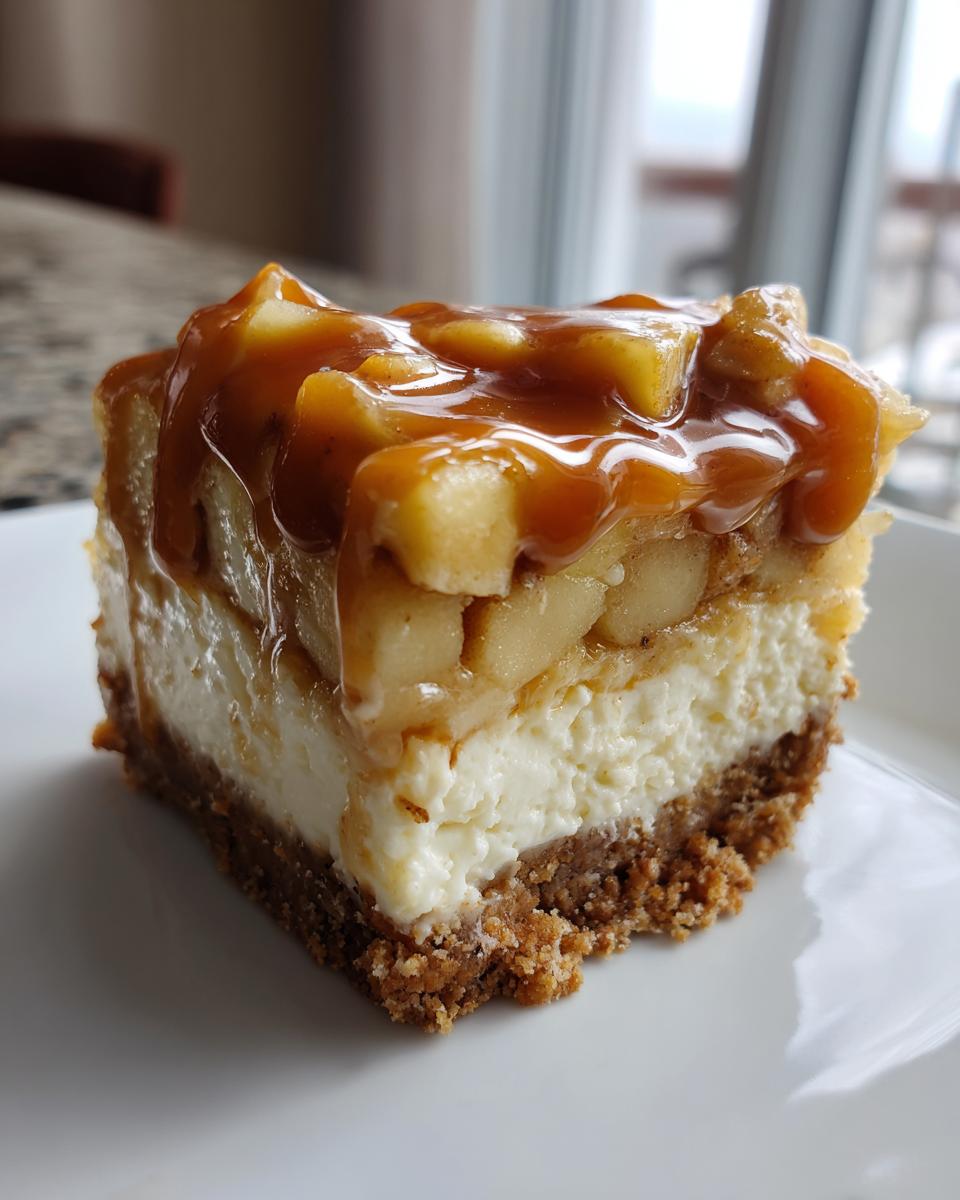
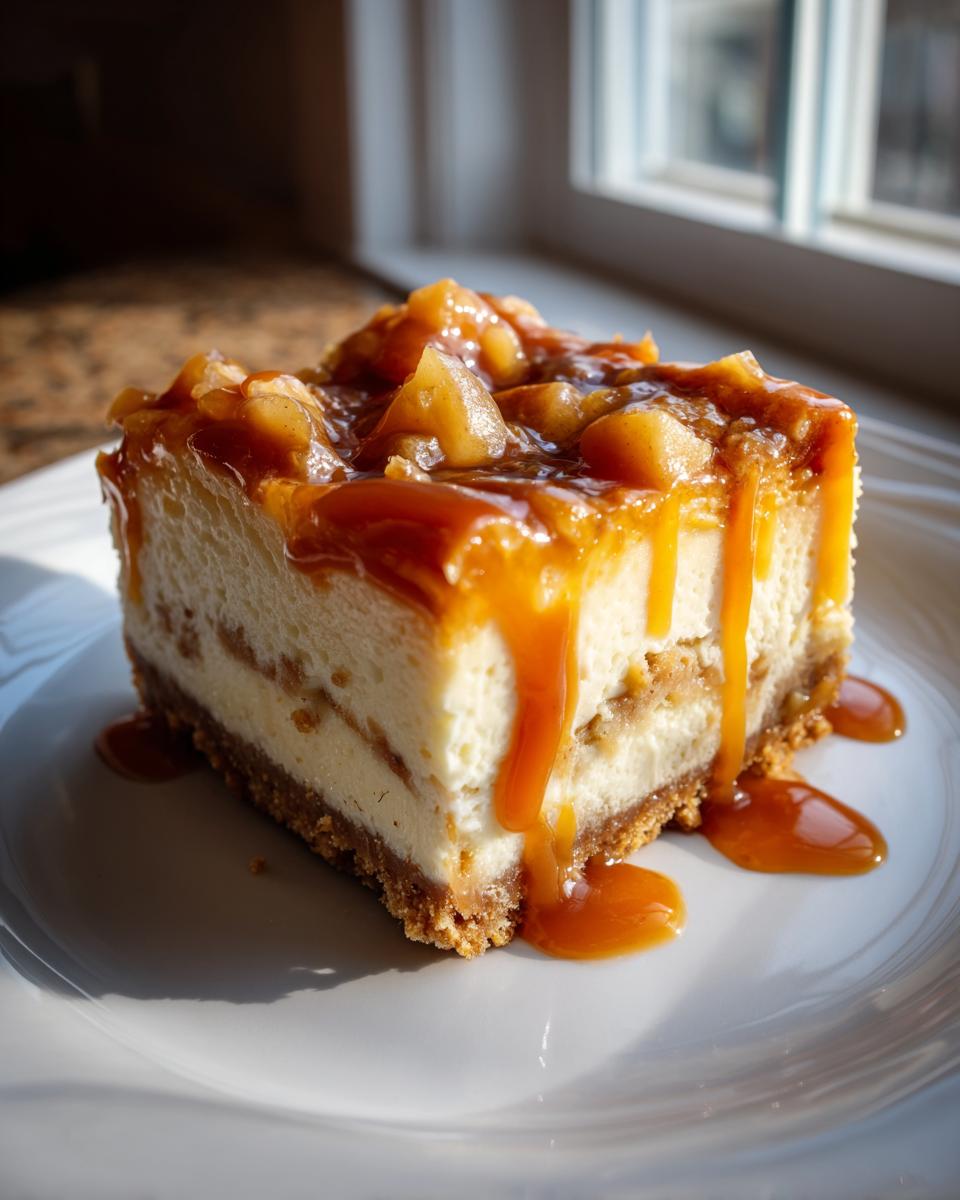
Oh my gosh, if you’re looking for that perfect taste of autumn that doesn’t involve slicing a whole pie, stop scrolling right now. I have cracked the code on the ultimate layered treat: the Caramel Apple Cheesecake Bars. Seriously, these bars have everything! You get that satisfying crunch from the graham cracker crust, the smooth, cool cheesecake layer, warm spiced apples, and then—the grand finale—a rich drizzle of caramel.

I love making these because they look incredibly fancy but are so straightforward. They are my go-to dessert whenever I need something impressive for a party without spending the entire day baking. Trust me, once you try this combination, you’ll understand why I make these Caramel Apple Cheesecake Bars constantly!
Why You Need These Caramel Apple Cheesecake Bars Now
Why wait for a special occasion? These bars are perfect for that craving that hits around three in the afternoon. They are unbelievably good now, but here’s why you should start mixing tonight:
- They are the absolute perfect make-ahead dessert for potlucks or holidays.
- The texture balance—crunchy, creamy, soft—is just addictive.
- They capture that cozy fall feeling without needing a heavy pie crust.
Essential Ingredients for Perfect Caramel Apple Cheesecake Bars
You know I’m always preaching about using good quality ingredients, and honestly, that’s half the battle won with these layers. We need a few core components to get that perfect structure, especially for the base and the filling. Pay close attention to how soft your cream cheese is!
For the Graham Cracker Crust
We need a crust that holds up against the moisture from the apples and cheesecake, so don’t skimp on melting that butter completely. It makes all the difference when you press it in firmly!
- 1 1/2 cups graham cracker crumbs
- 1/4 cup granulated sugar
- 6 tablespoons unsalted butter, melted
For the Cheesecake Filling and Apple Topping
For the best Caramel Apple Cheesecake Bars, you absolutely have to use room-temperature cream cheese. If it’s too cold, your filling will be lumpy, and nobody wants a bumpy cheesecake situation! Plus, Granny Smith apples are my favorite here—they hold their shape and don’t turn to mush.
- 16 ounces cream cheese, softened
- 1/2 cup granulated sugar
- 2 large eggs
- 1 teaspoon vanilla extract
- 2 medium apples, peeled, cored, and diced
- 1/4 cup brown sugar
- 1 teaspoon ground cinnamon
- 1/2 teaspoon ground nutmeg
- 1/2 cup caramel sauce (for drizzling later!)
Step-by-Step Instructions for Caramel Apple Cheesecake Bars
Okay, this is the fun part! Honestly, these bars come together surprisingly quickly before they need their crucial chill time. I always preheat the oven first thing, and I use parchment paper with a little overhang on the sides. That overhang acts as a sling, making it super easy to lift the whole slab out later. If you need tips on quick cooling liquids, check out this guide on iced tea mistakes—sometimes you just need a quick cool down before moving on!
Preparing the Crust and Initial Bake for Caramel Apple Cheesecake Bars
First, let’s get that base ready. Combine your graham crumbs, the smaller amount of sugar, and that melted soft butter. You want this mixture to feel evenly moist. Press it *firmly* into the bottom of that parchment-lined pan. I mean, use the bottom of a measuring cup to really pack it down. Then, pop that crust into your 350-degree oven for exactly 10 minutes. We want it set before we add the wet layers.
Mixing the Creamy Cheesecake Filling
While that crust is setting up, grab your softened cream cheese and the larger half-cup of sugar. Beat those together until you think they are perfectly smooth—no lumps allowed! Now, this is important: add the eggs one at a time, mixing just until they disappear before adding the next one. Finish with your vanilla. As soon as the crust comes out of the oven, pour this creamy filling right over the warm base immediately.
Layering and Baking the Caramel Apple Cheesecake Bars
Time for the apples! Toss your diced apples with the brown sugar, cinnamon, and nutmeg right in a bowl. Make sure those spices coat every piece. Scatter this spiced apple mix evenly over the top of the liquid cheesecake batter. It’ll sink a little, which is perfect. Bake this whole creation for about 30 to 35 minutes. You’re looking for the edges to be firmly set, but the very center should still have a slight, tiny wobble to it. That jiggle means future moist Caramel Apple Cheesecake Bars!
Chilling and Finishing Your Caramel Apple Cheesecake Bars
Resist the urge to cut them right away! Take the pan out and let it cool on the counter for about 15 minutes. Once it’s just warm, drizzle that lovely caramel sauce all over the top. Don’t try to spread it; just let it drip. Then, cover it gently and move the whole thing to the fridge. You need a serious minimum of 4 hours to chill, but honestly, make these the day before if you can. The chilling is non-negotiable if you want clean squares of Caramel Apple Cheesecake Bars!
Tips for Making the Best Caramel Apple Cheesecake Bars
You’ve got your recipe, you’ve got your ingredients, but a few secret touches really take these Caramel Apple Cheesecake Bars from “good enough” to “let me have the recipe right now!” I’ve learned these lessons the hard way, so you don’t have to deal with cracked tops or soggy bottoms.
First up: apple choice! If you use softer dessert apples (like McIntosh), they just dissolve into mush when baked. You need a firm apple—Granny Smith is my favorite because that tartness cuts through the richness of the cream cheese beautifully. They stay chunky and distinct.
My second big tip is about preventing cracks in that gorgeous cheesecake layer. Don’t over-mix the eggs! Once you add them one by one, slow down. Over-mixing incorporates too much air, and when that air escapes during baking or cooling, *boom*, instant crack city. Just mix until incorporated, please!
Finally, and maybe most importantly for the bars themselves, is cutting. Trying to cut these when they are just chilled is a nightmare. You end up with smears and mushy edges. For the cleanest presentation, I chill them completely overnight. Then, I run a sharp knife—like a big chef’s knife—under hot water, wipe it dry, and make one clean press/slice. Wipe the knife clean after every single cut. That’s how you get those professional-looking Caramel Apple Cheesecake Bars!
Ingredient Notes and Substitutions for Caramel Apple Cheesecake Bars
When I first developed this recipe for Caramel Apple Cheesecake Bars, I had a very specific pantry, just like everyone else! So, naturally, I’ve played around with substitutions over the years. Flexibility is key in home baking, but there are a few lines you just shouldn’t cross if you want that perfect flavor profile.
Let’s talk apples first, because that’s where most people get nervous. If you don’t have Granny Smith on hand, substitute with Honeycrisp or Pink Lady. The point is, you need a firm apple that handles heat well. Please, please do *not* use pre-made apple pie filling unless you are truly in a bind. That stuff is usually loaded with cornstarch for thickening and is often way too sweet. If you *must* use it, dump out most of the thick syrup first! We want the apple flavor, not the swampy filling liquid.
What about the butter? My recipe calls for unsalted butter in the crust because we control all the salt in the cheesecake layer. If you only have salted butter, cut the added salt from your own recipe development (though there isn’t much salt in these bars, since the crust is relying on the butter for flavor). You just need to be aware of the sodium difference.
And for those of you who like to sweeten things up naturally—I get it! You might be tempted to swap the regular sugar for simple syrup, but that will ruin the texture tremendously here. Stick to granulated and brown sugar to ensure the right structure for the crust and filling. These bars need that granular sugar to create those lovely pockets of air when creaming that cream cheese!
Storage and Make-Ahead Options for Your Cheesecake Bars
The really fantastic thing about these layered treats is that they actually taste *better* the next day. The chilling process is so important for structure, but that extra time lets the cinnamon and caramel flavors really deepen into that tangy cream cheese layer.
If you’ve made a batch of these, congratulations! You now have dessert planned for the week. You definitely want to keep them refrigerated. The cream cheese structure just won’t hold up well at room temperature, even though the caramel topping looks tempting right now.
For refrigeration, cover the pan or dish tightly with plastic wrap or foil. I usually don’t cut them until I need them, because cutting exposes more surface area to air, which can dry them out slightly over several days. Uncut, they stay wonderfully fresh in the fridge for about four days. If I’m making them for a school event coming up later in the week, I’ll bake them all up on a Sunday night!
Now, can you freeze them? Oh yes, you absolutely can! Freezing is great if you have too many or if you’re preparing for a holiday bake session way in advance. You’ll want to chill them completely firm first, then slice them into individual bars. Place the squares on a baking sheet lined with parchment paper—this is super important so they don’t all freeze together in one big block. Once they are completely frozen solid (give them a few hours), you can transfer them to a freezer-safe zip-top bag. I learned with my chocolate chip cookies that if you stack them, you must use parchment paper layers between them!
They should keep well in the freezer for up to two months. When you are ready to eat one, just pull a single bar (or three, who’s counting?) and let it thaw overnight in the refrigerator. They thaw beautifully and taste almost freshly baked!
Serving Suggestions for Caramel Apple Cheesecake Bars
Even though these Caramel Apple Cheesecake Bars are totally perfect standing alone—and trust me, they often don’t last long enough on the counter for me to even think about sides—a little garnish or the right beverage can really elevate the experience. These bars are rich, they are sweet, and they have that wonderful spiced apple background note that begs for a simple partner.
My favorite way to serve them, especially after dinner, is with just a tiny puff of whipped cream. Not the stuff from a can, but real whipped cream, maybe lightly sweetened with a touch of vanilla. It adds a lovely, cooling contrast to the dense cheesecake and the rich caramel drizzle. If I use it, I skip any extra toppings.
However, if you want a little more warm spice on top, skip the cream and grab your finest cinnamon. Just dust a tiny bit over the top right before serving, especially if you’ve had them chilling for a while and the caramel has set up hard. This immediately draws out those lovely apple spices we blended in the filling.
When it comes to what to drink alongside these Caramel Apple Cheesecake Bars, you need something robust to cut through the sweetness. Forget weak iced tea; you need something strong! A hot cup of coffee is divine. If you’re feeling fancy, or it’s chilly outside, try making a simple espresso drink—you can find tons of great combinations if you look into recipes for espresso drinks. The bitterness of the coffee is just the perfect foil for that sweet, gooey caramel and creamy cheesecake.
Honestly, though, if you ask me, they are best served slightly cool, paired only with the satisfied groan of someone taking their first bite!
Frequently Asked Questions About Caramel Apple Cheesecake Bars
I always get so many questions after I post these because everyone wants theirs to turn out perfectly structured. Cheesecake bars can be a little fussy, but once you know the secrets—which I’ve totally spilled above—you’ll be so fine! Here are the top things people ask me about when making these Caramel Apple Cheesecake Bars.
Why are my cheesecake bars runny after chilling?
Oh, this is the worst feeling! If you cut into your bars and they just slump onto the plate, it usually means one of two things, and both actually come down to patience. Either you pulled them out of the oven when the center was too liquidy—remember, we want a slight jiggle, not a full slosh—or, more likely, you didn’t let them chill long enough. You cannot rush the chilling process for cheesecake! I know 4 hours feels like forever, but seriously, that time lets the cream cheese fully hydrate and set up properly. If you can, go for overnight. That’s the real ticket to perfect, non-runny bars.
Can I make these Caramel Apple Cheesecake Bars without baking the crust?
I know, I know, skipping that first 10 minutes sounds like a time saver! But trust me on this one: don’t skip baking the crust. The crust mixture is just crumbs, sugar, and melted butter. If you pour the wet cheesecake batter right onto that unbaked crumb mixture, the butter soaks right up, and you end up with a soggy, crumbly bottom layer. Baking it first seals those layers together. It creates a sturdy platform so your Caramel Apple Cheesecake Bars can actually be picked up!
What is the best way to cut clean bars?
I touched on this a bit in my tips section, but it is worth repeating because it is the difference between a pretty dessert and a messy plate! Once your bars are completely cold and firm, grab a really sharp, large knife—like the big one you use for carving roasts. Run that blade under very hot tap water for about 15 seconds. Wipe it totally dry with a clean towel. Press straight down firmly where you want your first cut. Do not pull or twist the knife! Wipe the knife clean again, run it back under hot water, and repeat for every single cut. This hot, clean technique ensures you slice right through the apple layer and the caramel without dragging all that goodness around. For more dessert success stories, check out my ultimate recipe list!
Share Your Caramel Apple Cheesecake Bars Experience
Well, that’s all the secret knowledge I have on mastering these incredible layered treats! Now it’s your turn. Did you make these Caramel Apple Cheesecake Bars? Tell me what you thought! Leave a rating below and snap a picture to share—I absolutely love seeing your bakes in the comments!
Print
Caramel Apple Cheesecake Bars
- Total Time: 4 hours 40 min
- Yield: 18 bars 1x
- Diet: Vegetarian
Description
Simple recipe for layered cheesecake bars featuring a graham cracker crust, creamy cheesecake filling, spiced apples, and caramel topping.
Ingredients
- 1 1/2 cups graham cracker crumbs
- 1/4 cup granulated sugar
- 6 tablespoons unsalted butter, melted
- 16 ounces cream cheese, softened
- 1/2 cup granulated sugar
- 2 large eggs
- 1 teaspoon vanilla extract
- 2 medium apples, peeled, cored, and diced
- 1/4 cup brown sugar
- 1 teaspoon ground cinnamon
- 1/4 teaspoon ground nutmeg
- 1/2 cup caramel sauce
Instructions
- Preheat your oven to 350 degrees Fahrenheit. Line a 9×13 inch baking pan with parchment paper, leaving an overhang for easy removal.
- Combine graham cracker crumbs, 1/4 cup sugar, and melted butter. Press the mixture firmly into the bottom of the prepared pan. Bake for 10 minutes.
- While the crust bakes, beat the softened cream cheese and 1/2 cup sugar until smooth. Beat in the eggs one at a time, then mix in the vanilla extract. Pour this mixture over the warm crust.
- In a small bowl, toss the diced apples with brown sugar, cinnamon, and nutmeg. Scatter the spiced apples evenly over the cheesecake layer.
- Bake for 30 to 35 minutes, or until the edges are set and the center is slightly jiggly.
- Remove from the oven and let cool for 15 minutes. Drizzle the caramel sauce over the top.
- Cool completely on a wire rack, then chill in the refrigerator for at least 4 hours before cutting into bars.
Notes
- For easier cutting, chill the bars overnight.
- You can use store-bought caramel sauce or make your own.
- Use firm apples like Granny Smith for the best texture.
- Prep Time: 25 min
- Cook Time: 35 min
- Category: Dessert
- Method: Baking
- Cuisine: American
Nutrition
- Serving Size: 1 bar
- Calories: 300
- Sugar: 25
- Sodium: 150
- Fat: 18
- Saturated Fat: 11
- Unsaturated Fat: 7
- Trans Fat: 0
- Carbohydrates: 32
- Fiber: 1
- Protein: 4
- Cholesterol: 60
Keywords: caramel apple, cheesecake bars, graham cracker crust, apple dessert, baked cheesecake