
Let’s be honest, sometimes you just need a huge bowl of creamy, unapologetic comfort food, right? Forget those watery, bland boxed versions. Today, we’re diving deep into my absolute favorite dinner: the Upgraded Baked Macaroni and Cheese. This isn’t just elbow macaroni drowning in a basic cheese sauce; this is an architectural marvel of meltiness!
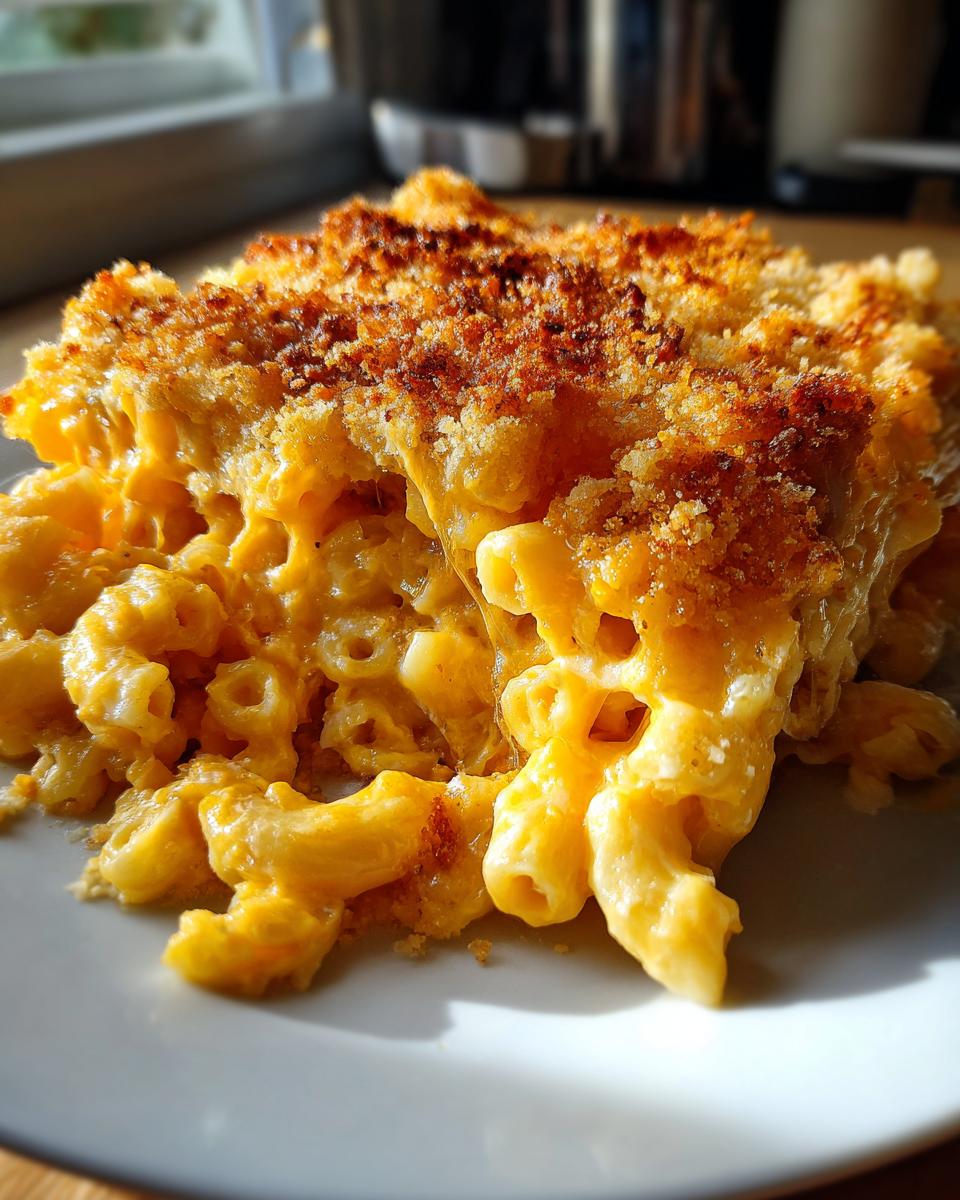
My secret weapon is the triple-cheese blend—oh, and that crispy panko topping that screams perfection. I swear, the smell alone makes my kids run in from outside whenever I pull this out of the oven. We use this recipe for everything—celebrating a good report card or just surviving a Monday. It just hits different.

The flavor depth here comes from seasoning the béchamel just right and using sharp cheddar that actually tastes like cheese. Trust me, once you try this rich, bubbly beauty, you’ll never go back. It’s the ultimate classic, completely overhauled.
Why This Upgraded Mac And Cheese Recipe Stands Out
So, why bother making this when you can just open a box? Honestly, the difference is night and day! This recipe takes simple ingredients and turns them into something truly special. It’s all about layering flavor and making sure every bite has a fantastic texture contrast.
- The Flavor Bomb: We combine three different cheeses—sharp cheddar, nutty Gruyère, and creamy Monterey Jack—for serious depth.
- Textural Heaven: You get that luxurious, velvety smooth sauce hugging the pasta, topped with a crunchy, buttery panko crust. Wow!
- Perfectly Seasoned: We sneak in nutmeg and cayenne, which nobody notices but they make the cheese taste richer and brighter.
- It’s Baked!: There’s just something magical about scooping a piping hot portion right out of the oven.
It’s the ultimate upgrade, really. If you love rich comfort food, you might want to check out my sour cream banana bread recipe next for more serious home baking goodness!
Essential Ingredients for Your Upgraded Mac And Cheese
When we talk about upgrading mac and cheese, it all comes down to the ingredients, especially the dairy, of course! You will need one pound of elbow macaroni cooked until it’s just right—al dente, please! Don’t even think about overcooking the pasta; it’s going back in the oven later.
For the sauce base, grab six tablespoons of good quality unsalted butter, half a cup of flour to make our roux, and four full cups of whole milk—yes, whole milk yields the best richness, so skip the skim if you want the luxury this recipe promises. We need salt, pepper, and the secret handshake: a little nutmeg and a tiny pinch of cayenne pepper for some warmth!
But the real stars? The cheese! You must shred these yourself; pre-shredded bags are coated in anti-caking agents that make your sauce gloppy. I insist on four cups of sharp cheddar—the sharper, the better for that classic tang. Then add one cup of nutty Gruyère and one cup of easy-melting Monterey Jack. If you’re looking for other cheesy inspiration, you should check out my copycat Velveeta broccoli mac and cheese recipe!
Expert Tips for Perfecting Your Upgraded Mac And Cheese Sauce
Listen, if you mess up the sauce, you are going to regret it when you take that first bite. Making a silky smooth béchamel base is easy, but you have to treat it right! A few small steps really separate the “okay” mac and cheese from the *legendary* stuff—which is what we are making today.
My personal rule for flavor is to always hit that sauce with both nutmeg and cayenne right before the cheese goes in. The nutmeg deepens the dairy flavor, and the cayenne just wakes everything up. You won’t taste the spice, I promise, but you’ll miss it if it’s gone! Also, remember that you should never boil the milk once it starts thickening, or you risk breaking the sauce structure before we even get to the good part.

If your sauce isn’t completely perfect, don’t panic! You can absolutely save a shaky sauce, though it’s much easier to avoid the problem altogether. For more amazing, smooth sauce techniques, you absolutely need to check out my tips for creamy stovetop Southern mac and cheese!
Building the Roux: The Foundation of Your Upgraded Mac And Cheese
The roux is the backbone, so treat it with respect! Melt your butter over medium heat, then whisk in that flour and let it cook for a solid minute—no less! If you don’t cook out the raw flour taste, your whole sauce suffers. Then, the milk addition has to be slow and patient. I pour the whole milk in little splashes while whisking like crazy. Keep whisking until that mixture coats the back of a spoon beautifully. That’s your perfect creamy base right there!
Achieving Maximum Melt: Cheese Incorporation Secrets for Upgraded Mac And Cheese
This is the most critical step, so pay attention! Once the pan is completely off the heat, then—and only then—do you start adding your three kinds of beautiful, freshly shredded cheese. If you add cheese while the heat is still going, the proteins seize up, and you end up with shiny, grainy cheese strings instead of smooth sauce. Add the cheese in small handfuls, stirring gently until each batch is fully incorporated before adding the next. Patience here ensures that luxurious, velvety melt we want!
Step-by-Step Instructions for Baking Your Upgraded Mac And Cheese
Alright, we have our amazing cheese sauce and glossy, perfectly cooked pasta. Now it’s time to bring it all together for that golden-brown, bubbly finish! Timing is everything here because you want the sauce hot when that pasta goes in, but you need the oven preheated first thing.
First things first: crank that oven up to 375 degrees Fahrenheit and grease up your 9×13 baking dish. While your big pot of water is boiling, get that elbow macaroni cooking; remember, just until it’s al dente. Seriously, pull it out right when it still has a little bite left, because it finishes cooking in the oven later!
Once your pasta is drained, you fold it right into that gorgeous, velvety cheese sauce we made earlier. Stir it gently until every piece is coated—don’t smash the pasta, we want those distinct shapes!
- Pour that entire, cheesy masterpiece into your prepared baking dish. Spread it out evenly so you get consistent results across the top.
- Now for the crunch! In a little bowl, toss your panko breadcrumbs with two tablespoons of *melted* butter. Don’t skip the melting part; dry panko just toasts, but buttery panko crisps up perfectly.
- Sprinkle those buttery crumbs evenly over the top of the mac and cheese. Shake the pan gently to settle them in.
- Slide it into the hot oven for about 20 to 25 minutes. You are looking for two main things: the sauce bubbling up around the edges and that topping turning deep golden brown.
- Once it’s out, let it rest for five minutes! I know, it’s torture waiting, but resting helps the sauce set up just enough so it isn’t completely liquidy when you scoop it.
If you’re also making homemade croutons for a side salad, you can look at my tips for making the best homemade croutons while this bakes!
Making the Crunchy Panko Topping for Your Upgraded Mac And Cheese
Okay, this is where we move from ‘delicious’ to ‘absolutely unbeatable.’ The crunchy panko topping is non-negotiable in my book for this Upgraded Mac And Cheese. Seriously, don’t even think about skipping it!
You’ll only need one cup of panko breadcrumbs and two tablespoons of nicely melted butter—make sure that butter is fully melted! Just toss the two together in a small bowl until every panko flake is glistening. Sprinkle this heavenly mixture evenly over the top of your cheesy pasta before it goes into the 375-degree oven. That melted butter is the secret to getting that fantastic, deep golden crisp!
Serving Suggestions to Complement Your Upgraded Mac And Cheese
This baked mac and cheese is incredibly rich, so you need something bright and sharp on the side to cut through all that glorious cheese and butter. If you just put it next to another heavy dish, you’ll need a nap immediately after dinner—and we don’t want that!
I always go for green things to balance the creaminess. A really simple side salad with a sharp vinaigrette works wonders; the acid brightens up your palate between bites of cheesy pasta. If you want something warm, lightly steamed broccoli or roasted asparagus tossed with just a little garlic and salt is perfect.
For a truly refreshing contrast, try a simple salad. I actually have a fantastic recipe for a refreshing cucumber and feta salad that is the perfect cool counterpoint to the hot, bubbly mac and cheese. Keep the sides simple so the main event can truly shine!
Storage and Reheating Instructions for Leftover Upgraded Mac And Cheese
Oh, the post-dinner dilemma: how do you keep this masterpiece tasting just as good the next day? Leftovers are inevitable because this recipe makes plenty, but you have to treat them gently.
For storage, make sure the mac and cheese has cooled down a bit first, maybe 30 minutes sitting on the counter. Then, transfer it to a sturdy, airtight container. It keeps beautifully in the fridge for about three to four days—any longer and the texture starts getting sad, in my opinion.
When you want to reheat it, resist the microwave if you can! Microwaving tends to make the sauce seize up and the edges get tough. I much prefer reheating it in the oven. Cover the dish with foil and bake it at 350 degrees for about 15 to 20 minutes, or until it’s piping hot all the way through and bubbly again. Adding a tiny splash of milk when you reheat it can help bring back some of that initial creaminess, too. Trust me on the foil; it keeps that amazing panko topping from burning before the center is warm!
Variations on the Upgraded Mac And Cheese Theme
Once you master the base recipe for the Upgraded Mac And Cheese, the sky is the limit! I love tweaking this recipe for holidays or just when I feel like being extra adventurous. It’s so flexible, which is another reason it’s my go-to comfort dish.
My absolute favorite variation is almost sinful: bacon and caramelized onions. Cook up some diced bacon until it’s perfectly crisp, set the bacon aside, and then make those onions in the rendered bacon fat before you start your roux. Wow, that flavor combination is incredible! If you like caramelized onions, you might also want to bookmark my recipe for caramelized onion and Gruyère dip because it uses similar flavor bases.

If you want to change the cheese profile instead of adding mix-ins, try swapping out that Monterey Jack for smoked Gouda. Hello, smoky depth! You get that nutty flavor from the Gruyère and then BAM—a little smoke hits you on the finish. That substitution is subtle but makes a huge difference in complexity. You can also skip the topping entirely and stir in a cup of steamed broccoli florets right before baking for a slightly healthier (but still decadent) feel!
Frequently Asked Questions About Upgraded Mac And Cheese
I’ve been asked a million questions about this recipe over the years, mostly about making it smoother or changing up the cheese lineup. Honestly, once you get the technique down for this Upgraded Mac And Cheese, customizing it gets really easy!
If you’re planning a huge dinner party, you might want to know about making it ahead of time, or troubleshoot why your cheese sometimes separates. Don’t stress; I’ve figured out all the little pitfalls so you don’t have to! And hey, if you end up with extra crumbs, you can use them for my recipe on homemade croutons!
Can I make this Upgraded Mac And Cheese ahead of time?
Yes, you absolutely can! I prefer to assemble the whole thing—pasta mixed with sauce, topped with the buttery panko—and then cover it tightly and keep it in the fridge overnight. When you’re ready to bake it the next day, just let it sit on the counter for about 30 minutes to take the chill off, and then add an extra 5 to 10 minutes to the baking time. I wouldn’t advise fully baking it and then reheating, because that crunchy topping gets soggy fast!
Why is my Upgraded Mac And Cheese sauce grainy?
That heartbreaking graininess always comes from the cheese being added when the sauce is too hot! Remember what I said about taking the pan completely off the heat before you stir in the cheddar, Gruyère, and Monterey Jack? If the temperature is too high, the milk proteins tighten up and turn your lovely sauce into little cheese pebbles floating around. You need low, slow heat application during the cheese melting phase to keep it silky smooth.
What is the best substitute for Gruyère in this Upgraded Mac And Cheese?
If you can’t find Gruyère or maybe just want to switch things up, my favorite high-flavor option is smoked Gouda. It brings a completely different dimension—that subtle smokiness really complements the sharp cheddar beautifully without overpowering the dish. It adds a lovely richness that is just superb in this Upgraded Mac And Cheese. You get that nuttiness paired with a little smoke; it’s fantastic!
Print
Upgraded Baked Macaroni and Cheese
- Total Time: 50 min
- Yield: 8 servings 1x
- Diet: Vegetarian
Description
A richer baked macaroni and cheese recipe using a blend of cheeses and a crunchy topping.
Ingredients
- 1 pound elbow macaroni
- 6 tablespoons unsalted butter
- 1/2 cup all-purpose flour
- 4 cups whole milk
- 1 teaspoon salt
- 1/2 teaspoon black pepper
- 1/4 teaspoon nutmeg
- 1/4 teaspoon cayenne pepper
- 4 cups shredded sharp cheddar cheese
- 1 cup shredded Gruyère cheese
- 1 cup shredded Monterey Jack cheese
- 1 cup panko breadcrumbs
- 2 tablespoons melted butter (for topping)
Instructions
- Preheat your oven to 375 degrees Fahrenheit. Grease a 9×13 inch baking dish.
- Cook the macaroni according to package directions until al dente. Drain well and set aside.
- While the pasta cooks, make the cheese sauce. Melt 6 tablespoons of butter in a large saucepan over medium heat.
- Whisk in the flour and cook for 1 minute, stirring constantly.
- Gradually whisk in the milk until smooth. Cook, stirring often, until the sauce thickens enough to coat the back of a spoon, about 5 to 7 minutes. Do not boil.
- Remove the pan from the heat. Stir in the salt, pepper, nutmeg, and cayenne pepper.
- Add the cheddar, Gruyère, and Monterey Jack cheeses to the sauce. Stir until the cheese is completely melted and the sauce is smooth.
- Add the cooked macaroni to the cheese sauce and stir to coat everything evenly.
- Pour the mixture into the prepared baking dish.
- In a small bowl, toss the panko breadcrumbs with 2 tablespoons of melted butter. Sprinkle the breadcrumbs evenly over the macaroni and cheese.
- Bake for 20 to 25 minutes, or until the topping is golden brown and the sauce is bubbly.
- Let it rest for 5 minutes before serving.
Notes
- For a sharper flavor, use aged cheddar cheese.
- You can substitute Gruyère with smoked Gouda for a different flavor profile.
- If you prefer a creamier texture, reduce the baking time by 5 minutes.
- Prep Time: 15 min
- Cook Time: 35 min
- Category: Dinner
- Method: Baking
- Cuisine: American
Nutrition
- Serving Size: 1 serving
- Calories: 550
- Sugar: 5
- Sodium: 550
- Fat: 32
- Saturated Fat: 18
- Unsaturated Fat: 14
- Trans Fat: 1
- Carbohydrates: 45
- Fiber: 2
- Protein: 25
- Cholesterol: 90
Keywords: macaroni and cheese, baked mac and cheese, comfort food, cheddar, Gruyère, panko topping