
Hey there, fellow kitchen adventurers! I’m so excited to share one of my absolute favorite party tricks with you today: Jellyfish Jam Shots. These little beauties aren’t just a drink; they’re a conversation starter, a burst of color, and frankly, just pure fun in a glass. I first stumbled upon the idea for these years ago, trying to find a unique cocktail for a themed party. I wanted something visually stunning but still easy enough for a home cook like me to pull off without a fancy bar setup.
Over time, I’ve tinkered and experimented, learning the secrets to getting those perfect, distinct layers and that cool “jellyfish” effect. It’s become a go-to for me when I want to impress friends without spending hours shaking and stirring. My experience in mixing drinks, even simple ones, has taught me that presentation can be just as important as taste, and these shots deliver on both counts.
You don’t need to be a professional bartender to make these work. Trust me, if I can do it, you definitely can! Get ready to wow your guests with these vibrant and tasty Jellyfish Jam Shots.
Why You’ll Love These Jellyfish Jam Shots
Seriously, who doesn’t love a drink that looks as cool as it tastes? These Jellyfish Jam Shots are a guaranteed hit for so many reasons. They just bring a smile to people’s faces the moment they see them.
- They look amazing! The vibrant blue and the little swirl of red really do look like tiny jellyfish floating in the ocean. It’s pure visual fun.
- They’re surprisingly easy to make. Even if you’ve never layered a drink before, I promise you can do this. It takes just a few simple steps.
- The taste is sweet and fruity. It’s a crowd-pleasing flavor that’s not too strong, making them perfect for celebrations.
- Perfect for parties. These shots are a fantastic way to add some flair to any gathering without a lot of fuss.
They’re just a blast to serve and to sip!
What You Need for Jellyfish Jam Shots
Okay, let’s talk ingredients! Making these Jellyfish Jam Shots is super simple because you only need a few things. The key is having the right stuff on hand before you start layering.
Here’s what you’ll need:
- Blue Curaçao: You’ll need about 1/2 ounce per shot. This gives us that beautiful blue base layer.
- Vodka: Grab your favorite bottle. We’ll use 1/2 ounce of vodka for the middle layer.
- Grenadine: Just a splash of this sweet, red syrup does the trick. It creates the cool “jellyfish” effect as it sinks.
That’s it! Just three ingredients stand between you and some seriously fun Jellyfish Jam Shots.
Equipment for Making Jellyfish Jam Shots
You don’t need a whole bar setup to make these Jellyfish Jam Shots. A few basic tools will get the job done. Having the right equipment makes the layering process much smoother.
Here’s what I use:
- Shot Glasses: You’ll need one for each shot you plan to make. Standard shot glasses work perfectly.
- Bar Spoon: This is crucial for layering! The back of the spoon helps guide the liquid gently onto the layer below.
- Measuring Jigger: To get the proportions just right for your Jellyfish Jam Shots. Accuracy helps with layering.
That’s really all you need to get started with these fun layered drinks.
How to Make Perfect Jellyfish Jam Shots
Alright, let’s get to the fun part: actually making these awesome Jellyfish Jam Shots! It’s simpler than it looks, I promise. The key is paying a little attention to detail, especially when you’re layering. Just follow these steps, and you’ll have beautiful shots in no time.
I’ll walk you through each part, sharing the little tricks I’ve learned along the way. Get ready to feel like a cocktail pro!
Step 1: Prepare for Your Jellyfish Jam Shots
This first step is super easy but important for getting those clean layers in your Jellyfish Jam Shots. Make sure all your ingredients are nice and cold. I usually pop the blue curaçao, vodka, and even the grenadine in the fridge for a bit before I start. Colder liquids are denser, which helps them stay separate when you layer them.
Also, have your shot glasses lined up and ready to go. Having everything in place makes the process smoother.
Step 2: Layering the Blue for Jellyfish Jam Shots
Now we start building our Jellyfish Jam Shots! Pick up one of your shot glasses. We’re going to pour the blue curaçao in first. This is your base layer, the “ocean” for our jellyfish. Carefully measure out 1/2 ounce of blue curaçao using your jigger.
Pour this directly into the bottom of the shot glass. Don’t worry about being super slow here; it’s the first layer. Just get it in there evenly.
Step 3: Adding the Vodka Layer for Jellyfish Jam Shots
This is where the bar spoon comes in handy for our Jellyfish Jam Shots. Measure out 1/2 ounce of vodka. Now, hold your bar spoon upside down over the shot glass, with the tip just touching the inside edge of the glass, right above the blue layer.
Slowly pour the vodka over the back of the spoon. This breaks the stream and lets the vodka gently float on top of the blue curaçao. Go slow! If you pour too fast, the layers will mix, and you’ll lose that cool effect. Take your time and watch the clear vodka build on top of the blue.
Step 4: Creating the “Jellyfish” Effect in Jellyfish Jam Shots
Here’s the magic part of the Jellyfish Jam Shots! Once your vodka layer is set, grab your grenadine. You only need a splash, maybe just a few drops. Carefully add the grenadine to the center of the vodka layer.
As the grenadine is denser, it will sink down through the vodka and into the blue curaçao, creating those cool, wispy tendrils that look just like a jellyfish! It’s such a neat visual. Watch it sink and spread; it’s quite satisfying.
And there you have it! A beautiful and fun Jellyfish Jam Shot, ready to enjoy.
Tips for Success with Jellyfish Jam Shots
Making these Jellyfish Jam Shots is pretty straightforward, but a few little tricks can make all the difference. I’ve made these enough times to know what really helps get those perfect layers. Follow these tips, and your shots will look amazing every time.
- Chill Everything! I mentioned this before, but it’s worth saying again. Make sure your blue curaçao, vodka, and grenadine are well-chilled. Colder liquids layer better because of their density.
- Pour Slowly and Gently. This is the biggest secret to layered shots. When adding the vodka over the spoon, go super slow. Let it trickle out. Patience is key here.
- Use the Back of a Spoon. Don’t just pour straight from the bottle for the second layer. A bar spoon is best, but any spoon will work. Just make sure you pour over the rounded back part.
- Add Grenadine to the Center. For the “jellyfish” effect, aim the grenadine right in the middle of the top layer. This helps it sink evenly and create those cool trails.
- Practice Makes Perfect. Don’t get discouraged if your first few aren’t perfect. Keep trying! You’ll get the feel for the pouring speed.
These simple tips will help you master the art of making stunning Jellyfish Jam Shots.
Variations on Jellyfish Jam Shots
While the classic Jellyfish Jam Shots with blue curaçao are a favorite, there are fun ways to mix things up! You can totally get creative and make them your own. Playing with different colors can make them even more festive for specific holidays or themes.
Here are a couple of ideas to get you started:
- Different Base Colors: Instead of blue curaçao, try a different colored liqueur for the bottom layer. Maybe a green melon liqueur for a swampy look, or a red liqueur for a fiery shot. Just make sure the density is similar to blue curaçao for layering.
- Sweet Rims: Add a little sweetness and sparkle to the rim of your shot glass. You could use colored sugar or even pop rocks for a fun surprise! Just wet the rim with a little citrus juice or simple syrup and dip it in your garnish.
- Flavored Vodka: While plain vodka works great, you could experiment with subtly flavored vodkas. A hint of citrus or berry could add another layer of taste without messing up the layering too much.
Don’t be afraid to experiment and find your favorite version of these fun layered shots!
Frequently Asked Questions About Jellyfish Jam Shots
I get asked a lot of questions when I make these Jellyfish Jam Shots! People are always curious about how they work or if they can make changes. Here are some of the most common things people ask me.
Hopefully, these answers help you feel confident in making your own beautiful layered shots!
Can I Make a Batch of Jellyfish Jam Shots Ahead of Time?
This is a great question, especially if you’re hosting a party! Unfortunately, I don’t recommend making a whole batch of Jellyfish Jam Shots too far in advance. The beautiful layers are sensitive and will start to mix over time, even just sitting in the glass. They really are best made right before you plan to serve them. The good news is they only take a few minutes per shot!
What Kind of Vodka is Best for Jellyfish Jam Shots?
You don’t need to use a super expensive, top-shelf vodka for these Jellyfish Jam Shots. Since it’s layered with sweet liqueurs, the subtle differences in vodka taste won’t be that noticeable. I usually just use a standard, mid-range vodka that I like. As long as it’s a decent quality and doesn’t have a strong off-flavor, it will work just fine for creating that clear middle layer.
Why Aren’t My Layers Staying Separate in My Jellyfish Jam Shots?
Ah, the dreaded mixing layers! This is usually the biggest challenge when making Jellyfish Jam Shots. The most common reason is pouring too fast. Remember to pour the vodka very slowly over the back of the spoon. Another factor is the temperature of your ingredients. Make sure everything is well-chilled. Warm liquids are more likely to mix. Also, try not to bump or move the shot glass too much after you’ve layered it.
Nutritional Information for Jellyfish Jam Shots
Just a quick note about the nutrition for these Jellyfish Jam Shots. Since the exact calorie and sugar content can vary quite a bit depending on the specific brands of blue curaçao, vodka, and grenadine you use, I’m not providing precise nutritional details here. Think of it as a fun treat for a special occasion rather than a health food!
Enjoy Your Jellyfish Jam Shots!
So there you have it! Everything you need to make these vibrant and fun Jellyfish Jam Shots. They’re such a simple way to add a little pop to any get-together.
I really hope you give this recipe a try! Let me know how yours turn out in the comments below. I love hearing about your kitchen adventures!
Print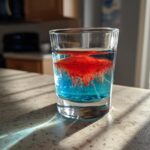
Jellyfish Jam Shots are a 3-Step Success Story
- Total Time: 5 minutes
- Yield: 1 shot 1x
Description
A fun and colorful layered shot with blue curaçao, vodka, and grenadine.
Ingredients
- 1/2 ounce blue curaçao
- 1/2 ounce vodka
- Splash of grenadine
Instructions
- Pour blue curaçao into a shot glass.
- Carefully layer vodka on top by pouring it over the back of a spoon.
- Add a splash of grenadine to create a “jellyfish” effect as it sinks through the layers.
Notes
- Ensure ingredients are chilled for best layering.
- Pour slowly to maintain distinct layers.
- Prep Time: 5 minutes
- Cook Time: 0 minutes
- Category: Drinks
- Method: Layered
- Cuisine: Cocktail
Nutrition
- Serving Size: 1 shot
Keywords: jellyfish jam shot, layered shot, blue curaçao, vodka, grenadine