
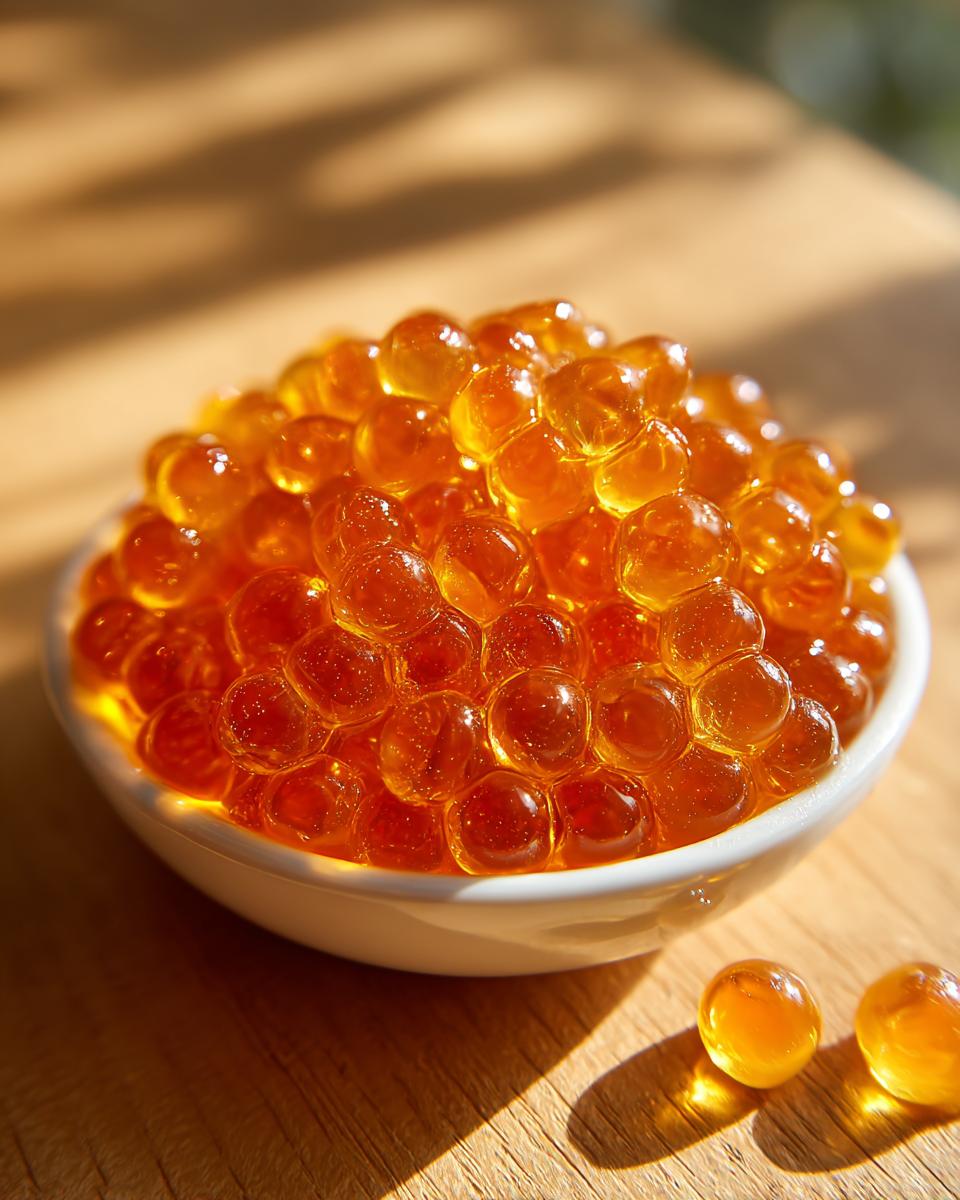
You know, honey is just the best, right? It’s sweet, it’s golden, it’s perfect on toast. But what if I told you we could take that basic sunshine-in-a-jar and turn it into something truly spectacular? I mean, something that looks like it belongs in a fancy Michelin-starred restaurant, but only took twenty minutes of hands-on time? That’s what we are doing today with this incredible Honey Caviar Recipe! Seriously, when I first saw edible spheres made from simple food ingredients? I thought it was pure magic. It’s all thanks to a little bit of kitchen science called spherification, but don’t let the big words scare you away.
This technique uses agar-agar—which comes from seaweed, by the way—to create these tiny, beautiful little pearls that burst with sweet honey flavor when they hit your tongue. Forget plain drizzles; we’re making gourmet toppings! This Honey Caviar Recipe is my secret weapon for making simple oatmeal look amazing or upgrading a plain glass of iced tea. Trust me, once you nail this easy method, you’ll be looking for excuses to make these pops of gold!

Why This Honey Caviar Recipe is a Must-Try
Honestly, I get why people think molecular gastronomy sounds impossible, but this recipe proves that’s just not true! Making these stunning little orbs is shockingly easy once you have the right temperature.
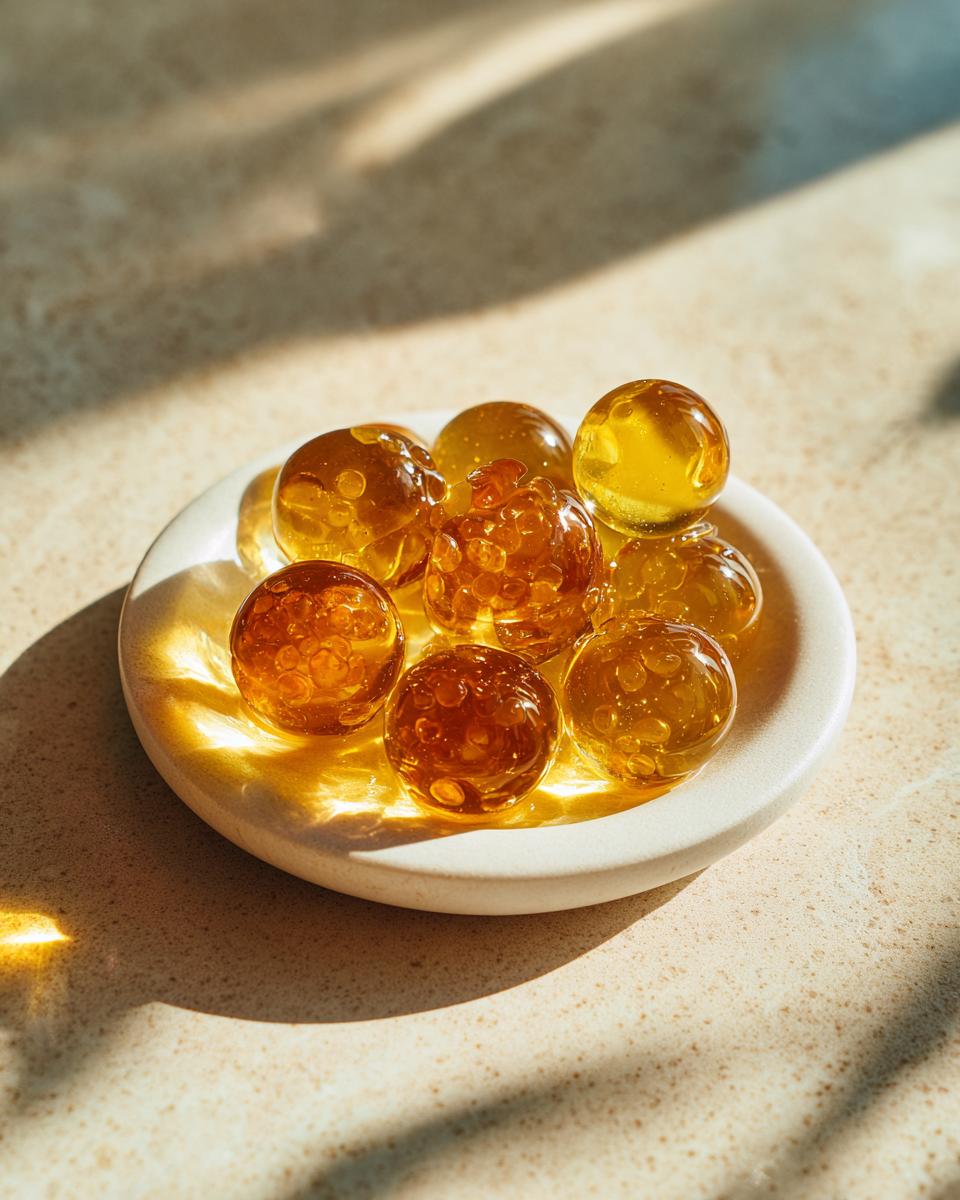
- It’s an absolute showstopper. Putting these shiny pearls on anything instantly makes you seem like a professional pastry chef!
- The texture, oh my gosh. You get that cool, slight resistance, and then—POP!—pure honey flavor floods your mouth. It’s totally addictive.
- The hands-on time? It’s nothing! Most waiting time is just chilling the oil, which is passive time, and you can even read a whole chapter of a book while you wait.
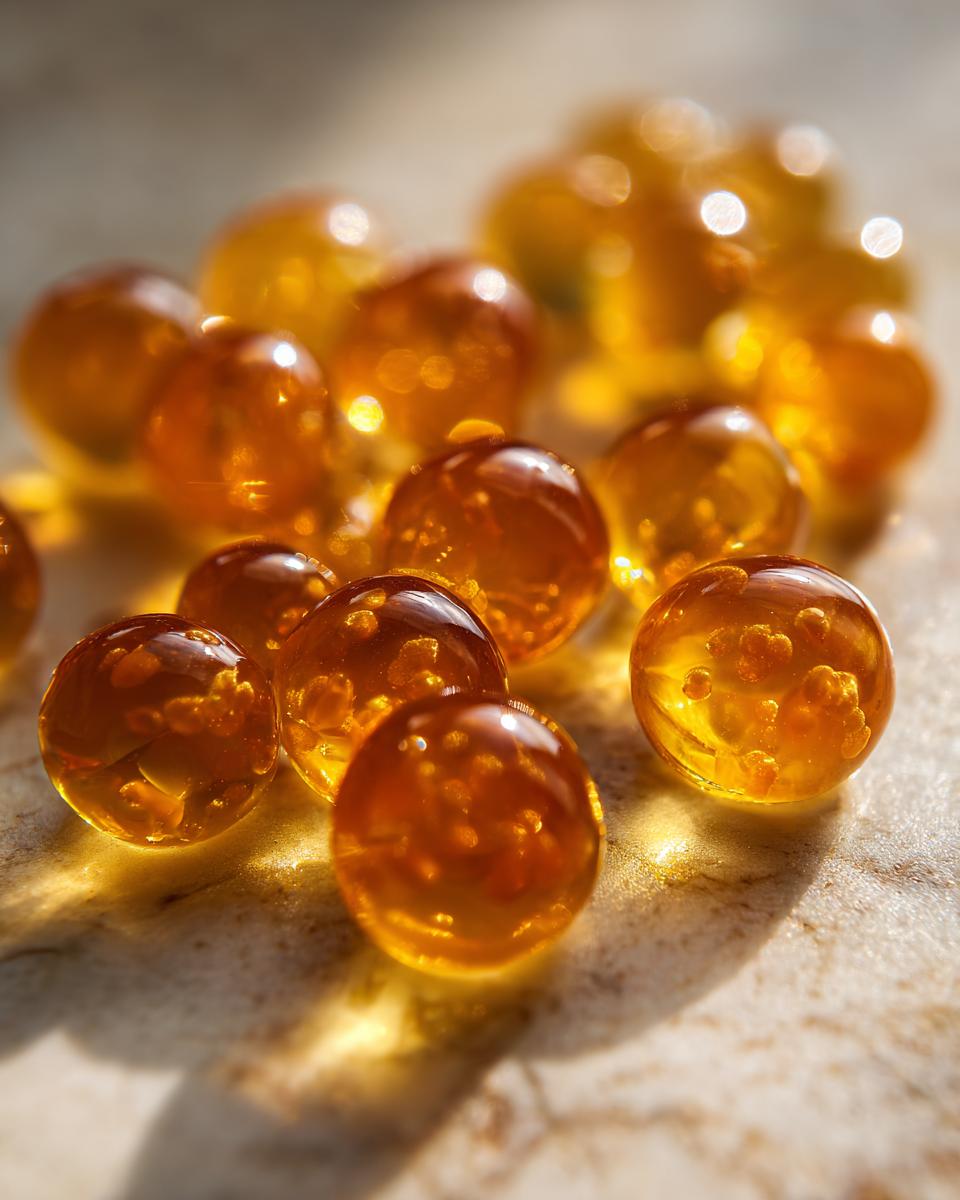
Visual Impact and Texture of Honey Caviar
Picture this: a spoonful of Greek yogurt topped with these tiny, glistening gold dots. It’s breathtaking! They look exactly like tiny fish eggs, which is probably why they make such a fun surprise ingredient, like in those jellyfish jam shots we tried last summer. That lovely little burst when you bite down is what sells it every time.
Simplicity of the Honey Caviar Recipe Technique
Don’t let the word “spherification” intimidate you! If you can boil water and stir, you can make this. We’re just using the super cold oil to instantly set the agar mixture into perfect little bubbles. It’s fast, effective, and requires zero special equipment other than maybe a syringe—which you can find easily!
Essential Ingredients for Your Honey Caviar Recipe
Okay, people! This is where the magic starts, and I promise you, these ingredients are so accessible. You don’t need any weird stuff shipped from overseas, which makes this Honey Caviar Recipe something anyone can tackle on a weeknight. Think of this like making a super-thickened honey syrup, but we are using a secret weapon to give it structure later.
When I was first gathering ingredients, I almost messed up the oil. Don’t make my mistake! If you’re looking for a simple way to sweeten drinks, you might check out this simple syrup recipe, but for caviar, we absolutely need the agar-agar and the cold oil bath to work!
Ingredient Breakdown and Specifics
Let’s talk specifics because that’s how we get perfect spheres. First, you need plain, neutral vegetable oil. I mean it—vegetable, canola, sunflower—whatever you have, but it has to go into the freezer for hours. It needs to be truly ice-cold, almost slushy, for those drops to set instantly. Ice-cold oil is non-negotiable!
Next up is the agar-agar. This is our firming agent, and you must measure it precisely. I use exactly 2 grams for this batch, no more, no less. Too little, and it won’t set; too much, and you get chewy little worms instead of caviar! Finally, use gorgeous, runny, liquid honey. Don’t use crystallized honey; it won’t mix smoothly into our water solution.
Equipment Needed for the Honey Caviar Recipe
You don’t need a lab coat or anything fancy for this! Believe me, I thought molecular gastronomy meant I needed specialty tools, but nope, my regular kitchen gear mostly works.
- A small saucepan for heating our honey and agar mix.
- A dropper or, honestly, a syringe works way better for getting those consistent little drops out.
- A deep bowl or tall container to hold all that super cold oil!
- A fine-mesh strainer for safely scooping those finished pearls out of the oil bath.
That’s really it! Make sure your syringe is clean—we don’t want any weird flavors mingling with our lovely honey caviar.
Step-by-Step Instructions for Making Honey Caviar
This is the ‘action’ part, where we turn liquid into these amazing little edible spheres! Follow these steps exactly, and you’ll have gorgeous Honey Caviar Recipe results on the first try. Don’t rush the chilling time for the oil, though; that’s your most important secret weapon!
Preparing the Cold Oil Bath
First things first, the oil needs to be freezing. Grab that vegetable oil—about a cup should do it—and stick it in the back of your freezer. I mean it, two hours minimum! If you pull it out and it’s merely cool, the honey drops will just melt and spread out into sad little honey puddles instead of firming up into perfect balls. You need that temperature shock to instantly set the agar when the drops hit the surface.
Creating the Agar-Honey Solution for Honey Caviar Recipe
While the oil is getting frosty, grab a small saucepan. Mix your water and the 2 grams of agar-agar powder. Put it over medium heat and stir constantly, just until you see all those little specks of powder disappear into the water. It shouldn’t be a rolling, angry boil, just nice and steady until it’s totally clear. Take it off the heat and honestly, let it sit for about five minutes—it needs to cool down just a tiny bit before we add the honey. If it’s too hot, it can mess with the final texture, so give it a moment to relax.
Once it’s just warm, gently stir in your cup of liquid honey. Make sure that’s totally combined before moving to the really fun part.
Forming the Honey Caviar Spheres
Time for the theatrics! Fill up your dropper or syringe very carefully with that warm honey-agar mixture. Hover the tip of the dropper just above the surface of the super-chilled oil. Then, just release the mixture, one drop at a time, letting gravity do the work. They should start forming right away as they sink! It’s mesmerizing, I swear.
Once you’ve dropped everything in (or run out of space!), let the little pearls just sit there in the cold oil for about two full minutes. This is crucial setting time. Don’t touch them! This allows the exterior shell to get firm enough to keep its shape.
Rinsing and Storing Your Honey Caviar
Now we have to rescue our beautiful caviar! Gently pour all the oil and the honey balls through a fine-mesh strainer. You absolutely cannot rinse these aggressively. Use a gentle stream of cold tap water to carefully wash off every last bit of that vegetable oil clinging to the spheres. If you scrub them, they will break, and then all that effort was for naught. Store the finished pearls in a clean, small container in the fridge until you’re ready to serve them. They are best used within a few days!
By the way, for even more ways to make amazing toppings, you should check out this article on avoiding the biggest mistake people make with iced tea—keeping things cold and fresh is always the goal in the kitchen!
Tips for Perfect Honey Caviar Recipe Results
Even with a great recipe, sometimes things go awry, right? That’s why I want to share the little things I learned watching my first few batches of Honey Caviar Recipe attempts fail spectacularly. Having the right temperature and the right tool makes all the difference between beautiful pearls and just a sticky mess.
Troubleshooting Oil Temperature Issues
If you pull your oil out and it’s only cool, not icy-cold, the honey drops will hit it and immediately spread out wide and flat instead of bouncing into spheres. When this happens to me, I panic and throw the whole bowl back in the freezer for another thirty minutes! Seriously, don’t try to rush this step. That instant temperature shock is the absolute key to getting those pretty, stable little bubbles.
Best Tools for Dropping the Honey Caviar
While you can use a regular dropper, I really prefer a syringe for this job. You have so much more control over the pressure and the speed at which the liquid comes out. If your syringe opening is a bit wide, that’s great because it lets the thicker honey solution flow easily. If it’s too narrow though, the agar mixture might start setting up inside the tool before it even leaves the tip!
Serving Suggestions for Honey Caviar
Now that you have your incredibly beautiful, bursty little golden pearls, the real fun begins: figuring out where to put them! Honestly, the hardest part about this Honey Caviar Recipe is not eating them all straight out of the strainer. They elevate everything they touch, and I try to keep them non-alcoholic since they go so well with everyday treats.
My absolute favorite way to serve them is dolloped right on top of thick, creamy Greek yogurt or homemade vanilla ice cream. It makes a basic snack look like something you’d get at a fancy brunch spot! They are amazing sprinkled over a slice of fresh toast topped with ricotta cheese, too.
If you are serving drinks, try spooning a teaspoon of these into a tall, chilled glass of our favorite cucumber mint cooler right before serving. Or, if you’re having one of those warm days and craving our honey lemon iced tea, just dot the top with a few spheres for an extra sweet surprise. They look so elegant!
Storage and Shelf Life of Honey Caviar
Because we rinsed off all the heavy oil, these little pearls need a little TLC in the fridge. Store your finished honey caviar in a small, airtight container. We don’t want them absorbing any funky fridge smells!
Since this recipe uses agar-agar, they hold their shape pretty well, but they are definitely best eaten fresh. I usually plan for them to be perfectly bouncy for about three to four days when kept nicely chilled. If they start looking dull or collapsing, toss them out. But honestly, they are usually gone way before then!
Frequently Asked Questions About This Honey Caviar Recipe
It’s funny how many questions pop up once people start trying this cool science trick! Seriously, I used to have so many questions myself when I first tried to make these edible spheres. Most of the issues come down to temperature or technique, but we can sort them out easily. You’re going to love serving these up as a topping!
Can I use gelatin instead of agar-agar for the Honey Caviar Recipe?
Oh, you absolutely cannot substitute with gelatin here, and this is a big one! The whole reason this Honey Caviar Recipe works with cold oil is because we are using agar-agar. Gelatin, as you might know, needs to be heated up to set, and it won’t firm up properly just by sinking into cold oil. Agar sets at room temperature. If you use gelatin, you’ll end up with a sticky, soupy mess, not those perfect little pearls.
Why are my honey spheres breaking when I rinse them?
This usually means one of two things happened, and I’ve definitely done both! Either you didn’t let them sit in that freezing oil for the full two minutes, so the outside shell wasn’t strong enough yet, or you were too aggressive when rinsing. When you wash off the oil, you have to be super gentle under the running water. Think of it less like washing dishes and more like gently pouring water over something extremely delicate. They are tougher once set, but still fragile!
What kind of oil is best for making edible spheres?
For making any kind of edible spheres related to this Honey Caviar Recipe, you must use a neutral oil. Stick to basic, refined vegetable or canola oil. Why? Because you want the oil to be as cold as possible without freezing, and you *don’t* want any flavor coming through! Olive oil or coconut oil comes with way too much flavor baggage and will ruin the pure taste of the honey. Remember, flavorless, icy-cold oil is your friend for this process!
If you’re looking for more ways to use ingredients in fun, innovative ways—maybe even for fun drinks—check out this guide on making easy non-alcoholic cocktails. You might find some inspiration for new toppings!
Share Your Honey Caviar Creations
Wow, we made it through the science bit and now you have jars of shining, bursting honey caviar! I am so excited for you to try these out because they really do make everything look professional. This part is my absolute favorite, though—I love seeing what you all do with my recipes once they leave my kitchen and head to yours!
So, please, don’t be shy! I want to see how you are using these little gold wonders. Did you use them to jazz up your morning granola? Are they floating beautifully in a zero-proof sparkling beverage? Every single application is so creative!
Go ahead and drop a rating on this Honey Caviar Recipe right below if you found the spherification process easier than you expected. And when you post a photo of your beautiful desserts or drinks on social media, tag me! I always look through because seeing your gorgeous plating genuinely inspires my next kitchen experiment. Happy bubbling, everyone!
Print
Honey Caviar Recipe
- Total Time: 20 min
- Yield: About 1/2 cup 1x
- Diet: Vegetarian
Description
Simple recipe for making edible honey caviar spheres using basic molecular gastronomy techniques.
Ingredients
- 1 cup liquid honey
- 1 cup cold vegetable oil (must be chilled)
- 1/2 cup water
- 2 grams agar-agar powder
Instructions
- Chill the vegetable oil in the freezer for at least 2 hours until very cold.
- Combine water and agar-agar powder in a small saucepan.
- Heat the water and agar mixture over medium heat, stirring constantly until the agar is completely dissolved (do not boil vigorously).
- Remove the agar solution from the heat and let it cool slightly for about 5 minutes.
- Gently stir the liquid honey into the slightly cooled agar solution.
- Fill a dropper or syringe with the honey mixture.
- Hold the dropper over the chilled oil and slowly release the honey mixture drop by drop into the cold oil. The drops will form spheres as they sink.
- Allow the spheres to sit in the oil for 2 minutes to set their shape.
- Carefully strain the oil and rinse the honey caviar gently under cold running water to remove excess oil.
- Store the honey caviar in a small container until ready to use.
Notes
- The oil must be very cold for the spheres to form correctly.
- Use a syringe or dropper with a wide opening for easier dispensing.
- Rinse the caviar gently to avoid breaking the spheres.
- Prep Time: 15 min
- Cook Time: 5 min
- Category: Dessert Topping
- Method: Spherification
- Cuisine: Modern
Nutrition
- Serving Size: 1 tablespoon
- Calories: 100
- Sugar: 25
- Sodium: 2
- Fat: 0
- Saturated Fat: 0
- Unsaturated Fat: 0
- Trans Fat: 0
- Carbohydrates: 25
- Fiber: 0
- Protein: 0
- Cholesterol: 0
Keywords: honey caviar, edible spheres, molecular gastronomy, agar-agar, honey topping