
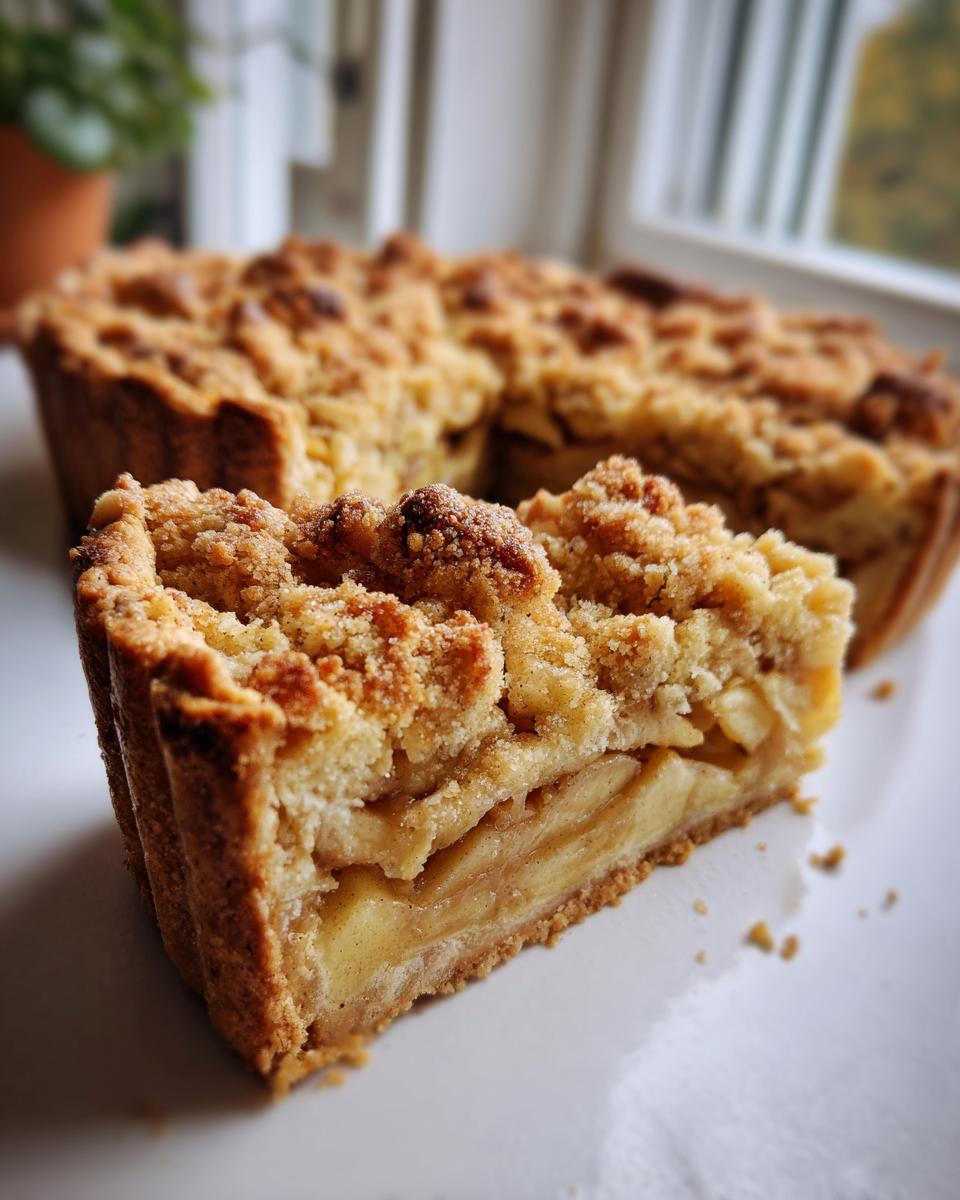
There is honestly nothing on earth quite like the smell of a pie baking on a cool afternoon. It just screams comfort, doesn’t it? I’m telling you—I have tried every single apple pie recipe out there, but the one that took the grand prize, the one I make over and over again, is this incredible Homemade Dutch Apple Pie. It’s all about that topping, trust me!
You see, the secret isn’t just in the apples, though they are vital. The real game-changer is the perfectly buttery, slightly crisp, brown-sugar-laden crumb topping that blankets the entire pie. I finally figured out how to nail that texture—it’s soft enough to yield instantly, but crunchy enough to make a satisfying sound when you cut into it. Mastering the pastry for this pie took me ages, but now I can whip up the dough for this Homemade Dutch Apple Pie in my sleep. Get comfortable; we’re making magic.
Why This Homemade Dutch Apple Pie Recipe Stands Out
I know, I know—everyone claims their apple pie is the best. But this Homemade Dutch Apple Pie isn’t just good; it’s fundamentally perfect. I’ve fiddled with the numbers over the years, chasing that perfect bite, and I think I finally cracked the code. It’s the combination of three things that makes this really shine.
- The crust is impossibly flaky—nothing short of magic in the pastry department.
- The filling is sweet but balances beautifully with tartness, making your kitchen smell incredible.
- The crumb topping, the real star of the show, gives it that classic Dutch texture you crave.
If you’re looking for a pie that tastes like it took all week but really only took an afternoon, this is it. You can check out my caramel apple pie recipe if you want a variation, but start here!
The Perfect Homemade Dutch Apple Pie Pastry
Listen to me: the pastry has to be cold. Ice cold! When you cut that butter into the flour, if the butter starts feeling soft at all, just stop, pop the whole bowl into the freezer for ten minutes. That shock of cold creates steam in the oven, which equals those beautiful, airy layers in a flaky crust. No exceptions!
Flavorful Apple Filling for Your Homemade Dutch Apple Pie
For the apples, don’t get shy. You need tartness to stand up to all that sugar in the crust and the topping. I always insist on Granny Smiths, maybe mixed with a few Honeycrisps if I want a bit more softness. The spice blend is crucial here—just cinnamon and nutmeg. If you add too much nutmeg, it tastes heavy, but the right amount makes the filling sing. The lemon juice keeps everything bright, too!
Ingredients for the Ultimate Homemade Dutch Apple Pie
Okay, the beauty of this recipe is that we’re using totally standard pantry stuff, but the *ratio* is everything. We’re going to keep everything super organized here. Trust me, having everything measured out before you even start mixing the crust prevents panic later! If you’re ever in a pinch and need to sweeten up drinks instead, you can check out my simple syrup recipe, but for this pie, we need real sugar and real butter!
For the Homemade Dutch Apple Pie Crust
This is where we lock in the flakiness. Remember, everything has to be ridiculously cold. I mean, the butter cubes coming directly from the freezer, the water almost slushy. This is non-negotiable for a great pie shell!
- 2 1/2 cups all-purpose flour
- 1 teaspoon salt
- 1 cup cold unsalted butter, cubed
- 1/2 cup ice water
For the Apple Filling
This is the hearty, spiced center. Get those apples prepped first so they can mingle with the sugar and spices while you deal with the dough. The lemon juice isn’t negotiable; it keeps the apples looking fresh and brightens the overall flavor.
- 6 medium baking apples (like Granny Smith), peeled, cored, and sliced
- 3/4 cup granulated sugar
- 1/4 cup packed brown sugar
- 2 tablespoons all-purpose flour
- 1 teaspoon ground cinnamon
- 1/4 teaspoon ground nutmeg
- 1 tablespoon lemon juice
- 1 large egg, beaten (for egg wash)
- 1 tablespoon milk (for egg wash)
For the Crumb Topping (The ‘Dutch’ Element)
This is the fun part! This mixture needs to stay crumbly, not melted. So, I usually make this right after the dough goes into the fridge, or I keep the butter for this tucked away in the freezer until the last minute. It’s what separates a classic pie from a glorious Dutch masterpiece.
- 1/2 cup all-purpose flour
- 1/2 cup packed brown sugar
- 1/4 cup granulated sugar
- 1/2 teaspoon ground cinnamon
- 1/2 cup cold unsalted butter, cut into small pieces
How to Prepare the Homemade Dutch Apple Pie Instructions
Alright, this is where we put all that gorgeous ingredient prep to work! Don’t rush these steps, especially the chilling time—that’s what keeps the pastry from shrinking sideways in the oven. Remember, we’re aiming for structure and flakiness here. I usually blast my oven preheating a good 20 minutes before I plan to assemble everything. If you’re looking for a good dip to go alongside your savory snacks, check out my thoughts on homemade cocktail sauce recipes!
Making the Homemade Pastry Dough
This is the foundational step, so take your time. You start by mixing your dry stuff—two and a half cups of flour and the salt—in a really big bowl. Then, you cut in that cold butter. I use a pastry blender, but two knives work fine, or even your fingertips if you’re quick! You want it looking like coarse pea-sized crumbs. If you see anything bigger than a nickel, keep blending!
Next, slowly drizzle in the ice water, a tablespoon at a time. You only add enough until the dough just barely holds together when you squeeze a handful. Don’t knead it! Just press it into a shaggy mass. Then, the crucial part: divide that mass right in half, gently shape each half into a flat disk, wrap them up tight, and send them to chill for at least an hour. I usually give mine an hour and a half!
Assembling the Apple Filling for Homemade Dutch Apple Pie
While that dough is getting cold and tense in the fridge, we combine our stars. Grab a big bowl. Toss in all those beautiful sliced apples. Now, sprinkle over the granulated sugar, brown sugar, the two tablespoons of flour (this thickens up the juices!), the ground cinnamon, nutmeg, and that little splash of lemon juice. Gently toss everything until those apples are evenly coated in that sugary spice mixture. You want them to start releasing a little bit of their juices while you work on the crust.
Constructing and Topping Your Homemade Dutch Apple Pie
Time to assemble! Set your oven to 425 degrees F. Lightly flour your counter and roll out one disk of dough until it’s big enough to drape over your 9-inch pie plate. Gently ease it in, trim the edges, but don’t crimp yet! Pour all that lovely spiced apple filling right on top. Make sure it’s mounded slightly in the middle.
Now, focus on the topping. You mix up those topping ingredients—flour, sugars, cinnamon—and then cut in the final half cup of cold butter until it’s beautifully crumbly. Sprinkle this mixture *generously* and evenly over the entire mound of apples. If you are feeling fancy, you can roll out that second disk and cut lattice strips, but for the Dutch style, we want that crumb topping to dominate! For the exposed edges of the bottom crust, mix your egg and milk together for an egg wash and brush it on the edges now. That gives us that gorgeous golden brown finish.

Baking Times and Temperature Adjustments
This is a two-stage baking process, so pay attention! We want that bottom crust to bake properly and prevent sogginess, so we hit it hard first: Bake at a high 425 degrees F for exactly 15 minutes. Then, *without opening the oven door if you can help it*, drop that temperature down to 375 degrees F. Let it bake for another 40 to 50 minutes.
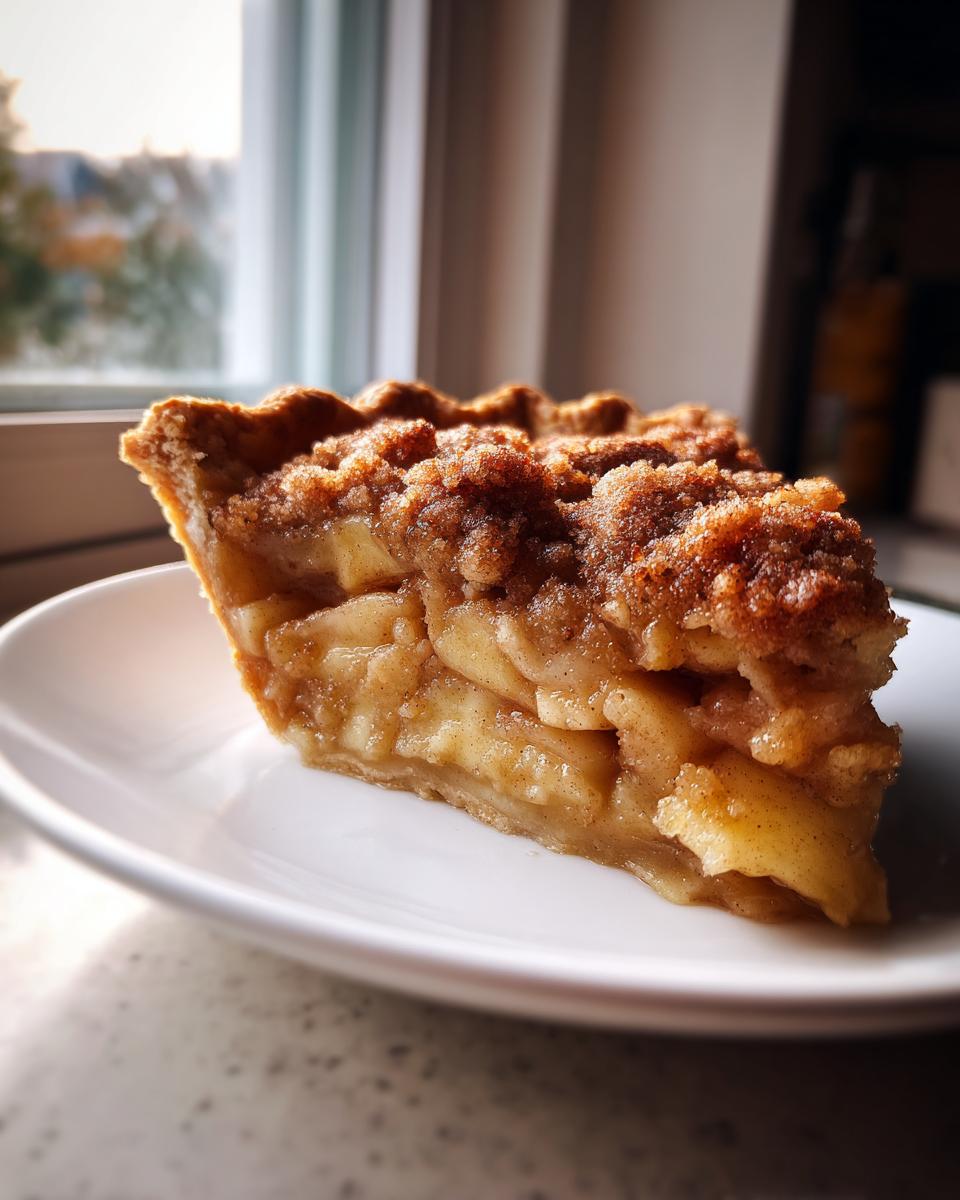
How do you know it’s done? You look for visual perfection: the topping should be deep golden brown, and you absolutely need to see the filling actively bubbling up through the crumbs. If you see the juices boiling nicely, you’re golden. Now, the hardest part, honestly: let it cool completely—at least two hours—on a wire rack so the filling can set up properly. If you cut it early, it’ll run everywhere!
Tips for Perfect Homemade Dutch Apple Pie Success
We’ve come a long way from mixing the dough, but trust me, that last little bit of know-how prevents a beautiful pie from becoming a beautiful disaster. Baking is science layered over intuition, and I’m sharing my hard-earned secrets for tackling the two biggest pie tragedies: the soggy bottom and the topping getting too dark too fast.
If you’re looking for another baking tip, I recently wrote about the fatal mistake people make with iced tea—it’s surprising how sometimes the simplest processes need the most attention!
Preventing a Soggy Bottom on Your Homemade Dutch Apple Pie
Oh, that dreaded wet layer right where the crust meets the hot apple filling. It breaks my heart every time that happens! The two-stage baking process helps a ton, but sometimes you need extra armor. My absolute best tip? Bake the pie on the lowest rack in your oven for the first 15 minutes when you’re using that high heat blast.
This ensures the bottom crust gets direct dry heat quickly. If your oven runs hot on the bottom, try slipping a preheated baking stone or even just a heavy baking sheet right on the rack below your pie plate. It draws heat away from the crust just slightly so it bakes evenly with the topping. Another thing—make sure you don’t skimp on that 2-tablespoon dusting of flour in the filling mixture; that’s there specifically to absorb the excess liquid released by the apples!
Adjusting the Crumb Topping Texture
The crumb topping is made from cold butter, flour, and sugar. If you’re struggling with it before it goes on the pie, listen up. If it feels too dry or sandy—like it won’t clump together at all when you squeeze it—just flick a few drops of ice water over the mixture and gently toss with your hands. Not enough to make pastry, just enough to encourage sticking.
Now, if you’re worried about it burning before the apples are done (especially if you have a very runny filling), you can easily fix it! Grab a sheet of aluminum foil, tear off a square, and loosely drape it over the pie about 20 minutes before you think it’s done. It acts like a little umbrella, shading that beautiful brown sugar topping from the direct heat while the center finishes cooking. Easy peasy, right?
Make-Ahead and Storage for Homemade Dutch Apple Pie
I get asked all the time if I make my pie the day of the party, and the answer is almost always no! Seriously, this pie is often better on day two. Planning ahead is the secret weapon of any good home baker, and this Homemade Dutch Apple Pie is fantastic for prepping, which means less stress when company arrives.
Did you know if you need to make a quick, soothing beverage to sip while you’re waiting for your pie to cool down, you should check out my guide on easy homemade oat milk? It’s surprisingly great in coffee or just plain!
Preparing Components Ahead of Time
You can absolutely get the heavy lifting done early. The pie crust dough is perfect for making up to three days ahead of time. Mix it, form the disks, wrap them tightly in plastic wrap, and shove them in the fridge. Cold dough chills out and your butter stays rock hard, which is exactly what we want for maximum flakiness later. If you forget to take it out, don’t panic—just let it sit on the counter for about 15-20 minutes until you can roll it, but no longer!
The apple filling? You can mix that all up the night before. Toss those apples, sugars, and spices together in a big bowl, cover it, and store it in the fridge. When the apples mingle with the sugar overnight, they release a little more liquid. That’s why when you pour it into the pie shell the next day, it looks like it has more sauce—which prevents that dry-filling flavor!
Storing the Baked Pie
Once your Homemade Dutch Apple Pie is completely cooled—and I mean *completely*, or the topping will steam and get mushy—you can store it covered loosely at room temperature for about two days. The higher sugar content in the filling and the crumb topping helps preserve it nicely. If you need it to last longer than that, move it to the fridge, but honestly, a pie this good never usually lasts that long!
Freezing Your Homemade Dutch Apple Pie
Yes, you can freeze this beauty! For the best results, freeze it *unbaked*. Assemble the entire pie—bottom crust, filling, and that gorgeous crumb topping. Cover the whole thing tightly in plastic wrap, then wrap it again in aluminum foil to prevent any freezer burn whispers. Freeze it flat for up to three months.
When you finally decide to bake it, take the foil off, but leave the plastic wrap on while it thaws slightly on the counter for maybe an hour. Pop it straight from the freezer into a 425 degree F oven. You’ll need to add about 20-30 minutes onto the total baking time, but it’s worth having a fresh-baked Dutch Apple Pie ready on demand!
Serving Suggestions for Homemade Dutch Apple Pie
Now that you have successfully navigated the tricky waters of butter temperature and two-stage baking—congratulations! It’s time for the best part: eating it! Honestly, after all that work, you deserve a moment of true indulgence. While this Homemade Dutch Apple Pie is spectacular all on its own, I always serve mine with something cold to contrast that warm, spicy filling and crunchy topping.
The obvious choice, and my personal favorite, is a generous scoop of high-quality vanilla bean ice cream. The way the cold ice cream starts melting instantly into those hot apple crevices is just heaven. If you’re serving it warm, forget everything else and go with that!

If you prefer something lighter, fresh whipped cream is absolutely the move. Whipped cream just works so well with the cinnamon flavor. Seriously, go heavy on the cream; you earned it!
For a really elegant presentation, especially if you used a lattice top or have a picture-perfect crumb coating, serve it on a small dessert plate with a little drizzle of caramel sauce—just a thin ribbon—and maybe a tiny dusting of powdered sugar right over the plate border. And hey, if you want to balance out all that sweetness with something perfectly crisp and tangy later, you should definitely check out my recipe for a classic margarita. It’s the perfect palate cleanser!
Frequently Asked Questions About Homemade Dutch Apple Pie
I love hearing from you all after you try this recipe! It seems like everyone has their own little hurdles when they tackle a pie for the first time, especially with the pastry. If you’ve been reading along, you know I really think this is the ultimate recipe, but I’m happy to clear up any lingering doubts. Before we dive in though, if you are looking to stock up your home bar, you absolutely must grab a copy of my favorite cocktail recipe book picks!
Can I use pre-made pie crust for this Homemade Dutch Apple Pie?
Oh, honey, I get it. Sometimes you just need a shortcut, especially if you’re short on time before a big dinner. And look, if you need to use store-bought crust, I won’t tell anyone! Go ahead and use your favorite brand for the bottom layer. But promise me something: you still have to make that amazing crumb topping from scratch.
The crumb topping is the defining feature of the Homemade Dutch Apple Pie, and honestly, it takes about three minutes to mix up. If you skip making the crumb topping, you’ve just got a regular apple pie with a top crust, not the special Dutch version we worked so hard for! So, buy the bottom crust, but make the topping yourself—deal?
What is the difference between Dutch Apple Pie and regular Apple Pie?
It’s famously all about the top layer! A traditional American apple pie usually has a solid top crust, maybe with some slits cut in for steam to escape. Or maybe you do a pretty lattice top, which looks lovely. But a Dutch Apple Pie? That’s when you completely ditch the closed top crust and replace it with that glorious, streusel-like crumb topping.
This topping is made with flour, butter, and sugar (and cinnamon in our case!), baked until it’s crispy and golden brown. It gives you amazing texture contrast: flaky bottom crust, soft spiced apples in the middle, and that crumbly crunch on top. That incredible crumb topping is the hallmark!
How long does the Homemade Dutch Apple Pie need to cool before slicing?
This is critical. I know you’re excited; I’m excited just thinking about it! But if you cut into this pie right out of the oven, you are going to end up with apple soup—it’s going to run everywhere, and you’ll be sad.
You absolutely, positively need to let this Homemade Dutch Apple Pie cool on a wire rack for a minimum of two full hours. Three is even better! Why? While the pie is hot, the apple filling is still actively cooking and the juices are super thin. As it cools down slowly, those juices thicken up into that beautiful, luscious sauce that clings perfectly to the apple slices. Patience, grasshopper! That cooling time is what sets the filling and makes that first slice hold its shape perfectly.
If you’re looking for more insider baking knowledge after conquering pie, check out my guide on my favorite cocktail recipe book picks for when you need a palate cleanser!
Estimated Nutritional Information for Homemade Dutch Apple Pie
I have to put this disclaimer here because, well, this is a glorious, butter-laden, sugar-topped pie, and it’s not exactly a health food! But I believe knowing what you are eating, even when it’s decadent, is important. I ran the ingredient list through a few standard calculators to give you a ballpark idea of what one slice of this Homemade Dutch Apple Pie works out to be.
Please remember this is just an estimate, guys! If you use a different type of butter or cut your apple slices thicker, the actual numbers will shift slightly. This assumes you get 8 tidy servings out of the whole pie. You can see the major players here—we’ve got the sugar and the fat doing the heavy lifting, which is why it tastes so amazing!
- Serving Size: 1 slice
- Calories: 450
- Fat: 25g (Be proud of that butter content!)
- Saturated Fat: 15g
- Carbohydrates: 58g
- Sugar: 35g (That’s the apples and the amazing topping talking!)
- Protein: 5g
- Fiber: 4g
- Cholesterol: 60mg
It’s definitely a dessert you save for special moments, but boy, oh boy, is every single calorie worth it when you break into that crisp, warm filling. Enjoy it!
Share Your Homemade Dutch Apple Pie Creations
Whew! We made it to the end! See? I told you that making the absolute best Homemade Dutch Apple Pie with the perfect crumb topping wasn’t scary at all. It just takes a little muscle in the pastry folding stage and a lot of patience while it cools down. Now comes the part I love the most—hearing from you!
Seriously, I live for seeing your photos! If you made this pie for a gathering, a Sunday dinner, or just because you needed a giant piece of apple goodness, please snap a picture and share it. Tag me on social media! I want to see those perfectly browned crumb toppings glistening in the light. It lets me know that my time testing and typing out all these tricky baking steps was worth it.
And don’t forget to leave a star rating right here on the recipe card! A simple five-star rating tells me you nailed the flaky crust and love the Dutch style as much as I do. If you ran into trouble—maybe your topping was too wet, or you couldn’t get that bottom crust quite right—please leave a comment below!
I read every single one. If you have a question about substitutions or a technique, drop it in the comments, and I’ll do my best to help you troubleshoot. Sometimes the advice I give a reader ends up becoming a whole new tip for the blog!
If you need to reach out directly for any reason, or perhaps you just want to chat more about pie vs. tart, you can always find the contact details over on my contact page. Happy baking, everyone. I hope your Homemade Dutch Apple Pie fills your home with the best smells!
Print
Homemade Dutch Apple Pie
- Total Time: 110 min
- Yield: 8 servings 1x
- Diet: Vegetarian
Description
A recipe for a classic apple pie with a crumb topping.
Ingredients
- 2 1/2 cups all-purpose flour
- 1 teaspoon salt
- 1 cup cold unsalted butter, cubed
- 1/2 cup ice water
- 6 medium baking apples (like Granny Smith), peeled, cored, and sliced
- 3/4 cup granulated sugar
- 1/4 cup packed brown sugar
- 2 tablespoons all-purpose flour
- 1 teaspoon ground cinnamon
- 1/4 teaspoon ground nutmeg
- 1 tablespoon lemon juice
- 1 large egg, beaten (for egg wash)
- 1 tablespoon milk (for egg wash)
- 1/2 cup all-purpose flour (for topping)
- 1/2 cup packed brown sugar (for topping)
- 1/4 cup granulated sugar (for topping)
- 1/2 teaspoon ground cinnamon (for topping)
- 1/2 cup cold unsalted butter, cut into small pieces (for topping)
Instructions
- Prepare the crust: Mix 2 1/2 cups flour and salt. Cut in 1 cup cold butter until mixture resembles coarse crumbs. Gradually add ice water until dough just comes together. Divide dough in half, form into disks, wrap, and chill for at least 1 hour.
- Prepare the filling: In a large bowl, combine sliced apples, 3/4 cup granulated sugar, 1/4 cup brown sugar, 2 tablespoons flour, cinnamon, nutmeg, and lemon juice. Toss to coat.
- Assemble the pie: Preheat your oven to 425 degrees F (220 degrees C). Roll out one dough disk and fit it into a 9-inch pie plate. Trim edges.
- Pour the apple filling into the crust.
- Prepare the topping: In a separate bowl, combine 1/2 cup flour, 1/2 cup brown sugar, 1/4 cup granulated sugar, and 1/2 teaspoon cinnamon. Cut in 1/2 cup cold butter until crumbly. Sprinkle this mixture evenly over the apple filling.
- For the bottom crust edge only (optional): Roll out the second dough disk and cut strips for a lattice top, or simply use the remaining dough to cover the top, cutting vents. Crimp the edges where the bottom crust meets the topping.
- Brush the exposed crust edges with the egg wash (beaten egg mixed with milk).
- Bake for 15 minutes at 425 degrees F (220 degrees C). Reduce oven temperature to 375 degrees F (190 degrees C) and continue baking for 40 to 50 minutes, or until the topping is golden brown and the filling is bubbly.
- Cool the pie on a wire rack for at least 2 hours before slicing and serving.
Notes
- Use firm, tart apples for the best texture and flavor.
- If the topping browns too quickly, loosely cover the pie with aluminum foil during the last 20 minutes of baking.
- Prep Time: 45 min
- Cook Time: 65 min
- Category: Dessert
- Method: Baking
- Cuisine: American
Nutrition
- Serving Size: 1 slice
- Calories: 450
- Sugar: 35g
- Sodium: 200mg
- Fat: 25g
- Saturated Fat: 15g
- Unsaturated Fat: 10g
- Trans Fat: 0g
- Carbohydrates: 58g
- Fiber: 4g
- Protein: 5g
- Cholesterol: 60mg
Keywords: apple pie, dutch apple pie, crumb topping, homemade pastry, cinnamon dessert