
Okay, listen up, because I’m about to drop the golden secret to fries that will make you swear off every fast-food version forever. Forget those limp, sad excuses for potatoes! We are going for that perfect, audible CRUNCH on the outside and a cloud-like soft center every single time. The key to achieving these legendary Crispy Seasoned French Fries is mastering the double-fry method—it sounds fancy, but trust me, it’s easy and totally worth the extra two minutes of oil time.
I swear, nothing beats the smell of fresh-cut potatoes hitting hot oil, and when you finally bite into one of these perfectly seasoned beauties, you’ll understand why I make a batch every other weekend. I used to think crispy fries were impossible at home, but once I figured out the right temperature dance, my kitchen became the new favorite fry spot. You won’t need a fancy recipe; you just need this technique!
Why You Will Love These Crispy Seasoned French Fries
I promise you, these fries will change how you look at potatoes forever. Once you nail this technique, you’ll be making them constantly! Here’s the quick rundown on why this recipe is my go-to:
- You get that incredible texture—super crispy outside hugging an unbelievably fluffy, cooked-through interior.
- The simple blend of salt, pepper, and garlic powder hits just right; it’s perfection without needing a million spices.
- It looks like a complicated restaurant secret, but honestly, the double-fry is easy once you get the temperatures right.
- These disappear faster than you can imagine, which is the true sign of a successful side dish, right?
Trust me, mastering the timing is the secret handshake to achieving fry nirvana at home.

Essential Ingredients for Perfect Crispy Seasoned French Fries
You don’t need a huge pantry for these, which I love. It’s about getting the right foundation, starting with the potatoes. We need starchy potatoes; I always grab Russets because they break down perfectly for that fluffy center.
You’ll need about 4 cups of high-heat vegetable oil—don’t skimp here; the oil does all the heavy lifting! For the seasoning blend, keep it simple but accurate:
- 3 large Russet potatoes (the star of the show!)
- 4 cups vegetable oil for frying (make sure you have enough to cover them safely!)
- 1 teaspoon salt (use good quality salt)
- 1/2 teaspoon black pepper (freshly cracked is a game changer)
- 1/4 teaspoon garlic powder
Seriously, just these few things, handled correctly, create the magic flavor profile we’re aiming for.
Equipment Needed for Crispy Seasoned French Fries
Before you even think about peeling a potato, we need to make sure you have the right gear ready. Frying is fun, but only if you have the right tools so you aren’t scrambling halfway through the process! When I’m set up, it goes way smoother, and I feel much calmer, honestly.
You don’t need anything too fancy here, but temperature control is non-negotiable if you want that perfect texture we talked about. Here is the list of things you should grab from the cupboard first:
- A deep, heavy-bottomed pot or, if you have one, an actual deep fryer—just make sure it’s large enough for the oil.
- A reliable thermometer! Seriously, this is crucial. You need something that clips on and tells you the oil temp instantly.
- A slotted spoon or a spider strainer for carefully lifting the potatoes out of the hot oil in batches.
- Lots of paper towels or a clean kitchen towel specifically for draining the fries when they come out.
- A large bowl for soaking the cut potatoes! We absolutely cannot skip the starch removal step.
Once you have your tools laid out, cleaning up is almost easier, and you can focus 100% on getting those temperatures right for that amazing crunch!
Step-by-Step Instructions for Crispy Seasoned French Fries
This is where the magic really happens, folks! We’re executing the famous double-fry technique. It’s not about frying twice as long; it’s about two distinct cooking phases that guarantee the interior is cooked fluffy while the exterior gets gorgeously crisp. Remember, patience in the prep stage pays off hugely when you pull them out of the oil!
Preparing the Potatoes: Cutting and Soaking
Grab your Russets and get peeling! The most important first step, after peeling, is cutting them evenly. I aim for about 1/4 inch thick sticks—if they are way different sizes, some will burn while others are still soft. Once they are cut, plop them right into a big bowl of cold water. You have to let them soak for at least 30 minutes. This pulls out that extra surface starch that makes fries gummy later. When you drain them, use paper towels and pat, pat, pat them until they are bone dry. If they’re wet, the oil will spit, and you won’t get that lovely crispy coating. It’s an absolute must!
The First Fry: Cooking Them Soft
Now it’s time for their warm bath! Heat your oil up to 325°F (160°C). We aren’t looking for color here, just cooking the insides through. Drop your dried potato sticks into the oil in small batches so you don’t drop the oil temperature too much. Let them swim for about 5 to 7 minutes. When you pull them out, they’ll be soft and limp, but they should look pale—definitely no browning allowed! Drain these on paper towels while you crank up the heat.
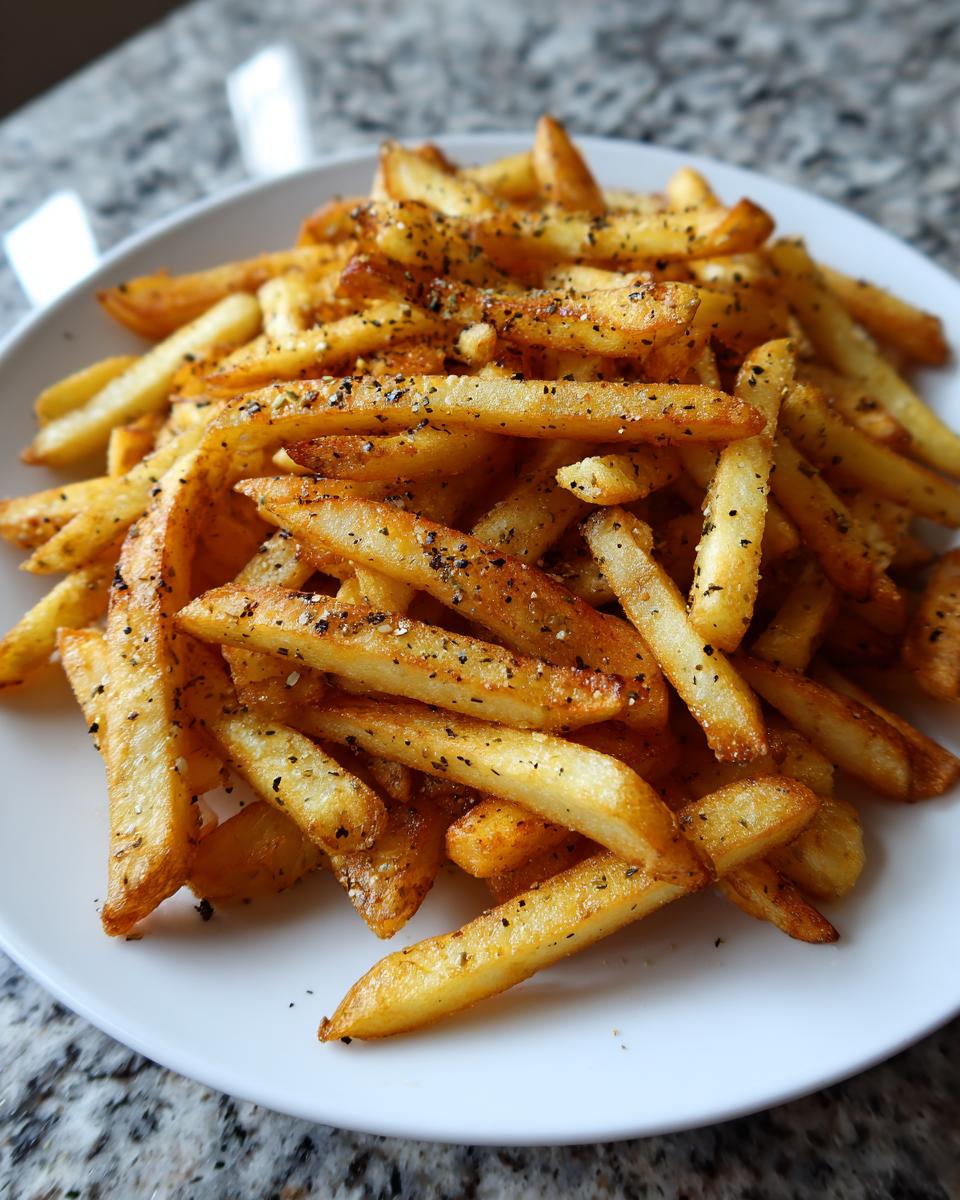
The Second Fry: Achieving Golden Crispy Seasoned French Fries
This is the grand finale for texture! Increase your oil temperature up to 375°F (190°C). Once it’s hot and steady, carefully return those pre-cooked fries to the bubbling oil. This second fry is quick—just 2 to 4 minutes. You are watching for that beautiful, deep golden-brown color that screams ‘crunch!’ This high-heat phase dehydrates the surface and locks in the fluffiness we created in the first fry. It’s truly amazing how transforming potatoes can be!
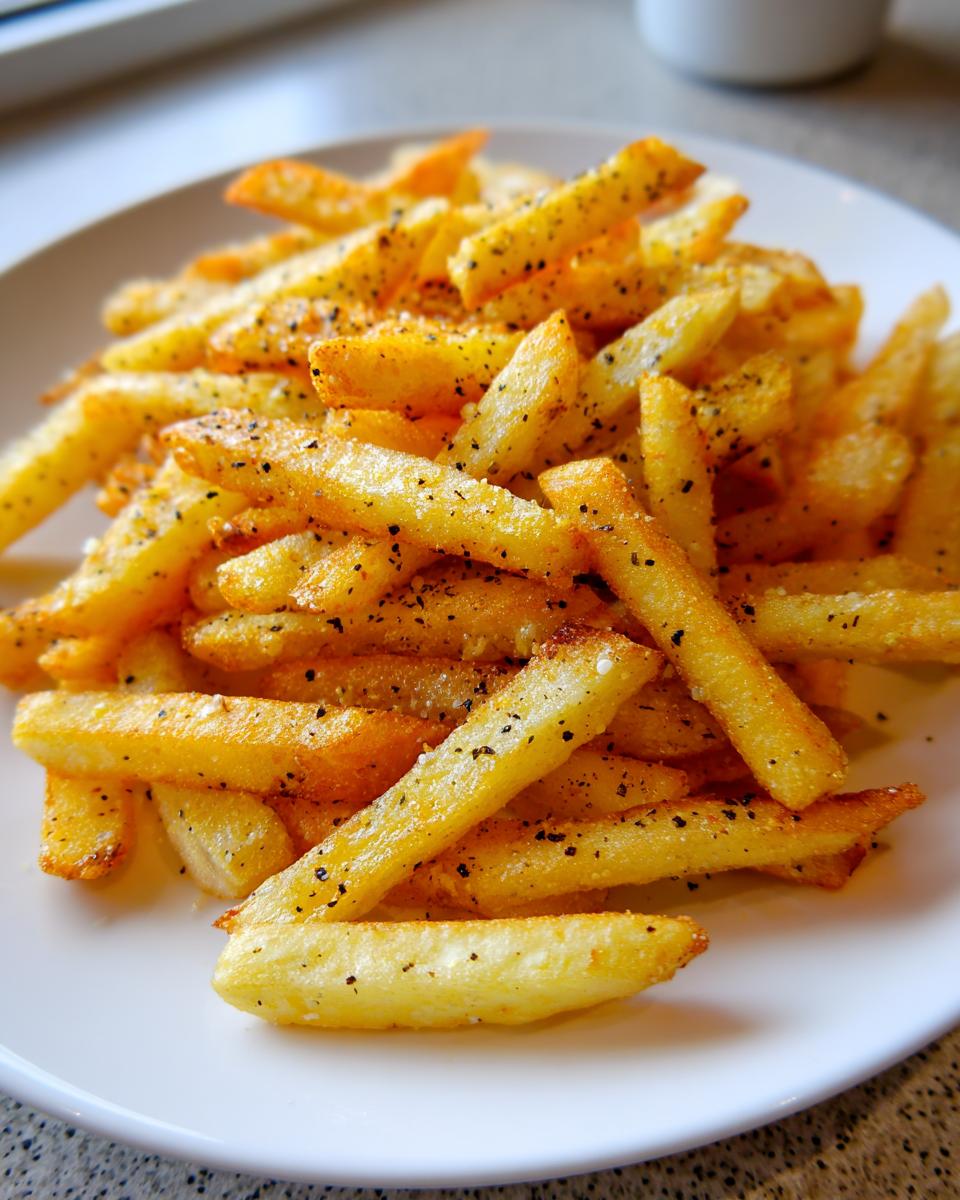
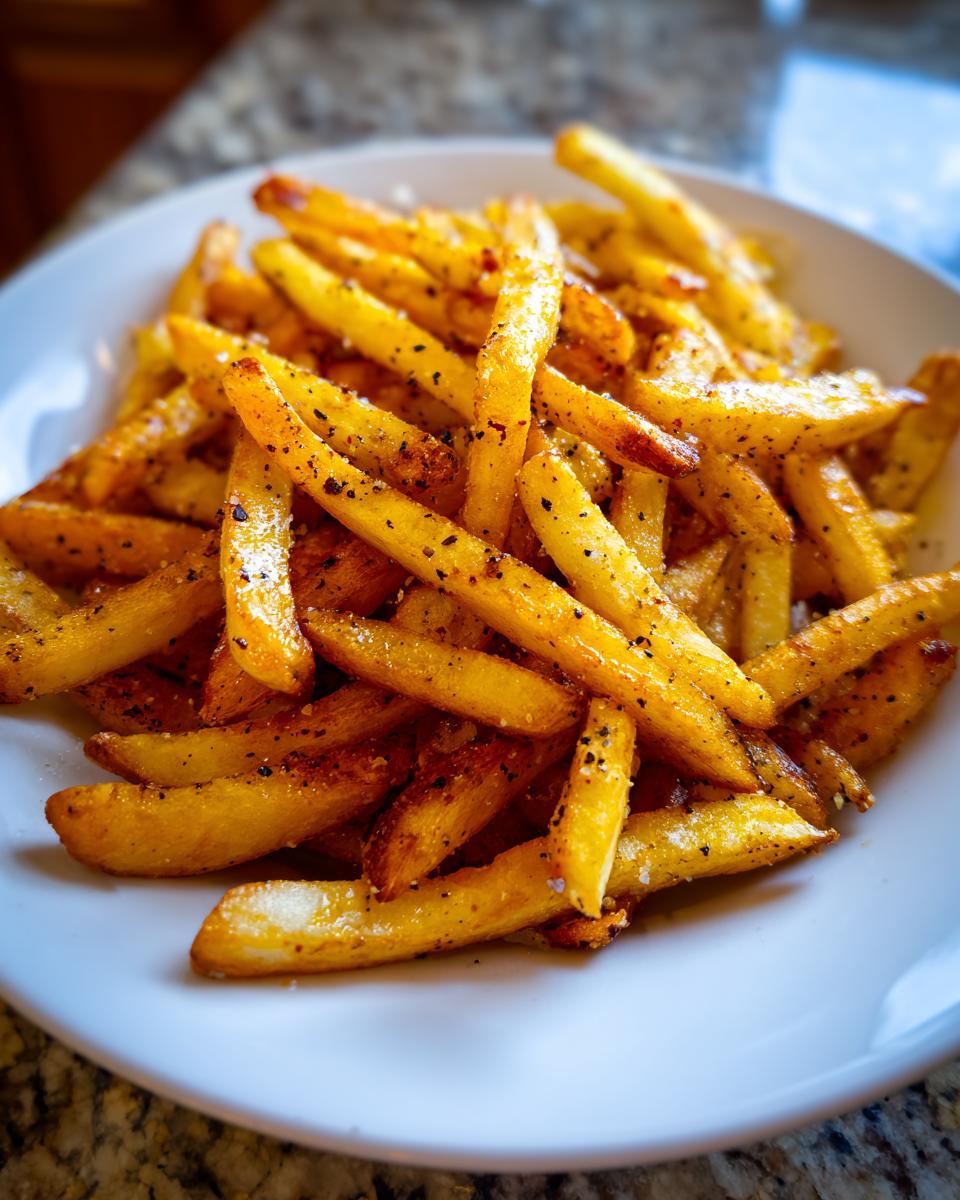
Seasoning Immediately After Frying
As soon as those gorgeous fries come out of the oil the final time, they must immediately hit a large bowl. You need to toss them right away with your mixture of salt, pepper, and garlic powder. The residual heat and oil are what make the seasoning stick perfectly to those hot surfaces. If you wait even five minutes, the seasoning just slides right off, and you’re left with a bland fry. Don’t let that happen! Toss them well and get them straight onto the plates while they are piping hot. If you want to check out how I make similar spicy potato snacks, you can see my recipe for irresistible sweet potato fries!
Tips for Success Making Crispy Seasoned French Fries
Okay, I’ve made plenty of sad, floppy fries in my life, so I’ve learned a few things the hard way! If you follow these tips, you’ll nail that perfect crispiness every single time, even if you aren’t double-frying. It’s all about moisture control, honestly.
First up, remember the soaking and drying? You cannot rush that. I always end up using three or four paper towel changes just to make sure those potato sticks are completely dry before they meet the oil. Any lingering water equals sogginess, and we simply cannot tolerate that!
Second, respect the temperatures. It’s tempting to just throw them in when the oil *looks* hot, but if you skip the thermometer, you’re guessing. Too cool, and they soak up grease; too hot, and they burn outside before the middle softens. That two-stage frying process—lower heat first, higher heat second—is the true secret weapon for these Crispy Seasoned French Fries.
My personal experience told me that using the freshest Russets possible makes a huge difference. The older the potato, the less starch it seems to hold, which impacts the final crunch. I also love checking out other seasoning ideas, like those savory crab seasoned fries when I’m feeling adventurous, but for the classic recipe, stick to the salt, pepper, and garlic trio!
Variations for Your Crispy Seasoned French Fries
Now, I know the base seasoning of salt, pepper, and garlic powder is legendary—it’s what makes the classic version sing! But sometimes, you just need to jazz things up a little bit, especially if you’re serving these fries alongside something new. The great news is, since we nailed the cooking technique, you can mess around with the seasoning toss at the very end without ruining the crunch!
I never change the cooking part because that’s how you get the texture right, but switching up the powders is super fun. Try these simple swaps the next time you pull a batch from the oil:
- For a Little Kick: Add about 1/2 teaspoon of smoked paprika and just a tiny pinch of cayenne pepper (start small!) to your main seasoning blend before tossing. The smoked paprika gives it such a nice BBQ vibe that goes great with a burger.
- Herby Goodness: If you prefer savory over spicy, mix in about 1 teaspoon of dried, crushed rosemary and maybe a pinch of dried thyme with your salt. This makes them taste almost gourmet, and it smells heavenly in the kitchen.
- Cheesy Dust: Okay, this one requires Parmesan. You need about 2 tablespoons of finely grated, good-quality Parmesan cheese. Mix it with the salt *before* tossing. Make sure they are super hot so the cheese melts just slightly and sticks to the grease.
Remember, these seasonings go on right after the second fry, while they are still dripping hot. That lingering oil acts like glue for whatever spices you decide to use!
Serving Suggestions for Crispy Seasoned French Fries
Honestly, what ISN’T better with a pile of freshly fried, piping hot potatoes next to it? I’m a traditionalist at heart, so my first thought usually goes straight to a big, juicy hamburger that needs something satisfying to soak up all the good juices. These definitely belong sitting right next to that burger!
They are also fantastic cut in half and used instead of toast with a fried egg and bacon for an epic weekend breakfast. Don’t knock it till you try it—it’s amazing comfort food!
But if you’re looking for something a little more unexpected to pair these beauties with, try using them instead of tortilla chips for loaded fries! You can pile on some chili, melted cheese, sour cream, and chives. Because they are so crisp from the double-fry, they hold up so much better than weaker, soggier commercially made fries do.
And let’s talk about dips, because no fry is complete without one! Of course, ketchup is standard, but if you want to elevate things, you need a good sauce. I am obsessed with making my own classic creamy dipping sauces—you can find my go-to recipe for homemade cocktail sauce which makes a shockingly wonderful fry dip when mixed with a little mayo. For something different, try a spicy aioli made with just mayo, garlic, and a squeeze of lime juice. Dip away, my friends!
Storage and Reheating Crispy Seasoned French Fries
So, if—and I mean if—you manage to have any leftovers of these perfect fries, we need to talk storage. These are honestly best eaten in the five minutes after they come out of the oil, because that initial peak crispiness fades quickly, which is why I *try* not to make too many!
If you do have some stragglers, you can store them, but you must keep them airtight, or they will turn into potato sponges overnight. Put them in a regular food container or a sandwich bag and seal it up tight. But honestly, I wouldn’t keep them more than one day. Fries are written into the food code as ‘Eat Fresh!’
When it comes to reheating, we have two absolutely non-negotiable rules: first, **never, ever use the microwave**. The microwave heats the water molecules inside the potato and turns them instantly soggy. We are fighting against sogginess here, people!
Your two best bets for bringing back that crispiness are your conventional oven or, even better, your air fryer. If you use the oven, lay the fries out in a single layer on a baking sheet—don’t let them touch! Pop them into a hot oven, maybe around 400°F (200°C), for about 8 to 10 minutes. You want them hot all the way through and that outer skin to tighten up again.
The air fryer truly shines here. It mimics the deep-fry heat so well! Toss them in your air fryer basket (don’t overcrowd it, please!) at about 375°F (190°C) for just 3 to 5 minutes, shaking them halfway through. They come out unbelievably close to fresh-fried, and you get that wonderful, satisfying crunch back without adding any extra grease. It’s the best way to rescue leftovers!
Frequently Asked Questions About Crispy Seasoned French Fries
It’s totally normal to have questions when you’re trying a new frying method! I get asked all the time about what to do if things go sideways, or if I’d change up my usual process. These methods work for me every time, but I know every kitchen is a little different, so let’s clear up any confusion right here.
I’ve pulled together the questions I hear most often about getting that perfect texture and flavor combo we’re aiming for. If you’re wondering about something else, leave a comment below, and I’ll hop in and try to help out!
Why do my homemade french fries turn out soggy instead of crispy?
Oh, that is the eternal struggle! Soggy fries almost always come down to one thing: moisture control. You absolutely have to soak those cut potatoes in cold water for a good while—that washes away the excess starch that gets sticky and gummy when fried. But here’s the real kicker: you must pat them until they are totally dry afterwards. I mean paper-towel-damp is not good enough; they need to be as dry as you can possibly get them before they hit the hot oil. Any water turns to steam and prevents that beautiful crispy crust from forming correctly.
Can I make these Crispy Seasoned French Fries in an air fryer?
You totally can adapt the method for an air fryer, and they turn out great! However, since the air fryer doesn’t immerse the potato in oil, you have to work harder on softening the inside first. I highly recommend still doing the double-fry principle, but in a modified way. You should definitely still cut and soak them as directed. Then, instead of the first oil bath, you’d ‘blanch’ them in 350°F air for about 10 minutes.
After they soften, you crank the air fryer heat up to 400°F and cook them again until they reach that golden, crispy perfection. The seasoning step stays exactly the same—toss while hot! If you’re looking for other baked/air-fried crispiness tips, check out my guide on making crispy homemade croutons; the underlying principles of drying out the surface are similar.
What is the best potato type for making french fries?
Hands down, you want a high-starch potato, and that means a Russet. They might seem boring, but they are the workhorse of the fry world! Because Russets have so much starch, which dissolves somewhat during the soak and then cooks beautifully in the oil, you get that light, fluffy texture inside that contrasts so perfectly with the hard, crispy shell we are aiming for. If you use a waxy potato, like a red potato, they tend to hold their shape better but stay kind of dense and waxy inside, which is not what we want for classic french fries.
Share Your Perfect Crispy Seasoned French Fries
Well, that’s it! You now know every single trick I have—from the mandatory soak to the quick, scorching second fry—to get those unbelievable, shatteringly crisp, seasoned fries right in your own kitchen. I really hope you give this technique a try because there’s nothing better than watching someone take that first bite and seeing their eyes light up!
I pour all my best tips into these posts, but results are always best when you try them out yourself, so I would absolutely love to hear what you think! Did you stick to the salt, pepper, and garlic, or did you try my rosemary variation?
When you make a batch (and you will be making them again, I guarantee it!), please come back here and leave a rating. Click those stars right at the top to let me know how yours turned out! And if you snapped a picture of your perfectly golden batch hitting that pile of seasoning, tag me on social media. Seeing your crispy creations honestly makes my day and proves that deep-frying at home doesn’t have to be scary!
Happy frying, and I can’t wait to read your feedback on the crunch factor!
Print
Crispy Seasoned French Fries
- Total Time: 35 min
- Yield: 4 servings 1x
- Diet: Vegetarian
Description
Recipe for making french fries that are crispy on the outside and soft inside, seasoned simply.
Ingredients
- 3 large Russet potatoes
- 4 cups vegetable oil for frying
- 1 teaspoon salt
- 1/2 teaspoon black pepper
- 1/4 teaspoon garlic powder
Instructions
- Peel the potatoes and cut them into uniform sticks, about 1/4 inch thick.
- Soak the cut potatoes in cold water for at least 30 minutes. Drain and pat them completely dry with paper towels.
- Heat the vegetable oil in a deep pot or fryer to 325°F (160°C).
- Fry the potatoes in small batches for 5 to 7 minutes until they are soft but not browned. Remove and drain on paper towels.
- Increase the oil temperature to 375°F (190°C).
- Return the partially cooked fries to the hot oil and fry for an additional 2 to 4 minutes until they are golden brown and crispy.
- Remove the fries and drain them well.
- Immediately toss the hot fries with salt, pepper, and garlic powder.
- Serve hot.
Notes
- Drying the potatoes thoroughly before frying is key to crispiness.
- Double frying ensures a soft interior and a crisp exterior.
- Prep Time: 20 min
- Cook Time: 15 min
- Category: Side Dish
- Method: Deep Frying
- Cuisine: American
Nutrition
- Serving Size: 1 serving
- Calories: 350
- Sugar: 2
- Sodium: 300
- Fat: 18
- Saturated Fat: 3
- Unsaturated Fat: 15
- Trans Fat: 0
- Carbohydrates: 45
- Fiber: 4
- Protein: 4
- Cholesterol: 0
Keywords: french fries, crispy fries, seasoned fries, potato recipe, deep fried potatoes