
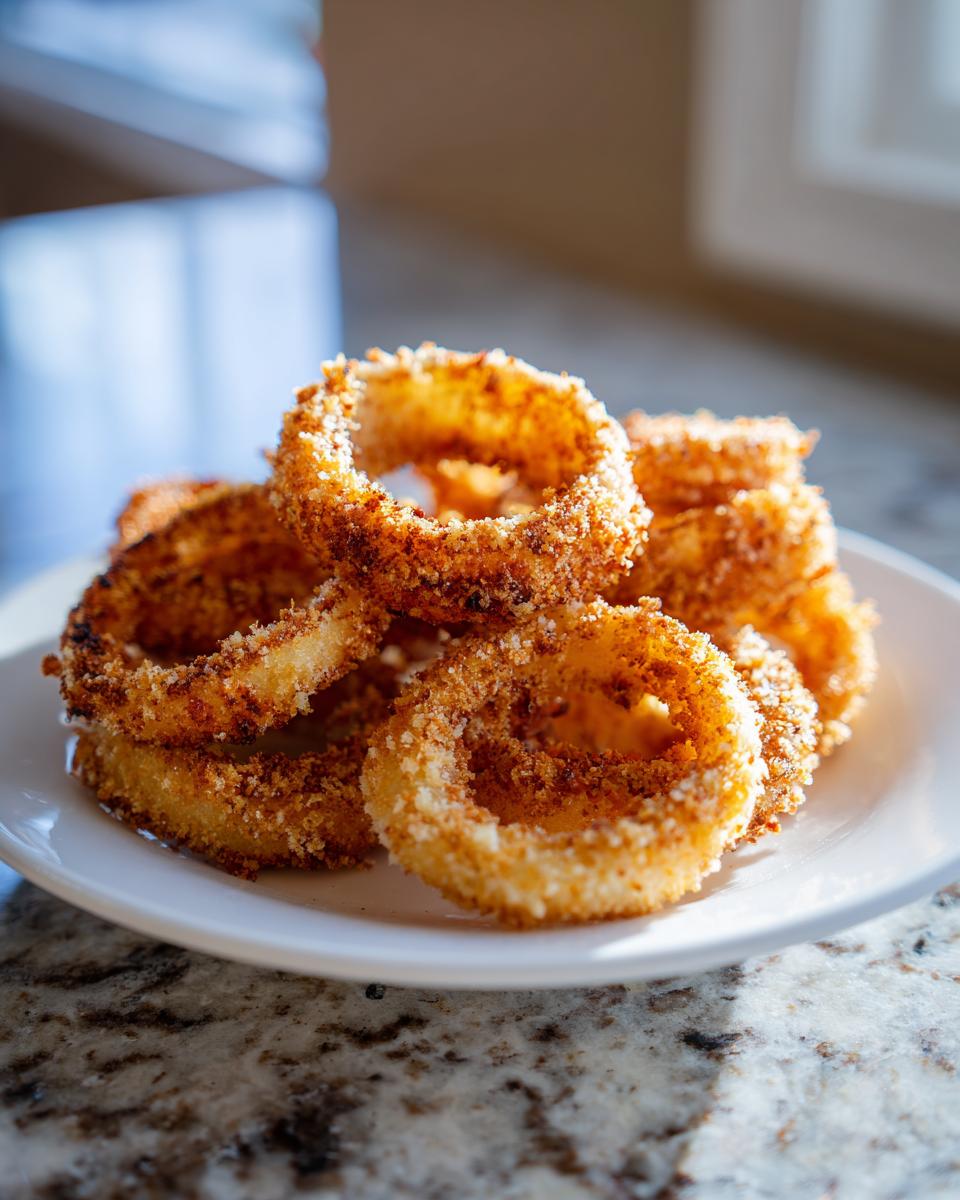
Oh, how I love a big, crunchy pile of onion rings! You know the drill—you want that savory, slightly sweet crunch you get from the diner, but the thought of heating gallons of oil and dealing with the greasy aftermath just stops you cold. I used to skip them totally because of the mess! But trust me, you absolutely do not need deep-frying to nail that perfect texture. We cracked the code on making genuinely Crispy Baked Onion Rings that snap back when you bite them.
This baking method is a total game-changer. We take simple pantry staples and use a little trickery with panko to create a crust so sturdy and golden, you’ll forget you skipped the fryer entirely. It’s fast, it’s less guilt, and frankly, it’s way easier to clean up. If you’re ready for a side dish that steals the show every single time, you’ve found the right place. Let’s get those onions ready!

Why You Will Love These Crispy Baked Onion Rings
I know what you’re thinking: Baked onion rings? Are they going to taste like sadness and cardboard? Absolutely not! When I developed this recipe, my biggest goal was getting that perfect snap without heating up the deep fryer. Trust me, these deliver everything you want in a classic side dish, only better.
Here are the reasons why these are about to become your go-to appetizer or side dish:
- Goodbye Grease, Hello Health: We cut out all that heavy oil, so you get the enjoyment of classic onion rings without feeling weighed down—perfect for a weeknight side!
- Total Simplicity: Seriously, this is a three-bowl dredge that anyone can manage. There’s no oil temperature monitoring; just set your timer and relax.
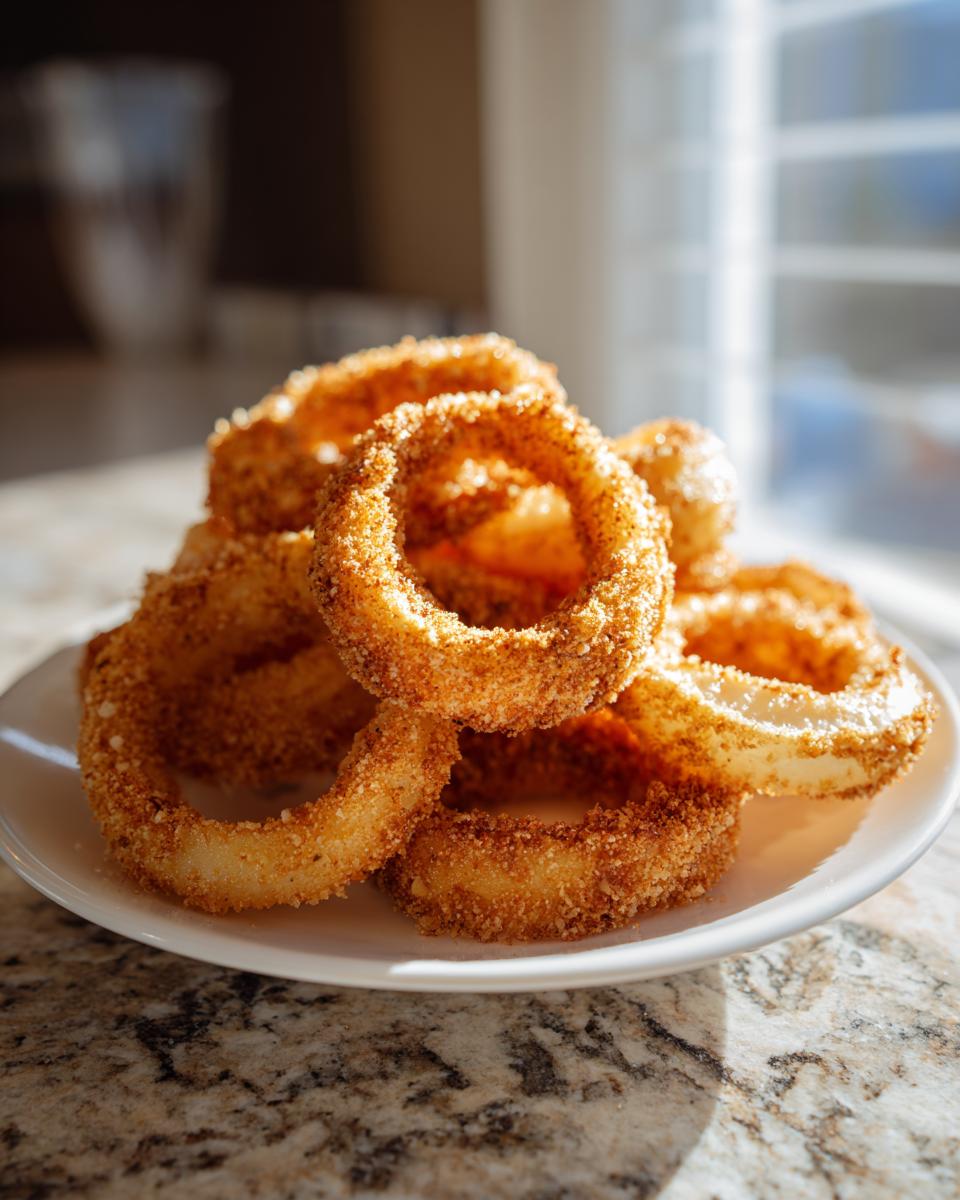
- Unbeatable Crunch: Thanks to using panko breadcrumbs and that high oven heat, these baked rings actually achieve that satisfying, non-soggy CRUNCH we all crave.
- Flavor Powerhouse: The secret little dash of paprika in the flour coating gives these rings a warm, savory background note that makes them taste amazing, even naked!
- Fast Clean-Up: Since we aren’t dealing with hot oil spills, cleanup is practically just washing a few bowls and tossing the parchment paper. I mean, what’s not to love about that?
Now that you know these are going to be your new favorite, let’s talk about what you need to grab from the pantry!
Essential Ingredients for Crispy Baked Onion Rings
When you’re baking onion rings, the ingredients are crucial because we can’t rely on hot oil to do all the heavy lifting on crispness. Don’t worry, these are all super common things you probably have sitting in your pantry right now! Having everything measured out before you start slicing those onions makes the breading process go like a dream.
We need the main stars, the dredge components, and the binder. Here’s exactly what you need to gather up:
- The Onions: Two big, beautiful yellow onions. You want to peel these and make sure you slice them into nice, uniform rings about 1/4-inch thick. Uniformity helps them cook evenly, trust me!
- The Flour Base: One cup of all-purpose flour seasoned perfectly with a teaspoon of salt, half a teaspoon of black pepper, and just a little kick from half a teaspoon of paprika.
- The Binder: Two large eggs whisked together with half a cup of regular milk. This is what gets the breading to stick!
- The Magic Crunch: One and a half cups of Panko breadcrumbs. Panko is non-negotiable here; the flakes are lighter and let more air circulate, which equals crispiness.
- The Final Touch: Plenty of cooking spray. We need this to coat the outside to help it brown up nicely in the oven.
That’s it! No weird binders or expensive specialty flours needed for these babies.
Equipment Needed for Perfect Crispy Baked Onion Rings
Okay, gathering your tools ahead of time is half the battle with any breading project. Since we aren’t using a giant pot of oil, the equipment setup is actually pretty simple! You just need a few things ready to go so you can move smoothly through the assembly line.
Make sure you have these items ready before you even start peeling the onions, or things get messy fast. I usually wipe down my countertop space so I have room to lay everything out!
- Baking Sheets: You’ll need one or maybe two large, rimmed baking sheets. The key here is space—we don’t want the rings touching, or they steam instead of crisping up!
- Parchment Paper: This is a must-have. It keeps the rings from sticking to the pan, and it makes clean-up a non-issue since you just toss this when you’re done.
- Shallow Bowls for Dredging: You need three separate, wide, shallow bowls or dishes. One for the flour, one for the egg wash, and one for the panko. Don’t skip the separate bowls; mixing them up is a recipe for lumps!
- Cooking Spray: This isn’t optional! We’re using spray instead of brushing oil on because it gives a much more even, fine mist across the breading for that perfect golden-brown finish under the broiler or in the oven.
- Slicer or Knife: You need something to cut those 1/4-inch rings. A sharp knife works, but if you have a mandoline or a good slicer, use it to keep those slices totally uniform.
That’s your whole station! It’s much less intimidating than setting up a deep fryer, I promise.
Step-by-Step Instructions for Crispy Baked Onion Rings
Alright, time to roll up those sleeves! Getting these perfectly crispy baked onion rings done relies on keeping everything moving quickly once you start coating. We aren’t using any fancy liquids like oat milk here; just the classic egg and milk works wonders to hold that panko on nice and tight. If you are interested in non-dairy options for other recipes, you can check out this guide on easy homemade oat milk. Just follow this process, and you’ll be golden.
Preparing the Onions and Oven
First thing, crank that oven up high! We need 425 degrees Fahrenheit (that’s 220 Celsius for my international bakers). Because the heat has to penetrate the onion flesh while crisping the outside, we need it hot. Line your baking sheets with parchment paper right away and give that paper a generous blast of cooking spray. While it preheats, peel your onions and slice them into neat 1/4-inch thick rings. You gotta separate those rings gently—they want to pull apart right now before we coat them!
Setting Up the Breading Stations
This is critical: you need three separate, shallow bowls ready to go side-by-side. In the first one, whisk together your flour, salt, pepper, and paprika until it looks nicely seasoned. The second bowl gets your eggs and milk whisked together until they’re frothy. Finally, set out your third bowl, which should be brimming with those wonderful panko breadcrumbs. Keep them in that order—flour, then egg, then panko—it’s the only way to get the coverage we need!
Coating and Arranging the Crispy Baked Onion Rings
Now, let’s create that crust! Take one onion ring and dip it first into the flour mixture, shaking off any excess that just wants to hold on too tightly. Next, dip that floured ring into the egg/milk wash, letting the drip stop completely. The very last step is pressing it firmly into the panko breadcrumbs. You need to press so the panko really sticks! Place the fully coated ring onto your prepared baking sheet. Remember, they all have to fit in a single layer—do not overlap them, or they will steam! Once they’re all lined up, give the tops of all the rings a light, even spray with cooking spray. If you want them extra crunchy, this is the time to stick the whole tray in the fridge for 15 minutes to firm everything up!
Baking for Maximum Crispiness
Pop those beauties into the 425°F oven for about 10 to 15 minutes. You’re watching for the tops to start looking golden. When that time is up, you gotta use tongs to carefully flip every single ring over. Put them back in for another 5 to 10 minutes until the second side is golden brown and they sound crisp when you tap them. Total bake time is around 20 to 25 minutes depending on your oven, but honestly, the color tells the whole story!
Tips for Achieving Truly Crispy Baked Onion Rings
I’ve made enough batches of these to learn what separates a decent baked ring from a truly amazing, stand-up-and-cheer baked ring. It all comes down to a few small moves that fight against sogginess. If you skip these little details, you’ll end up with something closer to a baked onion, and nobody wants that!
If you’re looking for that deep-fried satisfaction without the deep-fryer mess, pay close attention to these texture secrets. Speaking of things you don’t want to mess up, have you ever made flat iced tea? It’s heartbreaking! You can avoid that disaster by reading up on the 1 fatal mistake everyone makes! Back to our onion rings!
Don’t Crowd the Pan—Give Them Space to Breathe!
This is probably the single biggest mistake people make when trying to bake anything crispy. If your onion rings are touching one another on that baking sheet, they are trapping steam between them. Steam equals moisture, and moisture equals sogginess! You need to use more than one baking sheet if necessary. Give every single ring about an inch of breathing room around it. They need direct contact with the hot air circulating in your 425-degree oven to crisp up properly.
Panko is Your Best Friend for Crunch
I mentioned this before, but I’m saying it again because it’s that important: skip the regular breadcrumbs! Regular breadcrumbs are too fine; they just turn into a dense, hard crust when baked. Panko breadcrumbs are Japanese-style, meaning they are lighter, airier flakes. Those big, jagged flakes create a much larger surface area for the cooking spray to hit and toast up perfectly, giving you that shattery crunch you expect from the real deal.
The Chill Factor for Ultimate Firmness
If you have the time, please incorporate this step: chilling the breaded rings! Once you finish coating all your rings and laying them out on the sheet, cover that whole tray loosely with plastic wrap and pop it in the refrigerator for about 15 minutes. This short chill time lets the egg wash dry out just a tiny bit and helps the flour and panko adhere *firmly* to the onion. When they hit that hot oven, they set up faster, resulting in a much sturdier and crunchier exterior. It’s such a small step for such a big return!
Variations on Crispy Baked Onion Rings
One thing about home cooking that I absolutely adore is the freedom to mess around! While this base recipe delivers the classic experience, sometimes you want to spice things up a bit, especially when you’re making these for a crowd or just feelin’ adventurous. These modifications are super easy and fit right into the breading process we already established.
You don’t need complicated new steps—just tweak what’s already in that first flour bowl. I’m always trying to get a little more flavor depth in simple sides. Speaking of drinks that pair perfectly with flavorful snacks, have you ever perfected the sea salt rim on a margarita? It’s all about balance, just like our onion rings! You can find great tips for that classic margarita cocktail recipe.
Switching Up the Spice Blend
The paprika in the flour is lovely, but we can easily push the flavor profile further! If you like a bit of a kick, try adding a quarter teaspoon of cayenne pepper to the flour mix. It gives a nice little warmth on the back end without making them truly *hot*. For a touch of savory depth that screams ‘pub food,’ mix in about half a teaspoon of garlic powder and half a teaspoon of onion powder right in with the flour and paprika. It boosts the overall onion flavor, which is never a bad thing when you’re eating onion rings!
Going for an Extra Flavor Layer
If you want to get fancy with the breadcrumbs, here’s where the fun starts. Instead of just plain panko in that third bowl, try mixing in some finely grated Parmesan cheese—maybe a quarter cup? It melts beautifully as it bakes and gives the exterior a nutty, salty crispness that is just addictive. Alternatively, if you have dried herbs hanging around, stirring in a teaspoon of dried oregano or thyme into the panko gives these rings a lovely Mediterranean twist. Just make sure to keep the mixture loose so you can still press the rings firmly into it.
Experimenting with Onion Types
While large yellow onions are my standard because they hold their shape so well and have that great sweetness, don’t be afraid to try a sweet onion, like Vidalia, if you have some on hand! Sweet onions will caramelize a little more in the oven, making the inside even softer and sweeter, which contrasts gorgeously with the salty panko crust. Just be aware that sweet onions can sometimes be slightly thinner, so slicing them just might require a bit more care to keep them at that perfect 1/4-inch thickness!
Serving Suggestions for Your Crispy Baked Onion Rings
Honestly, these crispy baked onion rings are so good on their own that you could eat them straight off the cooling rack. I’ve definitely been caught doing that before the plate even makes it to the table! But what’s a proper onion ring without something fantastic for dipping?
Since we put so much effort into getting that perfect baked crunch, we need dips that match that level of flavor, not something heavy that will just weigh down the texture. Forget those gloopy jarred sauces; we want punchy, bright flavors!
Here are my absolute favorites for serving these up:
- The Classic Kick: You can’t beat a homemade spicy aioli. It’s just mayo, a good squeeze of lemon juice, maybe a pinch of smoked paprika, and some fresh garlic smashed in there. It’s creamy without being heavy. If you want to dive into the best version of that, I highly recommend checking out this quick guide to cocktail sauce; you can adapt those zesty notes easily for an aioli base.
- Creamy Ranch Revival: If you like cool and herby, a really good homemade ranch dressing is my second choice. You want one that tastes strongly of fresh dill and chives, not just bottled buttermilk.
- Just Ketchup, But Better: Okay, sometimes you just want ketchup. But try kicking yours up a notch! Stir in a little dash of Worcestershire sauce and a tiny bit of horseradish into your favorite ketchup. It gives it that classic diner tang that just sings alongside a sweet baked onion.
Whatever you choose, make sure you serve them right away. These baked beauties are best enjoyed piping hot when that coating is at its absolute crispiest!
Storage and Reheating Crispy Baked Onion Rings
Now, I have to be honest with you: the absolute, number-one, best way to eat these crispy baked onion rings is about thirty seconds after they come out of the oven. You get that beautiful hot crunch, the tender onion steaming right inside—it’s perfection! If you can manage to eat them all immediately, that’s great! I usually can’t, so I’ve had to learn how to revive them when leftovers strike.
The problem with *any* breaded item that’s been stored is that the steam gets trapped inside, making the crust go soft. We can fix this easily, but you can forget about trying to microwave them; they’ll turn into little steam bombs. Don’t even try it!
The Importance of Cooling Properly Before Storing
If you *know* you’re saving some for later, make sure they cool down completely on a wire rack before you store them. If you try to put hot onion rings into any kind of sealed container, they will sweat, and that wonderful panko crust you worked so hard on will turn to mush before morning. Let them sit out on a rack for at least 20 or 30 minutes until they are totally room temperature. Once cool, slip them into an airtight container. They’ll keep okay in the fridge for maybe two days, but my experience tells me they are best eaten the next day.
Reviving Crispiness in the Oven
This is my preferred method for bringing back that bakery-fresh snap. Preheat your oven back up to about 375 degrees Fahrenheit—we don’t need it quite as hot as when we first baked them. Lay the leftover rings out on a baking sheet, making absolutely sure they aren’t touching. Pop them in for about 5 to 8 minutes. Keep a close eye on them because that breading browns really fast the second time around! They should be hot all the way through and crispy again.
The Air Fryer Secret Weapon
If you happen to have an air fryer, this is honestly the fastest and best way to revitalize any baked side dish! Set your air fryer to about 350 degrees Fahrenheit. Place the rings in the basket in a single layer—again, no overloading needed. Give them just 3 to 4 minutes. I check mine at the 3-minute mark because air fryers are aggressive! They come out golden, hot, and surprisingly close to that original just-made crispiness. It’s cheating, but I won’t tell if you won’t!

Frequently Asked Questions About Crispy Baked Onion Rings
It’s funny how often I get questions about getting the texture just right when baking—it seems like everyone is chasing that perfect crunch, and I don’t blame them! We love these a little too much to have them turn out soft. You can find some super fast options if you need a quick drink to pair with these, check out these easy cocktail recipes while I answer the burning questions about your crispy baked onion rings!
Can I use regular breadcrumbs instead of panko for these Crispy Baked Onion Rings?
While you absolutely *can* use regular fine breadcrumbs, I strongly advise against it if your main goal is that stellar, shattering crispiness. Regular breadcrumbs absorb moisture differently; they tend to pack down tightly when baked, which often results in a crust that’s more hard than crunchy. Panko flakes are much larger and lighter, which lets air circulate around them while they toast in the high heat. That difference is what gives you that signature, light, airy crunch we are aiming for with these baked onion rings.
How do I prevent my baked onion rings from getting soggy?
Sogginess is the sworn enemy of the crispy baked onion ring, so we fight it on three fronts! First, make sure your oven is REALLY hot—425 degrees is necessary to blast off surface moisture quickly. Second, and this is huge: place them in a single layer on parchment paper with space between every ring. If they touch, they steam! And finally, you absolutely must apply the cooking spray generously over the top of the breaded rings right before they go into the oven. That oil helps the panko toast instead of just drying out.
What is the best type of onion to use for baked onion rings?
For this recipe, I always stick to large yellow onions, and here’s why: they strike the perfect balance of savory flavor and structural integrity. When you slice them 1/4-inch thick, the yellow onion holds up beautifully to the high heat without completely dissolving into mush. They get just tender enough on the inside while the outside gets crunchy. If you use Vidalia or other super sweet varieties, they can sometimes break down faster, but they are still delicious if you watch them closely!
Nutritional Estimate for Baked Onion Rings
Okay, everyone asks about the numbers, and I get it! Since we skipped that heavy deep-frying oil bath, these babies are definitely a lighter way to enjoy a classic side dish. I always say nutrition facts are just good guides—remember, this is homemade food, and your exact spray usage or onion size can change things slightly.
These estimates are calculated based on the recipe making 4 servings, which is about 5 rings per person, and only accounts for standard pantry ingredients. It’s an estimate, but it shows how much lighter we are compared to a restaurant version!
Here is what you can generally expect from about 5 of these crispy baked onion rings:
- Calories: Around 250 per serving size. That’s way more reasonable for a side order!
- Total Fat: About 5 grams. Much of that comes from the panko absorbing a little bit of the cooking spray we use, but it’s a fraction of what you’d soak up frying.
- Carbohydrates: We’re looking at about 45 grams. This is mostly from the flour and the natural sugars in the onion itself.
- Protein: You get a nice boost here, usually around 8 grams, thanks to the eggs and milk in the binder.
- Sodium: We kept the salt controlled, landing around 350mg, which is pretty standard for a nice seasoned side dish.
- Fiber: There’s about 3 grams of fiber in there, coming mostly from the onion itself—always a bonus!
So, while they are still a treat, they are undeniably a smarter way to satisfy that craving for incredible crunchy goodness. Feel good about eating these!
Share Your Crispy Baked Onion Rings Experience
Now that you’ve gone through all the steps—from perfectly slicing the onions to blasting them in the hot oven—I really want to know how they turned out for you! Baking can sometimes feel tricky, and I love hearing about all the small tweaks that people try at home. Did you sneak in some cayenne? Did you stick to the single-layer rule like your life depended on it?
Please, please, please leave a star rating right here on the page! That little ranking helps other people who are nervous about giving up deep-frying know that this recipe is solid gold. And if you tried something fun—maybe you used a dipping sauce that blew your mind—drop a comment below and tell me all the details! I read every single comment and truly love building this little cooking community with you all.
If you ever have questions about the recipe or need to get in touch about something else, feel free to reach out via my contact page. Happy cooking, and I hope your onion rings were perfectly crispy!
Print
Crispy Baked Onion Rings
- Total Time: 45 min
- Yield: 4 servings 1x
- Diet: Vegetarian
Description
A recipe for making onion rings crispy using baking instead of deep frying.
Ingredients
- 2 large yellow onions
- 1 cup all-purpose flour
- 1 teaspoon salt
- 1/2 teaspoon black pepper
- 1/2 teaspoon paprika
- 2 large eggs
- 1/2 cup milk
- 1 1/2 cups panko breadcrumbs
- Cooking spray
Instructions
- Preheat your oven to 425 degrees Fahrenheit (220 degrees Celsius). Line baking sheets with parchment paper and lightly coat with cooking spray.
- Peel and slice the onions into 1/4-inch thick rings. Separate the rings.
- In a shallow bowl, whisk together the flour, salt, pepper, and paprika.
- In a second shallow bowl, whisk the eggs and milk together.
- In a third shallow bowl, place the panko breadcrumbs.
- Dip each onion ring first into the flour mixture, shaking off excess.
- Next, dip the floured ring into the egg mixture, letting excess drip off.
- Finally, press the ring firmly into the panko breadcrumbs to coat completely.
- Place the coated onion rings in a single layer on the prepared baking sheets.
- Lightly spray the tops of the onion rings with cooking spray.
- Bake for 10 to 15 minutes, flip the rings, and bake for another 5 to 10 minutes, or until golden brown and crisp.
Notes
- For extra crispiness, you can chill the coated rings for 15 minutes before baking.
- Serve immediately after baking for the best texture.
- Prep Time: 20 min
- Cook Time: 25 min
- Category: Side Dish
- Method: Baking
- Cuisine: American
Nutrition
- Serving Size: 5 rings
- Calories: 250
- Sugar: 6
- Sodium: 350
- Fat: 5
- Saturated Fat: 1
- Unsaturated Fat: 4
- Trans Fat: 0
- Carbohydrates: 45
- Fiber: 3
- Protein: 8
- Cholesterol: 50
Keywords: onion rings, baked, crispy, appetizer, vegetarian, side dish