
Oh my goodness, is there anything better than pulling apart a freshly baked loaf of bread that’s impossibly soft on the inside? That delicate, almost cloud-like texture—it’s just heaven. Well, today we are leveling up that cloud! We’re diving deep into my favorite recipe for creating the show-stopping Chocolate Marble Asian Bread Recipe. It brings together that pillowy softness only Asian milk bread can deliver with rich, beautiful ribbons of cocoa throughout.
I used to just layer the doughs flat, but trust me when I say that cutting the log lengthwise and twisting? That technique is the game-changer! It opens up those layers right before the final proof, guaranteeing that perfect fluffy air pocket structure every single time. Get ready for the softest, most stunning swirl you’ve ever baked.

Why This Chocolate Marble Asian Bread Recipe Works So Well
There are marble breads, and then there’s this recipe. Honestly, achieving that signature Asian milk bread fluffiness requires a few non-negotiables, and sticking to them is why you’ll get bakery results. This isn’t just about slapping chocolate in; it’s about technique!
Here’s the breakdown of why this Chocolate Marble Asian Bread Recipe stands head and shoulders above the rest:
Achieving the Signature Soft Texture
You absolutely must use bread flour here. It has higher protein content, which is what develops those strong, elastic gluten strands we covet. When you knead properly—and I mean really properly—until you can stretch a small piece thin enough to see light through without tearing (that’s the famous windowpane test!), you’re setting up a structure that traps air beautifully. That trapped air is the secret to softness!
Perfect Chocolate Swirl Integration
My biggest complaint when I first tried marble bread was that the chocolate just looked muddy or disappeared. Not here! We make a thick cocoa paste with hot water first. Why? Because if you just dump dry cocoa powder into your dough, it absorbs liquid immediately and can ruin the hydration balance. Making that paste gets the cocoa ready to mix in smoothly, ensuring you get those distinct, gorgeous ribbons instead of a dull, brownish loaf in the final Chocolate Marble Asian Bread Recipe.
Ingredients for the Ultimate Chocolate Marble Asian Bread Recipe
Okay, let’s get this straight: we are making one yeast dough, but we need to keep track because half of it becomes chocolatey! Don’t panic about the list; most of this is standard bread stuff. The magic comes from dividing and conquering halfway through. I always lay everything out beforehand—I call it mise en place—because dealing with sticky dough while searching for salt is a recipe for disaster.
These ratios are spot-on for that classic Pullman-style softness. Here’s what you’ll need to gather up for a beautiful, swirled loaf:
Dough Ingredients (Base)
- 1 cup milk, gently warmed (not hot, remember we like our yeast babies happy!)
- 2 tablespoons sugar (for feeding the yeast, not the main sweetness)
- 1 teaspoon instant dry yeast
- 2 large eggs, room temperature is always best
- 3 cups bread flour (non-negotiable for structure!)
- 1/4 cup granulated sugar (this brings the sweetness)
- 1/2 teaspoon salt
- 1/4 cup unsalted butter, softened to squishy room temperature
Chocolate Flavoring Components
This is what splits our dough and makes the marble happen for the Chocolate Marble Asian Bread Recipe. Keep these measured out separately until the main dough is assembled:
- 1 tablespoon cocoa powder (good quality makes a difference!)
- 1 tablespoon hot water (this helps bloom the cocoa)
Step-by-Step Instructions for Chocolate Marble Asian Bread Recipe
Now for the fun part where all our prep pays off! We’re moving from just dough to bread that looks like a masterpiece fresh out of the oven. Remember, dough takes time—don’t rush those rising periods; that’s where the softness happens!
Activating Yeast and Mixing the Dough
First things first, we wake up the yeast! Gently warm up your milk—it should feel just slightly warm to the touch, not hot enough to burn you. Dissolve the initial two tablespoons of sugar in that milk and sprinkle the yeast on top. Let it sit for about five minutes until it gets foamy. If it doesn’t foam, your yeast is dead, and we need to start over, so don’t skip this check!
While that’s happening, grab your big bowl and mix the flour, the main 1/4 cup of sugar, and the salt. Next, pour in the bubbly yeast mixture along with your eggs. Stir everything until it looks like a messy, shaggy cloud of flour bits. That’s step three done!
Kneading and Developing Elasticity
Here’s where the elbow grease comes in! Knead that shaggy dough for about five to seven minutes until it starts pulling together. Now, we add the softened butter gradually. Don’t dump it all in at once, or it gets slippery! Keep kneading, slowly incorporating that fat for another ten minutes or so. You are looking for that ultimate elasticity. Keep going until you can perform the windowpane test—if you can gently stretch a small piece thin enough to see light through without tearing (that’s the famous windowpane test!), you are golden for this Chocolate Marble Asian Bread Recipe.
Creating the Chocolate Dough Portion
Once the dough is perfect and smooth, gently divide it into two equal balls. Take one of those balls and dedicate it to chocolate! Mix your tablespoon of cocoa powder with just one tablespoon of hot water to create a thick, powerful paste. Knead this cocoa paste right into that half of the dough. Keep working it until the color is uniform and you don’t see any light streaks of plain dough peeking out.
First Proofing and Shaping the Marble Effect
Pop both the plain and the chocolate dough balls into lightly oiled bowls, cover them up, and let them relax in a warm spot for an hour to an hour and a half. They need to double in size! When they’re puffy, punch them down gently. Roll each dough chunk into a rectangle of the exact same size. Layer the chocolate rectangle directly on top of the plain one, and then—and this is key—roll them up tightly together, like a Swiss roll or jelly roll.
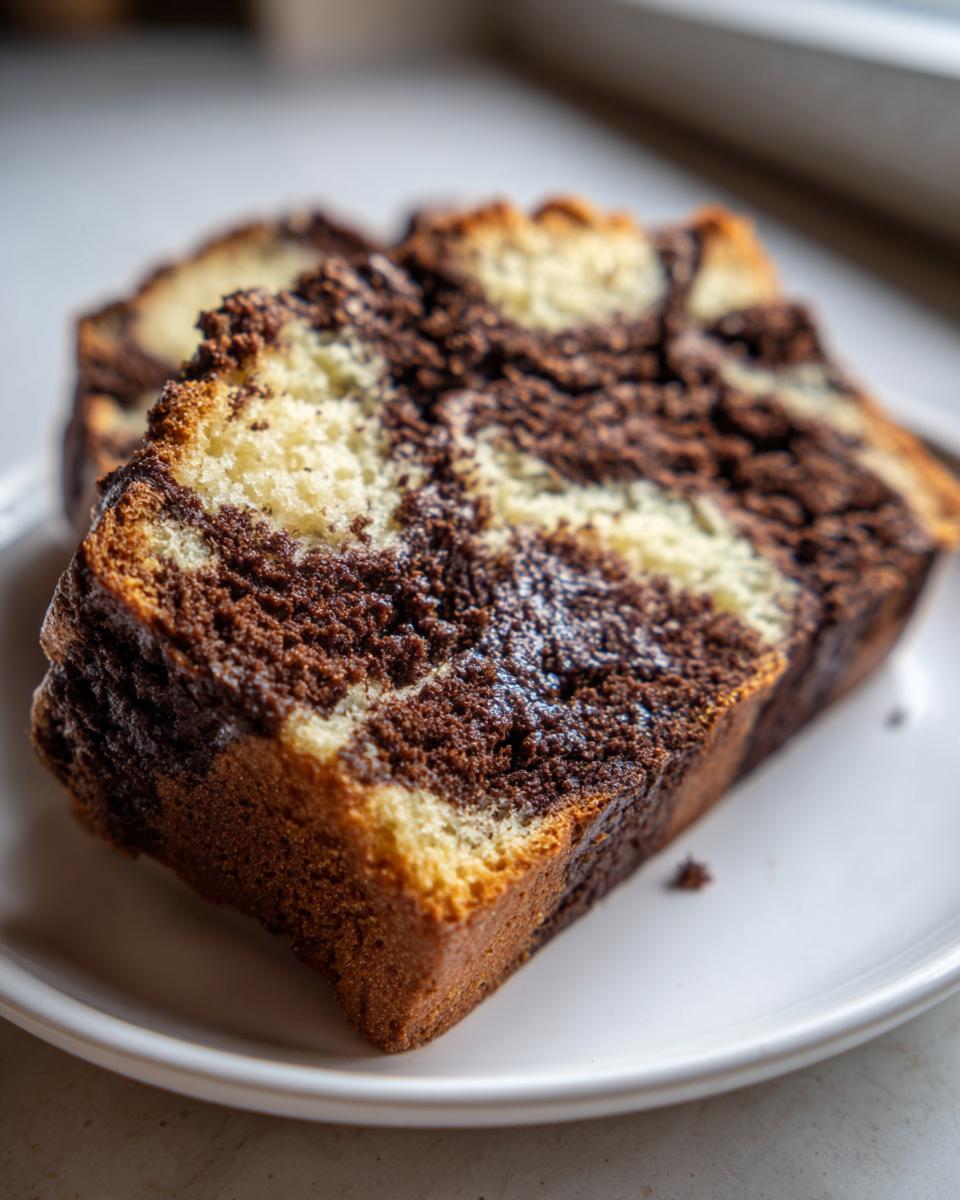
For the dramatic swirl, grab a sharp knife and slice that rolled-up log right down the center, lengthwise. You should see all those beautiful layers! Now, place the two cut halves side-by-side, making sure those lovely cut sides are facing up. Twist them around each other gently. This twisting creates the marble pattern. Place the twisted dough into a greased loaf pan (9×5 inch). If you were making a simple syrup for another recipe, you might use this guide, but for bread, we stick to the yeast method!
Final Proof and Baking the Chocolate Marble Asian Bread Recipe
Cover the pan again and let it proof one last time for about 45 to 60 minutes. We want the dough to rise about one inch above the rim of the pan—don’t let it go too high or it might collapse! Preheat your oven to 350°F (175°C) while that’s finishing up.
Bake for 30 to 35 minutes. You’re looking for a gorgeous golden brown top, and if you happen to have a thermometer, make sure the internal heat hits 200°F (93°C). Take it out immediately when it’s done and move it to a wire rack to cool. If you leave it in the hot pan, the bottom can steam and get gummy!
Tips for Success with Your Chocolate Marble Asian Bread Recipe
Baking is forgiving, but bread especially needs a few little nudges in the right direction. Don’t worry if your first swirl isn’t perfect; the taste will still be amazing! But if you want that bakery-quality shine and texture, these little insider tricks really move the needle with this Chocolate Marble Asian Bread Recipe.
Crust Appearance and Dough Handling
First, for that gorgeous, deep golden shine you see in professional photos, you need a wash! Before it goes into the hot oven, gently brush the top of your loaf with either a splash of milk or, if you want it extra glossy, a whisked egg wash. It makes all the difference in the final look.

Now, about stickiness—it happens! Remember in Step 4 when we kept kneading in the butter? Sometimes the dough can feel too sticky to handle, especially when you divide it for the chocolate half. If you find yourself reaching for too much flour, stop! Resist the urge to dump it in. You can try lightly oiling your hands instead, or just scraping the dough onto a lightly floured surface for handling. Remember, too much added flour ruins that soft crumb we are aiming for!
Ingredient Notes and Substitutions for Chocolate Marble Asian Bread
I know sometimes you open your pantry only to realize you’re missing that one specific item, and you panic! With this Chocolate Marble Asian Bread Recipe, most swaps won’t ruin the loaf entirely, but some ingredients are definitely heroes.
The most critical ingredient, hands down, is the flour choice. You really, really want to stick with bread flour for this one if you can. I’ve tried it with all-purpose flour in a pinch, and oh boy, what a difference! All-purpose flour just can’t form those long, strong gluten networks that bread flour naturally has.
When you knead that AP flour dough, it gets tough and breaks easily. That means when the dough proofs and bakes, it can’t stretch and trap the gasses needed to make it that signature light, fluffy Asian milk bread texture. You end up with something denser, more like a regular sandwich loaf than that beautiful, airy cloud we’re chasing.
As for the butter, make sure it’s truly softened, not melted! Softened butter incorporates air when creamed with sugar, which aids in that light texture. If you use melted butter, you lose that crucial aeration step, and the bread ends up heavier. Trust me, take the extra minute to let your butter sit out!
Storage and Reheating Instructions for Chocolate Marble Asian Bread Recipe
This is one of those beautiful breads that tastes even better the next day, *if* you treat it right! Because we worked so hard to get all that fluffy air into this Chocolate Marble Asian Bread Recipe, the main enemy is air exposure, which dries it out faster than you can say ‘windowpane test.’
The absolute best way to keep this loaf fresh is an airtight container or by wrapping it very tightly in plastic wrap first, then perhaps tossing it into a zip-top bag. I aim for zero air contact. Store it on the counter at room temperature for up to three days. If you need it to last longer than that, popping it in the freezer is the way to go! Slice it first, wrap each slice individually in plastic wrap, and then seal those bundles in a heavy-duty freezer bag. It freezes beautifully for about a month.
When you’re ready to enjoy the frozen slices, just pull one or two out. Don’t try to toast them straight from rock-solid frozen, unless you like chewing cardboard! The trick to bringing back that incredible soft texture is gentle heat.
Bringing Back That Fresh-Baked Fluff
If your loaf is just a day or two old and slightly firm, microwaving is my secret weapon. Take one slice—maybe even spritzed with a tiny bit of water—and microwave it for about 10 to 15 seconds. It steams itself back to perfection! It’s crazy how soft it gets. It truly revives that Asian milk bread magic instantly.

If you’re reheating a larger piece or the whole loaf that’s been sitting out, a quick blast in a 300°F (150°C) oven for about five minutes works wonders. Just tent it loosely with foil so the crust doesn’t burn while the inside warms up. As soon as it comes out, slice it up while it’s warm. I promise you’ll think you just baked it this morning!
Serving Suggestions for Your Chocolate Marble Asian Bread Recipe
Okay, you’ve done the hard work! Your Chocolate Marble Asian Bread Recipe is baked, cooled, and smelling like a dreamy cloud. Now the fun part: eating it! Because this bread has such a beautifully balanced, mild sweetness—it’s not overly sugared like a dessert—it pairs with almost anything savory or sweet.
Honestly, the first slice should always be eaten plain, right? Just tear off a piece while standing over the cooling rack. That’s mandatory. But once you’ve honored that tradition, you need to save a few slices for spreading and dipping!
For breakfast, you can’t go wrong with just a very thin layer of good quality salted butter. The salt is the perfect counterpoint to the chocolatey dough. Or, if you like fruit, a really tart raspberry jam or homemade apricot preserves cuts through the richness beautifully. The sweetness level of this bread means it competes beautifully with strong flavors rather than getting lost.
If you’re looking for a midday treat, this bread is practically crying out for a great cup of coffee. Forget boring black coffee, though; you deserve something special! You could try whipping up some fantastic cold coffee drinks, which you can see recipes for over here: cold coffee drinks recipes. The slight bitterness of a good espresso pairs astonishingly well with the soft texture of the chocolate marble.
It’s also fantastic served lightly toasted alongside a big bowl of soup, believe it or not! It holds up nicely. Just remember to toast it gently so you don’t lose that iconic soft interior. Happy eating!
Frequently Asked Questions About Chocolate Marble Asian Bread
I get so many questions about this recipe! It’s tricky because Asian milk bread relies on exact gluten development, so people often wonder about ingredients or shaping. Don’t worry, these are the most common things people ask when they first try making this beautiful Chocolate Marble Asian Bread Recipe. Let’s clear up a few things so your next loaf is perfect!
Can I use all-purpose flour instead of bread flour in this Chocolate Marble Asian Bread Recipe?
Oh, I really advise against it, sweetie! While you *can* use all-purpose flour, you won’t get that signature heavenly softness. Bread flour has a higher protein count, which creates strong, elastic gluten. That strong structure is what traps the gas needed for that super light, airy, cloud-like texture we love in swirl bread. If you use AP flour, your loaf will be okay, but it’ll definitely be denser and not nearly as soft.
Why didn’t my chocolate swirl show up clearly in the loaf?
This almost always comes down to the shaping process, especially the roll and the twist! If the swirl looks muddy or faint, it usually means you didn’t roll the two dough rectangles together tightly enough, or you didn’t press out all the air before cutting. When you roll the dough up like a jelly roll, make sure you’re sealing the seam well. And for the twist—make sure you are placing the cut sides up and twisting gently but firmly. If you twist too much, the colors start blending before the final proof!
Is this recipe similar to Tangzhong bread?
That’s a great question that gets right to the heart of soft bread! This recipe, as written, doesn’t use the Tangzhong method—that’s using a roux of flour and water cooked first. However, the *goal* is exactly the same: ultra-moist, springy bread that stays soft for days. By using a high ratio of liquids, eggs, and adequate kneading time (plus the high-protein bread flour!), we are achieving that desired milk bread softness through different means. Both methods are fantastic ways to get that super soft bread experience!
Nutritional Estimate for Chocolate Marble Asian Bread
I always feel a tiny bit guilty listing this part out, because honestly, if you stop to count calories or fat content when you’re pulling a loaf of this incredible Chocolate Marble Asian Bread Recipe out of the oven, you’re missing the point! It’s homemade comfort food, and we should celebrate it!
But, because I know some of you are curious, I pulled together a general estimate based on the recipe amounts. Please take this with a grain of salt—or, you know, a grain of sugar! Every brand of flour, every type of butter, and exactly how much you spread on your slice for eating will change these numbers. These figures are just rough guidelines for one slice, so don’t stress over them too much!
- Serving Size: 1 slice
- Calories: 220
- Sugar: 8 grams
- Sodium: 150 mg
- Fat: 6 grams
- Saturated Fat: 3 grams
- Carbohydrates: 35 grams
- Protein: 7 grams
See? Not too bad for something that tastes this decadent! Because this recipe uses milk and eggs, it packs a little extra protein compared to leaner doughs. Knowing the ingredients helps me feel better about enjoying an extra slice with my afternoon coffee.
Share Your Chocolate Marble Asian Bread Creations
Whew! You made it! You navigated the yeast, you mastered the windowpane test, and you created that gorgeous chocolate swirl. I told you this recipe for Chocolate Marble Asian Bread was worth the effort, didn’t I? Now that you have this soft, pillowy loaf cooling on the rack, the best part happens next: sharing the love!
I truly want to see what you bake! There is nothing that makes my day more than seeing a photo of someone else’s perfectly swirled loaf. Did your chocolate ribbons turn out exactly how you pictured? Which topping did you choose for that first slice? Don’t hesitate!
Please leave a star rating right down in the comments below. Let me know how the bread turned out for you and if you made any tweaks that you think other bakers should know about. And if you snapped a picture of that beautiful cross-section, please tag me on social media! Seeing your successes with this Chocolate Marble Asian Bread Recipe is the biggest reward for me. Happy baking, and enjoy every single soft slice!
Print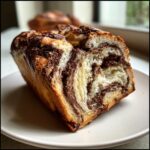
Chocolate Marble Asian Bread
- Total Time: 2 hr 40 min
- Yield: 1 loaf 1x
- Diet: Vegetarian
Description
A recipe for soft, swirled bread combining plain and chocolate doughs, typical of Asian-style milk bread.
Ingredients
- 1 cup milk
- 2 tablespoons sugar
- 1 teaspoon instant dry yeast
- 2 large eggs
- 3 cups bread flour
- 1/4 cup granulated sugar
- 1/2 teaspoon salt
- 1/4 cup unsalted butter, softened
- 1 tablespoon cocoa powder
- 1 tablespoon hot water
Instructions
- Warm the milk slightly. Dissolve 2 tablespoons of sugar and yeast in the warm milk. Let stand for 5 minutes until foamy.
- In a large bowl, combine flour, 1/4 cup sugar, and salt.
- Add the yeast mixture and eggs to the dry ingredients. Mix until a shaggy dough forms.
- Knead the dough for 5-7 minutes until smooth. Add the softened butter gradually while kneading. Continue kneading for another 10 minutes until the dough is elastic and passes the windowpane test.
- Divide the dough into two equal portions.
- For the chocolate portion, mix the cocoa powder with 1 tablespoon of hot water to form a paste. Knead this paste into one dough portion until fully incorporated and the color is uniform.
- Place both the plain and chocolate dough balls in lightly oiled bowls, cover, and let rise in a warm place for 1 to 1.5 hours, or until doubled in size.
- Punch down both doughs gently. Roll each dough into a rectangle of similar size.
- Place the chocolate dough rectangle on top of the plain dough rectangle. Roll them up tightly together like a jelly roll.
- Cut the rolled dough lengthwise down the center, exposing the layers.
- Place the two cut halves side-by-side, cut sides facing up. Twist them gently around each other to create the marble effect.
- Place the twisted dough into a greased loaf pan (9×5 inch).
- Cover the pan and let the dough proof for 45-60 minutes, or until it has risen about 1 inch above the rim of the pan.
- Preheat your oven to 350°F (175°C).
- Bake for 30-35 minutes, or until the top is golden brown and the internal temperature reaches 200°F (93°C).
- Remove from the pan immediately and cool on a wire rack.
Notes
- For a shiny crust, brush the top of the loaf with milk or an egg wash before baking.
- If the dough seems too sticky during kneading, add flour one teaspoon at a time.
- Prep Time: 30 min
- Cook Time: 35 min
- Category: Baking
- Method: Baking
- Cuisine: Asian
Nutrition
- Serving Size: 1 slice
- Calories: 220
- Sugar: 8
- Sodium: 150
- Fat: 6
- Saturated Fat: 3
- Unsaturated Fat: 3
- Trans Fat: 0
- Carbohydrates: 35
- Fiber: 1
- Protein: 7
- Cholesterol: 45
Keywords: chocolate marble bread, asian milk bread, tangzhong bread, soft bread, swirl bread, sweet bread