
Okay, you know those days? The ones where you just crave that golden, gooey, nostalgic hug only a grilled cheese sandwich can provide? Well, I’m here to tell you we’re taking that classic childhood favorite and giving it a serious, grown-up upgrade. Forget boring bread and cheese; we’re introducing the star of the show: cauliflower! Trust me on this one. This isn’t some weird health fad; it’s genuinely the most satisfying, surprisingly delicious way to sneak in some veggies. We are talking about the ultimate Cauliflower Grilled Cheese, and the best part? It comes together faster than you can decide what to watch on TV—seriously, we’re talking about lunch being ready in about 13 minutes flat!
Why This Cauliflower Grilled Cheese Recipe Works So Well
You might be thinking, “Cauliflower in a grilled cheese? Is she serious?” Oh, I am completely serious! This recipe jumps out ahead of the crowd because it delivers on texture and speed, which is exactly what you need on a busy day. It gets way more interesting than just scraping some cheese between two slices of bread.

- It adds substance without weighing you down—it’s surprisingly filing!
- The tiny bits of cauliflower actually help hug the melted cheese together.
- It’s a fantastic way to make a standard lunch feel exciting again.
Quick Prep Time for Your Cauliflower Grilled Cheese
I love recipes that respect my time. We’re talking 5 minutes of prep here, folks! That means while the skillet is heating up, you’re already mashing your already-cooked cauliflower and layering things up. You don’t have time for fussy stuff on a Tuesday, and trust me, this Cauliflower Grilled Cheese delivers fast results.
Vegetarian Friendly Cauliflower Grilled Cheese
Since we’re ditching the meat, this sandwich is naturally vegetarian, which is great for keeping things simple. But don’t confuse ‘simple’ with ‘boring’! The cooked cauliflower doesn’t just fill space; it adds a cozy, slightly creamy texture right in the middle that you just can’t get from plain cheese alone. It’s hearty and satisfying, I promise!
If you want to see another cheesy masterpiece that really steps outside the box, you should definitely check out how I make my Irresistible Grilled Cheese Sloppy Joes—another real game-changer!
Essential Ingredients for the Perfect Cauliflower Grilled Cheese
Okay, for any grilled cheese to sing, you need the right players on the field. While this recipe is simple—we’re only working with four main components—the quality of those components is what separates a good sandwich from an absolutely amazing Cauliflower Grilled Cheese. Since the cauliflower is already cooked ahead of time, the real work here is just layering!
Here’s what you need to pull together one serving of this lunchtime magic:
- Two slices of your favorite bread (don’t cheap out here—texture matters!).
- About half a cup of cooked cauliflower florets, which you’ll need to chop up nicely.
- Two slices of good cheese—we’re using cheddar for this batch, but any firm cheese works.
- One tablespoon of butter, softened just enough to spread easily without ripping the bread.
We’re keeping things simple, but if you want to check out how I make my simple syrup for sweet treats later, I’ve got a little guide on that, too! Simple Syrup Recipe.
Ingredient Notes and Substitutions for Cauliflower Grilled Cheese
Let’s talk cheese for a second. The number one rule for filling is using a cheese that melts beautifully. My note said to go for cheddar, and I stand by that, but if you use something super soft like Boursin, it might get a little too soupy. You want something firm that turns gooey, like Monterey Jack, Gouda, or even a good young Provolone. Those are fantastic choices for your Cauliflower Grilled Cheese!
For the bread, seriously consider stepping up from standard white sandwich bread if you can. A good sourdough has the structural integrity to hold up against the mashed cauliflower, and the slight tang cuts through the richness of the butter and cheese perfectly. Thick-sliced artisan bread is my go-to upgrade!
Step-by-Step Instructions for Making Cauliflower Grilled Cheese
Alright, this is the fun part! Because we pre-cooked the cauliflower, this whole process is slick and super fast. You’re not just throwing things together randomly; we follow a specific order because, honey, that’s how we get that perfect golden crust without burning the cheese inside. Once you see how easy this assembly is, you’ll be making this Cauliflower Grilled Cheese every week for lunch!
Remember, the goal is to protect those soft insides while making the outside beautiful and crisp. We spread the butter on the outside, not the inside—that’s a rookie mistake that leads to soggy bread!
Preparing the Cauliflower Base for Your Cauliflower Grilled Cheese
First things first, let’s tackle that cauliflower. Since it’s already cooked until tender (and hopefully, it’s cooled down a bit!), put those florets into a small bowl. Now, take a fork—or the back of a sturdy spoon—and lightly mash them up. You don’t want baby food puree here; you want texture! Leave some little chunks!
Here’s my little secret for moisture control while making this Cauliflower Grilled Cheese: if your cooked cauliflower seems suspiciously watery, give it a quick press between a couple of paper towels first. Too much moisture means steam, and steam means sogginess, which is the absolute enemy of a great grilled cheese!
Grilling the Cauliflower Grilled Cheese to Golden Perfection
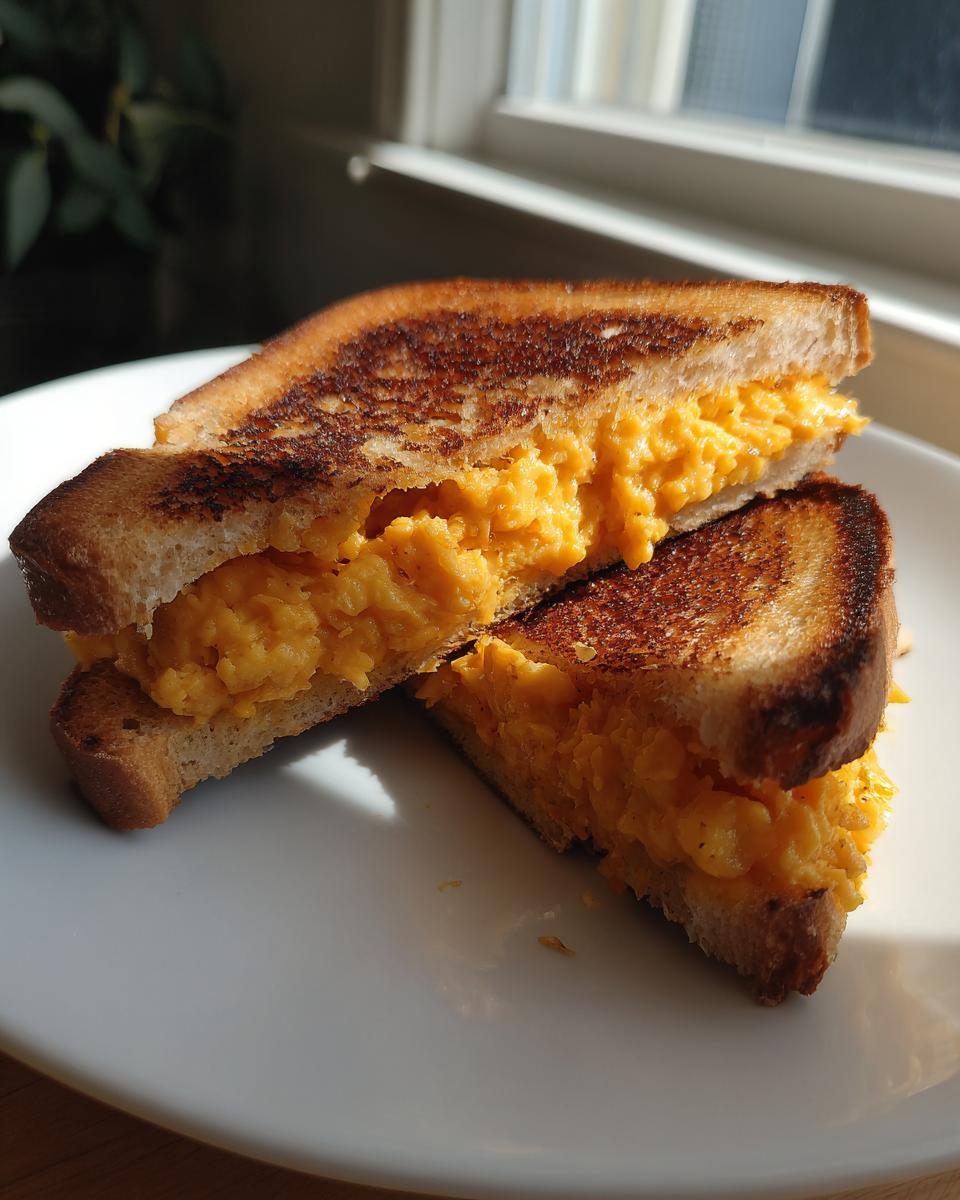
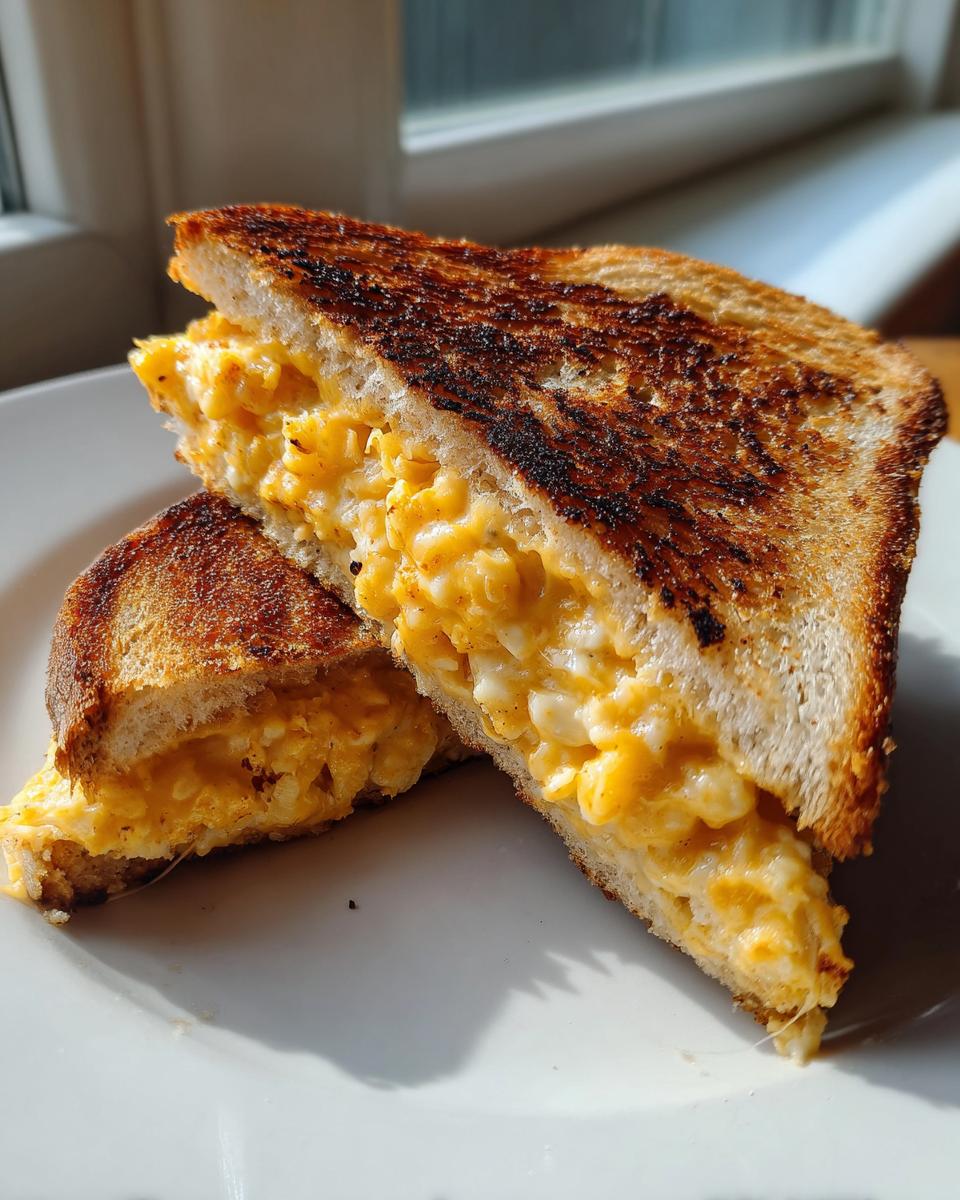
Time to build! Lightly butter one side of each bread slice. Place one slice, butter-side down, into your skillet set over medium heat. This is vital—medium heat ensures the cheese has time to fully melt before the bread turns black! Layer one slice of cheese down first, then spread over your mashed cauliflower mixture evenly. Top that with your second slice of cheese, and then finish with the second slice of bread, butter-side up.
Now, gently grill it for about 3 to 4 minutes on that first side. You’ll know it’s time to flip when you peek underneath and see a perfect golden brown crust. Flip it carefully, and then press down gently with your spatula—not crushing, just *encouraging*—for another 3 to 4 minutes until the bread is dark golden and you can see that second layer of cheese oozing out just a little. That’s the sign of a happy, fully melted Cauliflower Grilled Cheese!
If you want to see my super easy method for making an Air Fryer Grilled Cheese when you’re not using fillings, you can check out Air Fryer Grilled Cheese. Sometimes I just need that crunch!
Tips for Success with Your Cauliflower Sandwich
Even though this recipe is super simple, I always want you to have the best results possible! Over the years, I’ve learned a few little tricks that really take this Cauliflower Grilled Cheese from great to legendary. It’s all about managing moisture and getting that perfect contrast between crisp exterior and gooey middle.
Here are my top three non-negotiable tips:
- Keep the Cauliflower Cool: The cauliflower needs to be cooked and chopped, yes, but don’t put piping hot cauliflower right on top of cold cheese! Let the mashed cauliflower cool down a bit after you mash it. If it’s too hot, it starts melting the bottom layer of cheese before it even hits the pan, leading to a messy, soupy situation when you try to flip.
- Use the Spatula to Seal the Deal: When you flip the sandwich, press down *gently* in the center, but concentrate your pressure around the edges. This helps seal the bread around the filling and ensures the cheese grabs onto both slices. It prevents the filling from trying to escape out the sides when you bite into it later!
- Low and Slow is Key (Medium Heat is Your Friend): I know we are in a hurry, but resist the urge to crank the heat up to high. High heat burns the buttered bread instantly, leaving you with charcoal on the outside and sadly, only lukewarm, un-melted cheese on the inside. Medium heat gives you that perfect slow melt and even browning. Patience pays off, even in a 13-minute sandwich!
Serving Suggestions for This Sandwich
So, you’ve got this magnificent, savory little bundle of golden goodness—your Cauliflower Grilled Cheese—sitting hot on the plate. Now what? While honestly, this sandwich is robust enough to stand completely alone, sometimes you just need a little something extra on the side to make it feel like a real, comforting meal, right?
I keep my sides simple because the sandwich is the hero here. You don’t want sides that are going to fight with the cheesy flavor. Here are my two absolute favorite pairings. They are classic for a reason, and they just *work*!
- The Non-Negotiable: Tomato Soup! You cannot beat a grilled cheese without dipping it into something warm and tangy. I’m partial to a really bright, acidic tomato soup. It cuts right through the fat from the butter and cheese so perfectly. If you’re feeling fancy, you have to try my recipe for Creamy Roasted Garlic Tomato Soup; it takes things up a notch without adding any fuss!
- For a Refreshing Crunch: Quick Pickles! If you’re not feeling soup, you need something acidic and crisp to balance the richness. A couple of dill pickle spears or some tangy bread-and-butter pickles on the side are perfect. They cleanse the palate between bites of cheese.
- A Simple Green Salad: If I’m trying to pretend this is a lighter lunch, I toss together some mixed greens with a very light vinaigrette—think lemon juice, olive oil, salt, and pepper. Don’t put anything creamy on the salad, or you’ll just end up with a cheese bomb overall!
Whatever you choose, make sure it’s ready before the sandwich comes off the heat, because once that bread is golden, you do *not* want to wait!
Storage and Reheating Instructions
Now, let’s be real. When this Cauliflower Grilled Cheese comes off the skillet looking like a masterpiece, it’s usually gone in about 90 seconds flat. But hey, maybe you made one for later, or maybe just you and your partner couldn’t finish a double batch. If you have leftovers, you have to treat them right. The enemy here is sogginess, and the microwave is the #1 offender if you try to reheat a grilled cheese in it!
If you absolutely must store leftovers, wrap each sandwich tightly in aluminum foil or plastic wrap and pop it in the fridge. I find they hold up best for about 2 days max. The bread will soften up a bit, which is sad, but totally salvageable!
The Key to Reheating for That Perfect Crunch
The goal when reheating this beautiful Cauliflower Grilled Cheese is to re-crisp the bread and perfectly re-melt that creamy cauliflower and cheese center without drying out the filling. You need dry heat, not steam!
Forget the microwave entirely—it will make the bread chewy like old silicone. Here’s what I do:
- Take the sandwich out of the fridge about 15 minutes before you plan to eat it, still wrapped in foil.
- Place the foil-wrapped sandwich straight into a preheated 350°F (175°C) oven or toaster oven. Don’t re-butter the outside; the fat from the original cooking should still be enough.
- Let it heat up for about 8 to 10 minutes in the oven. This gentle heat warms the filling all the way through.
- Finally, unwrap it and pop it directly onto a hot, dry skillet (no extra butter needed!) for about 1 minute per side until that golden-brown color is back. This wakes up the crust beautifully!

Using an Air Fryer for the Best Results
If you’ve got one of those handy air fryers, it is honestly your best friend for reviving almost any sandwich. It’s faster than the oven and gives you that amazing crispness. Try to avoid putting the sandwich in if it looks really soggy, though—it works best on sandwiches that were just slightly left over.
Set your air fryer to about 360°F (180°C). Place the sandwich in the basket (you might need to use a small one or do half at a time). Air fry for 4 minutes, check it, and then give it another minute or two if the cheese isn’t quite molten yet. It turns out amazing and quickly brings that crunch back to your Cauliflower Grilled Cheese!
Frequently Asked Questions About Cauliflower Grilled Cheese
It happens every time I share this recipe with friends—they get so excited but always have one or two little questions first. And honestly, that’s great! It means you’re thinking critically about how to make your Cauliflower Grilled Cheese absolutely perfect. Here are some of the things I hear most often when people are making this sandwich for the first time!
Can I use raw cauliflower instead of cooked?
Oh, please don’t try to use raw cauliflower here! I know sometimes we’re tempted to skip a step for speed, but this is one step you absolutely cannot skip when making this sandwich. If you use raw cauliflower, A) it won’t soften enough in the short melt time of the sandwich, so you’ll get crunchy, hard bits in your gooey cheese, and B) it releases a lot of water when raw cauliflower heats up. That water turns straight into steam, and steam means a soggy bottom slice of bread. Cook it until it’s tender first, then loosely mash it—that’s the secret sauce!
What is the best type of cheese for this recipe?
For the most reliable, satisfying melt in your Cauliflower Grilled Cheese, you always want a cheese that has good moisture content and separates nicely when heated. I swear by a mix, to be honest! Use one slice of sharp Cheddar for flavor and one slice of Monterey Jack or Gruyère for that beautiful, stretchy pull. If you stick to just one type, make sure it’s not an aged cheese like very sharp Parmesan—those tend to get oily or grainy instead of smoothly melting around the cauliflower bits.
Can I add other vegetables to this grilled cheese?
You can absolutely get creative here, but you have to use restraint! We are building an amazing sandwich, not a vegetable casserole pressed between two pieces of bread, ha! If you want to add something, go for finely chopped, cooked items. My favorite addition is a spoonful of caramelized onions; they are sweet, they add texture, and they don’t dump a ton of extra water into the sandwich.
Just be careful! Anything that’s super high in water content—like fresh tomatoes or sautéed mushrooms—will cook off steam in the pan and destroy that golden crust we worked so hard to achieve! Keep the additions minimal, and you’ll be fine.
Estimated Nutritional Data
Now, before you dive into this heavenly, cheesy creation, I always like to give a little heads-up about the numbers! Since this Cauliflower Grilled Cheese comes together so quickly, sometimes we forget that it’s still a rich, buttery sandwich built around cheese, right? The details below are my best estimate based on standard ingredients—a slice of whole wheat bread, a medium-sharp cheddar, and a tablespoon of butter.
Please remember, these numbers are just guides! If you use thicker artisan bread or load up on extra cheese because you simply can’t help yourself (I don’t blame you!), your personal count will change. Think of this as a helpful general overview for one serving before you head back for seconds!
Here is the breakdown:
- Calories: Roughly 350 per sandwich. That’s not bad for a deeply satisfying lunch!
- Fat: Around 20 grams total, which includes about 10 grams of that satisfying saturated fat. Butter and cheese bring the flavor!
- Carbohydrates: About 30 grams, primarily coming from the bread.
- Protein: We are getting a solid 18 grams in here, thanks mostly to the cheese, which makes this feel like a real meal.
It’s amazing how much staying power this little sandwich has, even with all that delicious butter melting away!
Share Your Cauliflower Grilled Cheese Creations
Well, folks, that’s it! That’s the whole glorious journey from humble head of cauliflower to one of the most satisfying, quick lunches you’ll ever whip up. I really hope you try this the next time you’re craving something warm, savory, and just a little bit different. It’s such a crowd-pleaser, even for people who usually turn their noses up at vegetables!
I’ve poured all my best tips for making the perfect crust and keeping the interior gooey heaven right here, but the real fun starts when you take over in your own kitchen. Did you use sourdough or brioche? Did you sneak in a little smoked paprika with your cheese? I absolutely *need* to hear about it!
Don’t be shy! Hit that star rating button right below this section—it really helps me know if you loved this Cauliflower Grilled Cheese recipe as much as I do and guides me on what recipes to share next. And if you snapped a picture of your golden-brown beauty, please share it with me! You can always send me a message or shout out on social media; I love seeing your success stories. If you’re looking for other ways to get in touch, you can always find my contact information here: Let’s Connect!
Go enjoy that beautiful, cheesy, vegetable-packed sandwich. Happy cooking, and I’ll catch you in the next recipe!
Print
Grilled Cauliflower Cheese Sandwich
- Total Time: 13 min
- Yield: 1 serving 1x
- Diet: Vegetarian
Description
A simple recipe for a grilled cheese sandwich featuring cooked cauliflower.
Ingredients
- 2 slices bread
- 1/2 cup cooked cauliflower florets, chopped
- 2 slices cheese (cheddar or preferred type)
- 1 tablespoon butter
Instructions
- Lightly mash the cooked cauliflower florets in a small bowl.
- Butter one side of each slice of bread.
- Place one slice of bread, butter-side down, in a skillet over medium heat.
- Layer one slice of cheese, the mashed cauliflower, and the second slice of cheese on the bread in the skillet.
- Top with the second slice of bread, butter-side up.
- Grill for 3 to 4 minutes per side, pressing gently with a spatula, until the bread is golden brown and the cheese is melted.
- Remove from the skillet and slice in half.
Notes
- Cook the cauliflower until tender before starting the sandwich assembly.
- Use firm, mild cheese for best melting results.
- Prep Time: 5 min
- Cook Time: 8 min
- Category: Lunch
- Method: Pan Frying
- Cuisine: American
Nutrition
- Serving Size: 1 sandwich
- Calories: 350
- Sugar: 3
- Sodium: 550
- Fat: 20
- Saturated Fat: 10
- Unsaturated Fat: 10
- Trans Fat: 0.5
- Carbohydrates: 30
- Fiber: 4
- Protein: 18
- Cholesterol: 50
Keywords: cauliflower, grilled cheese, sandwich, cheese, bread, quick lunch