
Oh my gosh, you know how much I adore a good, messy, sliceable classic dessert, right? Well, sometimes you just don’t want to deal with a whole pie—the slicing, the sliding the slippery cream out—it’s a whole production! That’s why I spent weeks fiddling with textures until I landed on the absolute best **Boston Cream Pie Cupcakes** recipe. Seriously, these are my proudest achievements in tiny baking. We’re talking light vanilla cake, that silky, perfect pastry cream filling, and a gorgeous chocolate drizzle, all contained in one perfect little bite. I’ve taken that iconic bakery staple and transformed it into a fuss-free, home-kitchen treat. Trust me, once you try these, you’ll never look at a whole pie the same way again!
Why You Will Love These Boston Cream Pie Cupcakes
Honestly, ditching the massive pie tin for these individual beauties just changes the game. They are fun, easy to serve, and look so impressive without any of the stress! Here’s why these are about to become your go-to dessert:
- Portion Perfection: No awkward cutting or dealing with the pie crumbling apart when you serve it. Everyone gets a perfectly formed cupcake with the ideal ratio of cake, cream, and chocolate every single time.
- Fuss-Free Assembly: Think about cutting a slice of pie where the pastry cream drips everywhere. With these, you just core, fill, and glaze. It’s so much neater, which means less clean-up for me!
- Intense Flavor Delivery: Because they are smaller, the flavor hits much harder! The rich vanilla cake soaks up just a tiny bit of the moisture from the cream underneath, making every bite intensely flavorful and beautifully textured.
- Make-Ahead Potential: You can bake the cake parts the day before, which saves so much time when company comes over. We all need a little help with big desserts, right?
Essential Ingredients for Perfect Boston Cream Pie Cupcakes
Okay, the ingredients list looks straightforward, but I promise you, the little details here make these cupcakes sing! We’re essentially building three separate layers of yumminess, so let’s talk about what you need for these 12 little treats. First up is the vanilla cake base. You absolutely need 1 1/2 cups of all-purpose flour, 1 1/2 teaspoons of baking powder, and salt. Then for richness, we’re using 1/2 cup of softened unsalted butter and 1 cup of sugar. Don’t forget the two eggs and the 1/2 cup of milk!
Now, here is where you can’t skimp when making any vanilla-based item: **vanilla extract**. Use the good stuff, or at least a nice pure vanilla. It really shines through because there are no heavy spices like cinnamon to hide behind! You’ll need 1 teaspoon of that liquid gold.
For the filling and topping, the key is simple: 1 cup of pre-made pastry cream—whichever way you choose to get that—and then the chocolate topping, which is just 1/2 cup of semi-sweet chocolate chips mixed with 2 lovely tablespoons of heavy cream. That’s it! Simple, quality components are the secret weapon here.
Expert Tips for Making the Vanilla Cake Base for Boston Cream Pie Cupcakes
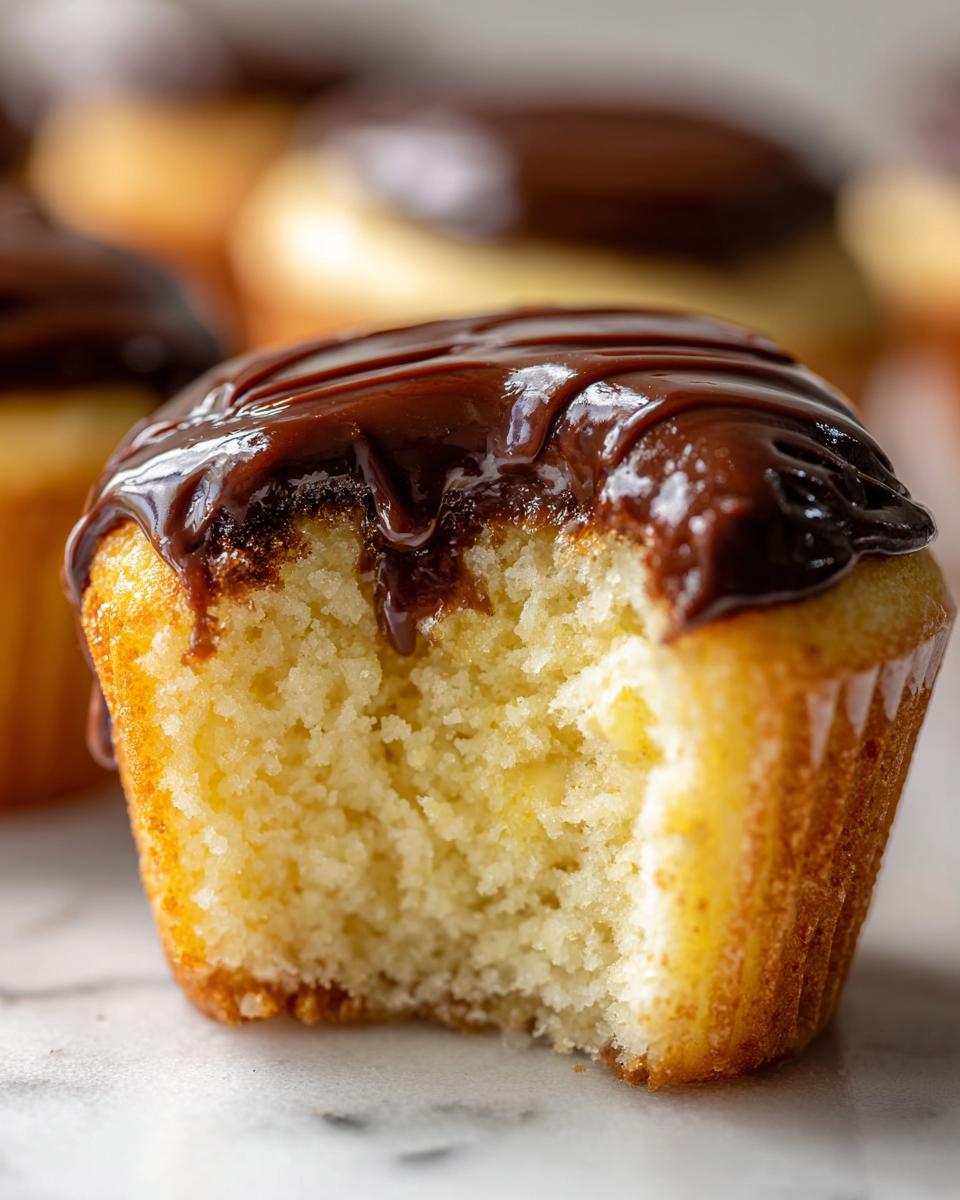
The cake base is the foundation of this whole operation, right? If the cake isn’t light and tender, the whole Boston Cream Pie Cupcakes experience falls apart before you even get to the filling. My biggest piece of advice, which I learned the hard way trying to rush things when I was younger, is temperature control. Make sure that butter and those two eggs are fully at room temperature—I mean, really sitting out for at least an hour. Cold ingredients don’t incorporate air well, and when you skip that step, you end up with dense little hockey pucks instead of fluffy cakes.
Another crucial thing: oven space and filling! You are baking 12 individuals, so make sure your muffin tin has room to breathe in the oven. And please, only fill those paper liners about two-thirds full. They rise nicely, but we need room for that expansion so they dome up without spilling over the edges. If you want to check out making your own milk substitute like oat milk for other recipes, you can find a great guide here, but for this classic vanilla, stick to regular milk!
Creaming Butter and Sugar: The First Step to Fluffy Boston Cream Pie Cupcakes
This is where you build the structure! Don’t just stir the butter and sugar together for a minute and call it a day. You need to beat them together—I prefer using a stand mixer for this part—until the mixture is visibly pale yellow and super fluffy. It takes a solid 3 to 5 minutes on medium speed. What you’re doing is whipping tiny air bubbles into the fat, and those bubbles are what give your cupcake the lift it needs. When you see that beautiful, airy texture, you’re ready for the eggs.
Achieving the Right Batter Consistency for Boston Cream Pie Cupcakes
Once those eggs and vanilla are mixed in, you move on to the alternating rule. This is non-negotiable for tender cake. You whisk your dry stuff (flour mix) and your wet stuff (milk) separately, and then you add them to the creamed butter mixture by switching back and forth. Start and finish with the dry ingredients. So, a bit of flour, then a bit of milk, more flour, the rest of the milk, and finally the last of the flour. The key word here is *just combined*. As soon as you don’t see any more white streaks of flour, STOP MIXING. Overmixing at this stage develops gluten, and suddenly you have tough, chewy cupcakes!
Preparing the Pastry Cream Filling for Boston Cream Pie Cupcakes
This is where things get fun, but also where you can cheat a little bit, and I won’t tell anyone! Since this recipe makes 12 Boston Cream Pie Cupcakes and we want to keep the process moving, I totally understand if you grab a good quality store-bought pastry cream. It saves a ton of time! If you go that route, make sure it’s thick enough—none of that watery stuff, please!
If you are feeling ambitious and want to make it from scratch, you absolutely should! Homemade pastry cream just has that incredible fresh vanilla flavor that store-bought sometimes misses. Think about it: warm vanilla custard filling? Yes, please! Either way, your filling needs to be completely cool before you put it into the baked cake.
But here is my secret little trick for making the filling process super smooth: once your pastry cream is made (or opened, if you’re taking the shortcut!), pop it in the fridge for about 30 minutes until it thickens up just a *little bit* more. It shouldn’t be rock hard, but chilling it slightly makes it less floppy when you’re trying to inject it into the cupcake core. When the cream is too warm and liquidy, it just oozes right back out the top when you try to seal it up, and that makes glazing a nightmare!
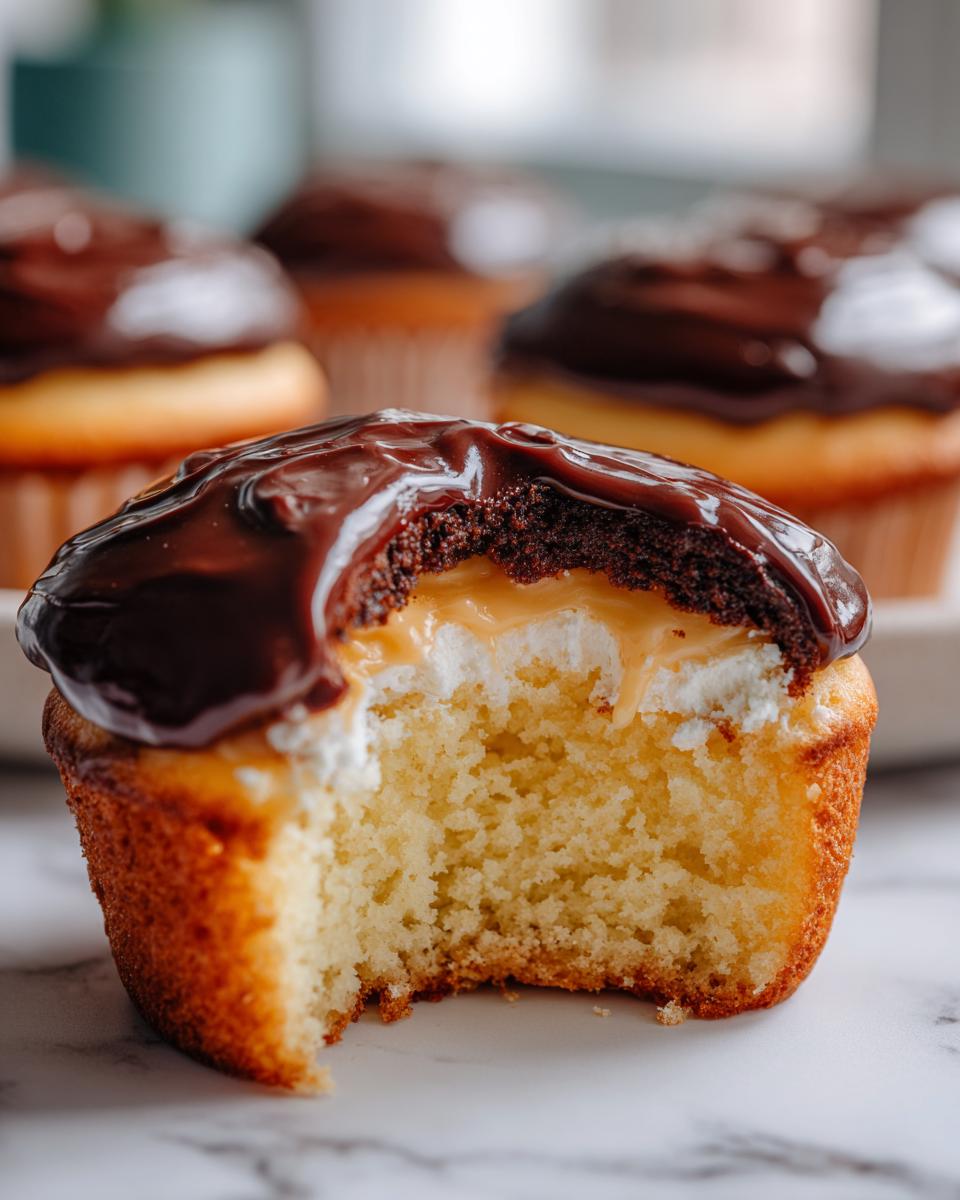
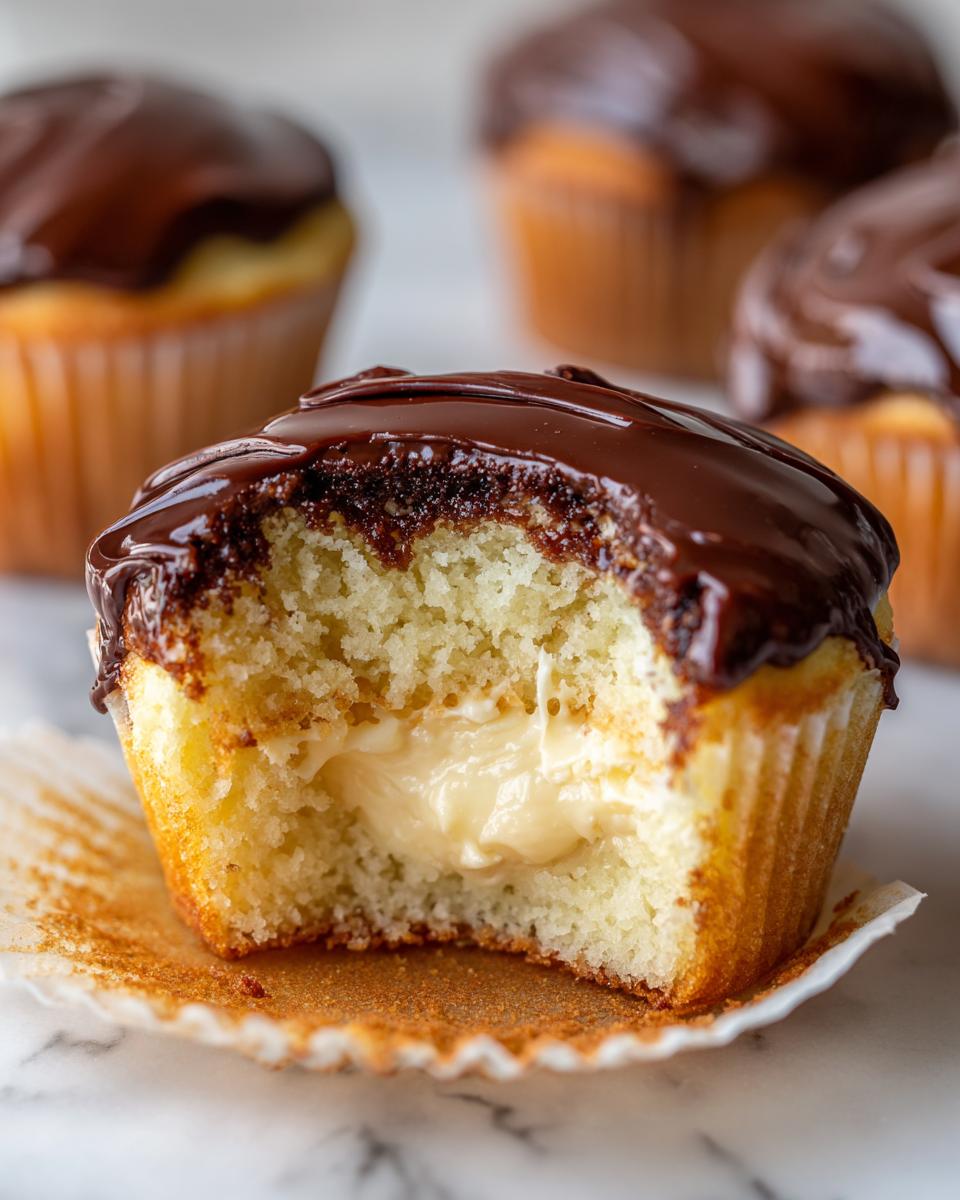
Assembling Your Boston Cream Pie Cupcakes: Coring and Filling
This is the part where your perfect little vanilla cakes officially become Boston Cream Pie Cupcakes! The absolute number one, non-negotiable rule here is patience. The cakes must be completely cooled. I mean it—stone cold. If they are even slightly warm, the pastry cream you just chilled will melt immediately, and your perfectly cored hole will collapse into a soggy mess. Don’t rush this! Let them sit on that wire rack for at least an hour after they come out of the pan.
Once you’re sure they are cool, grab your weapon of choice for coring. Back in the day, I used a tiny paring knife, but honestly, I waste so much cake that way! My absolute favorite tool now is an apple corer—the one that just punches a nice, clean hole right through the center. It makes the cleanest core, and it’s so fast. You only need to go about three-quarters of the way down; don’t drill straight into the bottom of the liner, or the cream will leak out the bottom!
Once you have your little cylinder of cake removed (you can snack on these later, by the way!), you’re ready to fill. Use a piping bag with a wide tip, or honestly, just a spoon if you’re feeling rustic—but piping is neater! Carefully pipe the pastry cream into that hole you made. You want to fill it right up to the top edge, but don’t overstuff it. If you are already worried about the glaze sticking, you can chill these filled cupcakes for another 15 minutes before glazing them—it helps set the cream so it doesn’t squish out when the glaze goes on. If you’re looking for some other fun, creamy, no-bake inspiration for when you’re skipping cake, check out these no-bake cheesecake treats!

Creating the Perfect Chocolate Glaze for Boston Cream Pie Cupcakes
We’ve got the cake, we’ve got the cream, now for the crowning glory! The chocolate glaze on a true Boston Cream Pie has to be shiny, smooth, and just the right thickness—not too thin that it runs right off, but not so chunky that it looks like mud. Luckily, the glaze for these Boston Cream Pie Cupcakes is ridiculously easy since it’s only two ingredients: those semi-sweet chocolate chips and the heavy cream.
This is one of those steps where you absolutely must pay attention, especially if you are using the microwave like I do, because chocolate scorches faster than you can say “ganache!” First, toss those chips and the heavy cream into a microwave-safe bowl. Make sure the bowl is big enough that the chocolate can expand a little when it melts. Don’t just blast it on high for a minute, I beg you! You need to use short intervals.
I start mine at 30 seconds on medium power. Stir it really well after that 30 seconds, even if it still looks mostly chunky, because the residual heat will keep melting things. Then, put it back in for another 30 seconds. You keep going in these short bursts—stirring vigorously between each one—until you can see only a few tiny unmelted bits left. Then, just stir until those last few bits dissolve into the rest of the smooth, glossy chocolate. That little technique is my insurance policy against ever having burnt, gritty chocolate glaze, which, trust me, ruins the whole look of these pretty cupcakes. Once it’s smooth, you let it sit for just a minute so it cools down slightly, and then you drizzle it right over the tops of your filled and ready cupcakes!
Tips for Success When Making Boston Cream Pie Cupcakes
Look, we’ve covered the making and the assembling, which is the hard part! But even at this stage, there are always a few little insider secrets that elevate your wonderful Boston Cream Pie Cupcakes from “great” to “I can’t believe you made these at home!” These tips are all about longevity and presentation, ensuring they look and taste perfect when you serve them.
First up: presentation of the glaze. If you want those beautiful, distinct lines of chocolate drizzle instead of just dumping it all on top, you need to let the glaze set up just a little bit more than I mentioned before. Wait until it’s lukewarm, maybe thick enough to coat the back of a spoon thickly, *then* use a piping bag with a thin round tip to create those iconic swirls. It takes longer, but the definition is worth it, especially if you are bringing these to a party.
This next tip is crucial because of the cream filling: storage is everything! Since these cupcakes have a dairy filling (the pastry cream), they cannot hang out on the counter like a regular frosted cupcake. You absolutely must store them in an airtight container in the refrigerator. I know, cold cake isn’t my first choice either, but the cream needs the cold. If you want to combat the slight dryness that refrigeration can cause in the vanilla cake, try this slightly odd trick I use.
Before you fill them, you can brush the inside of the cored-out cake base with a tiny bit of simple syrup. Honestly, this little bit of moisture insurance keeps the cake tender even after a night in the fridge. You can whip up a basic sweetener for this if you want; this guide explains how easy it is to make a simple syrup. It won’t change the flavor, it just keeps everything soft!
Finally, if you find your chocolate glaze is getting too thick while you’re working through the batch, don’t panic and don’t use the microwave again! Just stir in one tiny drop—seriously, one drop—of warm water or milk into the remaining chocolate in the bowl. Stir it quickly until it smooths back out. This revives the glaze without scorching it, ensuring that last cupcake looks just as beautiful as the first one you served!
Storage and Reheating Instructions for Boston Cream Pie Cupcakes
Okay, listen carefully because this is the most important non-baking part of the whole Boston Cream Pie Cupcakes process: storage! We have perishable dairy in the middle of these beauties, which means they absolutely cannot sit out on the counter like regular, everyday frosted cupcakes. If you leave them out overnight, that delicious pastry cream is going to turn into something questionable, and frankly, we worked way too hard for that!
You must store these in an airtight container in the refrigerator. I know, I know, cold cake isn’t my first choice either, but food safety is number one, and the cream needs that chill to stay firm and safe. They hold up really well for about three days in the fridge, though honestly, they never last that long in my house!
Now, about reheating? Don’t even think about putting the whole finished cupcake in the microwave! If you try to warm up the whole thing, that lovely, firm chocolate glaze will turn into a puddle, and the pastry cream will become soupy and hot. That defeats the entire point of making a Boston Cream *Pie* style cupcake, where you want that cool, creamy center contrast.
If you really, really feel like you need a warm cake component—maybe you just pulled them out of the fridge and the cake feels too firm—the trick is to remove the chocolate glaze and the pastry cream filling first. Take the plain vanilla cake shell, microwave that little empty cake section for maybe 5 to 8 seconds just to take the chill off, and then let it cool for just a second before you stop and re-pipe the cold cream back in and re-glaze the top. It’s a pain, I won’t lie, but that keeps the temperature contrast perfect. If you are looking for tips on chilling drinks because these cupcakes will go fast, I recently found a great guide on how to properly make iced tea, which is the perfect pairing!
Frequently Asked Questions About Boston Cream Pie Cupcakes
I know you bakers are going to have questions about how to manage these beauties, especially since they have three distinct components! Don’t worry, I’ve gathered the things people ask me most often about making these Boston Cream Pie Cupcakes. Let’s get those last little details ironed out!
Can I make the cake part of the Boston Cream Pie Cupcakes ahead of time?
Yes, absolutely! This is one of my favorite tricks for making dessert less stressful. You can bake the plain vanilla cake shells—the batter filled two-thirds full—and let them cool completely. Store them in an airtight container at room temperature for up to two days before you plan to serve them. They stay remarkably fresh because they haven’t been exposed to the moisture of the cream yet! However, you should only core them, fill them with the pastry cream, and glaze them the *day* you plan to serve them. Cream + cake does not hang out well for long periods!
What is the best way to keep the pastry cream fresh in these cupcakes?
Once you’ve filled those cored-out centers, the humidity factor comes into play. Since pastry cream is involved, refrigeration is a must. You want to store them in a container where they are protected from picking up any weird fridge odors, but try not to stack them right on top of each other if you can help it, or the chocolate glaze might smear. If you are worried about the cake getting too firm overnight in the fridge, lightly brushing the inside of that core cavity with simple syrup before filling—like I mentioned earlier—will help lock in moisture. They need that cold to keep the cream safe, so just plan to let them sit on the counter for about 20 minutes before serving to take the hard chill off the cake.
Can I substitute the all-purpose flour in this Boston Cream Pie Cupcakes recipe?
This is a tricky one, honestly, because the structure of this vanilla cake is already delicate due to the alternating mixing method we use. If you are going gluten-free, you will need a high-quality 1-for-1 baking blend that contains xanthan gum. I wouldn’t recommend swapping just half the flour for something like whole wheat or almond meal, as it will drastically change the light texture we are aiming for in a true Boston Cream Pie Cupcake. Stick to all-purpose or a reliable gluten-free blend for success!
They look so gorgeous once they are done, almost like little polished gems. If you’re having people over, maybe serve them with a tall, refreshing glass of cold tea—just make sure you avoid that one common mistake people make with iced tea so your drink is perfect too!
Print
Boston Cream Pie Cupcakes
- Total Time: 45 min
- Yield: 12 cupcakes 1x
- Diet: Vegetarian
Description
A recipe for individual cupcakes that taste like a classic Boston Cream Pie, featuring a vanilla cake base, pastry cream filling, and chocolate glaze.
Ingredients
- 1 1/2 cups all-purpose flour
- 1 1/2 teaspoons baking powder
- 1/2 teaspoon salt
- 1/2 cup unsalted butter, softened
- 1 cup granulated sugar
- 2 large eggs
- 1 teaspoon vanilla extract
- 1/2 cup milk
- 1 cup pastry cream (prepared)
- 1/2 cup semi-sweet chocolate chips
- 2 tablespoons heavy cream
Instructions
- Preheat your oven to 350 degrees Fahrenheit (175 degrees Celsius). Line a 12-cup muffin tin with paper liners.
- Whisk together the flour, baking powder, and salt in a medium bowl. Set aside.
- In a large bowl, cream the softened butter and sugar together until light and fluffy.
- Beat in the eggs one at a time, mixing well after each addition. Stir in the vanilla extract.
- Gradually add the dry ingredients to the wet ingredients, alternating with the milk, beginning and ending with the dry ingredients. Mix until just combined.
- Fill each cupcake liner about two-thirds full with batter.
- Bake for 18 to 20 minutes, or until a toothpick inserted into the center comes out clean. Let the cupcakes cool completely in the pan for 10 minutes before transferring them to a wire rack to cool fully.
- Once cool, use a small knife or apple corer to remove a small core from the center of each cupcake.
- Fill the cavity of each cupcake with prepared pastry cream.
- Make the glaze: Place chocolate chips and heavy cream in a microwave-safe bowl. Microwave in 30-second intervals, stirring until smooth.
- Spoon or pipe a small amount of chocolate glaze over the top of each filled cupcake.
Notes
- You can make your own pastry cream or use a good quality store-bought version for convenience.
- For a cleaner filling process, chill the filled cupcakes slightly before glazing.
- Prep Time: 25 min
- Cook Time: 20 min
- Category: Dessert
- Method: Baking
- Cuisine: American
Nutrition
- Serving Size: 1 cupcake
- Calories: 300
- Sugar: 30
- Sodium: 150
- Fat: 15
- Saturated Fat: 8
- Unsaturated Fat: 7
- Trans Fat: 0
- Carbohydrates: 38
- Fiber: 1
- Protein: 4
- Cholesterol: 60
Keywords: Boston Cream Pie, cupcakes, vanilla cake, pastry cream, chocolate glaze, dessert