
Oh, the magic of a tiny, warm pastry filled with bright, zesty meat! There’s nothing quite like pulling a tray of homemade savory bites out of the oven. Forget those dry, complicated versions you find sometimes. I’m here to give you my secret weapons for making the absolute best baked meat Esfihas. I still remember the first time I tried one; they were bursting with this incredible mix of cumin and lemon that just woke up my whole mouth. Trust me, this baked method is so simple, you’ll never go back to fussing with frying!
Why This Recipe for Esfihas Stands Out
I’ve tried a lot of recipes, and honestly, some are just too fussy or leave you needing a whole tube of paper towels because they’re deep-fried! This recipe is different. It cuts out all the unnecessary drama while keeping that incredible flavor you want in authentic Esfihas. I just want something that tastes great without making me work for three days, and this delivers.
- It’s baked, not fried, which gives you a crisp, golden crust without all that extra grease. Hello, healthier snack!
- The dough is seriously beginner-friendly—it comes together fast and doesn’t need an all-day rise.
- That filling? It’s packed with bright lemon and warm cumin, making it taste rich, even though we skip the heavy oils.
Perfectly Baked Esfihas Every Time
Baking these beauties is where the magic really happens. You get that satisfying, slightly chewy outside, and the meat stays juicy because the oven temperature is just right. You won’t get that greasy mouthfeel you sometimes get when frying. It’s pure reliability, I promise. If you want to check out another simple winner that uses the oven well, you should look at how I prepare my irresistible garlic butter shrimp—totally different flavor profile, but same ease!

Simple Dough for Delicious Esfihas
Nobody has time to wait four hours for dough to proof these days, right? The yeast mixture wakes up quickly—seriously, five minutes, and it’s ready to go—and the dough only needs about an hour locally to double. That means you can whip up these savory pastries faster than you think!
Ingredients Needed for Your Meat Esfihas
Okay, let’s talk components! Making these savory pies isn’t about tracking down obscure spices; it’s about good, basic ingredients that work together perfectly. The key here is organization—get your dough stuff in one spot and your meat filling ingredients grouped together. Once you have everything measured out, assembly is a breeze. Don’t forget that a little splash of something bright, like nice fresh lemon juice, makes the ground beef sing! If you’re ever looking for other simple flavor boosters, remember that a good simple syrup can totally transform a sauce or glaze, just like that lemon brightens this meat!
For the Esfihas Dough
You need just a few things to get that perfect soft, pliable dough that holds up well in the oven. We start with 1 cup of very warm water—make sure it’s around 105 to 115 degrees F, or just comfortably warm to the touch, so your yeast wakes up happy! Then we grab 3 cups of all-purpose flour, 1 teaspoon of sugar to feed that yeast, 1 teaspoon of salt, and just 2 tablespoons of olive oil for a bit of richness.
For the Savory Meat Filling for Esfihas
This is the heart of the esfiha. You’ll need 1 pound of good ground beef; I always lean toward 80/20 because that little bit of fat keeps the meat from drying out during baking, which is essential! Finely chop 1 medium onion—and I mean finely, we don’t want big chunks! You’ll also need 2 tablespoons of tomato paste for depth, 1 teaspoon of cumin for that classic warmth, half a teaspoon of black pepper, and about 1/4 cup of fresh lemon juice to cut through the richness.
Tips for Success When Making Esfihas
Even though these Esfihas are simple, a couple of little tricks can save you from frustration when you’re first making them. I learned these the hard way—I once made an entire batch where the dough was tough as leather because I added flour like a maniac! Don’t do what I did. The key here is gentle handling during the dough stage and making sure that meat mixture has enough zing to stand up to the oven heat.
Achieving the Right Dough Consistency for Esfihas
My big mistake early on was thinking that if the dough stuck to my hands, it needed more flour. Wrong! If the dough is a little sticky initially, just keep kneading it; it works itself out because of the oil and the gluten development. If, after a good 5 minutes of kneading, it’s truly grabbing everything, add flour just one tablespoon at a time. Remember, too much flour means dry, crumbly crusts, and nobody wants that.
Keeping the Meat Filling Moist in Your Esfihas
The filing has lemon juice and tomato paste, which is great, but sometimes ground beef can go dry. If you find your raw meat mix looks a little sparse or stiff, don’t hesitate to drizzle in just a touch more olive oil—maybe an extra teaspoon. Also, the lemon juice helps break down the meat fibers, so really mix those ingredients well; you want them thoroughly incorporated. If you’re having trouble with dry flavor absorption in other baking, check out my piece on the one fatal tea mistake everyone makes—it’s all about controlling moisture, which applies here too!
Step-by-Step Instructions for Perfect Baked Esfihas
Alright, let’s tackle the assembly! It looks like a lot of steps, but honestly, once you get into the rhythm, it flows really nicely. The dough is happy doing its thing for an hour, so we use that time to focus totally on getting that filling seasoned perfectly. Remember, Esfihas are all about balancing that dough with that zesty, bright meat mixture. We’re going to bake them hot and fast for that classic golden color!
Preparing the Yeast Mixture and Dough Base
First things first: we need to bring that yeast to life! In a small bowl, mix your 1 cup of warm water with 1 teaspoon of sugar and your active dry yeast. Go off and make a cup of coffee, maybe check your phone, because you need to wait about five minutes. If you see it get foamy and bubbly on top? Success! That means your yeast is happy and ready to work. Now, the dough base: take your 3 cups of flour and salt in a big bowl, make a well right in the middle, and pour in that foamy yeast mixture along with your 2 tablespoons of olive oil. Mix it gently until it just starts coming together into a shaggy ball.
Kneading and Proofing the Esfihas Dough
Time to get your hands dirty! Turn that shaggy mess onto a lightly floured surface and knead it with some muscle for about 5 to 7 minutes. You’re looking for a dough that’s smooth and springs back gently when you press it. Pop it into an oiled bowl, give it a cover—a damp tea towel works great—and leave it somewhere cozy where it’s warm. It needs a solid hour, minimum, to double up in size. If your kitchen is chilly, turn your oven on for just two minutes, turn it OFF, and put the bowl inside. Instant proofing box!
Mixing the Flavorful Meat Filling
While the dough is having its hour-long nap, we attack the filling. In a separate bowl, mix up that pound of ground beef with your finely chopped onion. Now, throw in your flavor boosters: the tomato paste, cumin, black pepper, and that crucial lemon juice. You really need to mix this thoroughly—I use my hands for this part—so everything is evenly distributed. We don’t want one bite tasting only of onion and the next only of cumin!
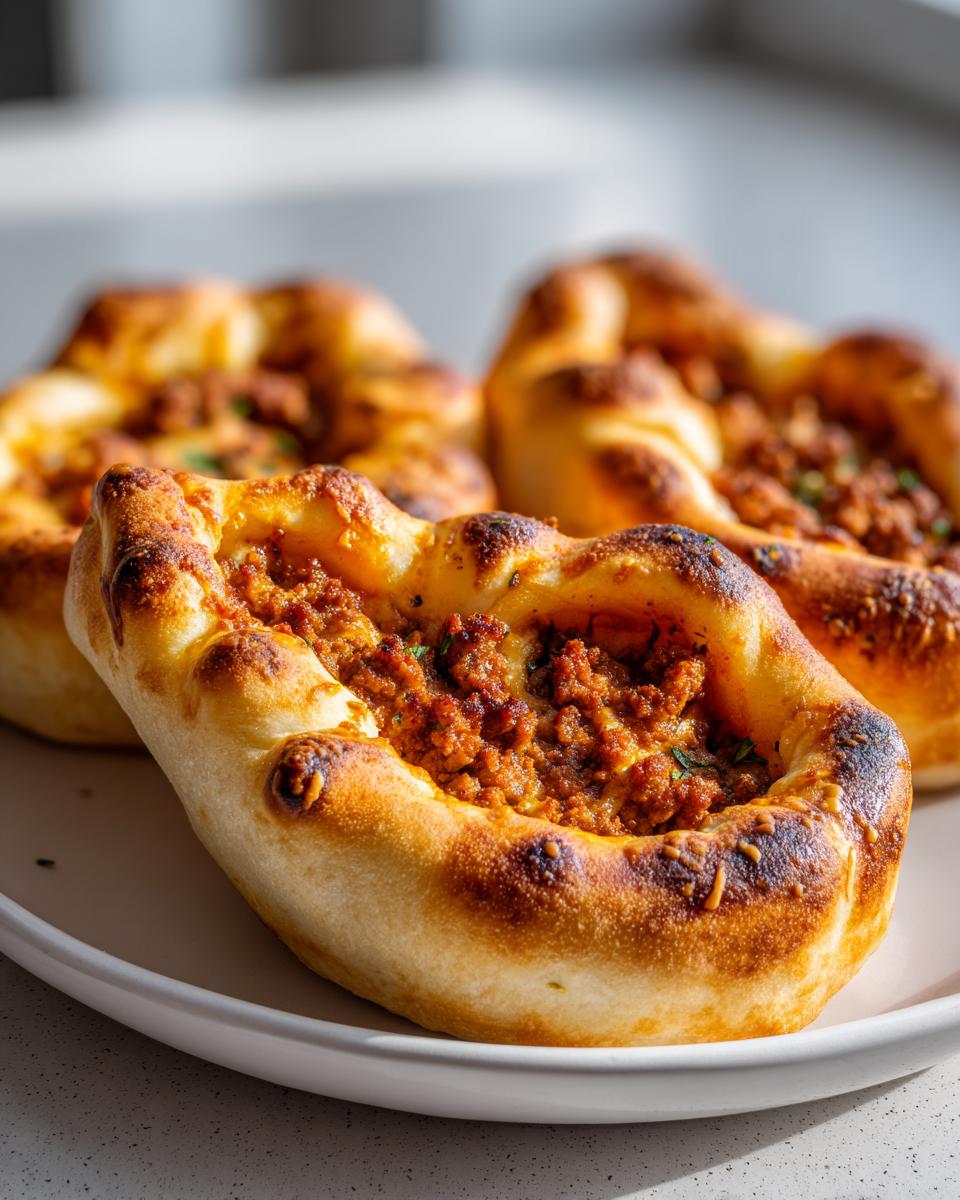
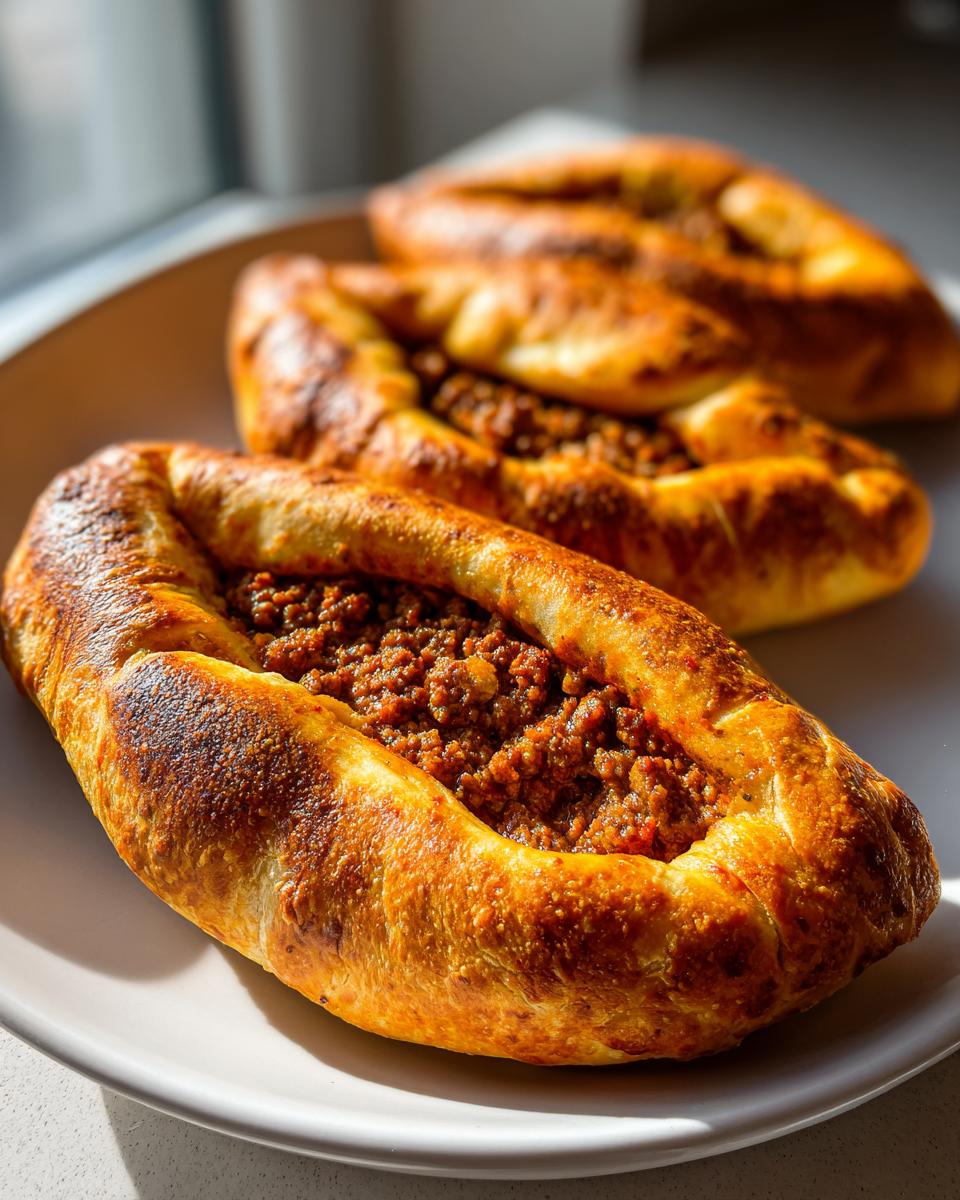
Shaping, Filling, and Baking Your Esfihas
Okay, oven time! Preheat your oven to a nice hot 400 degrees Fahrenheit (or 200 Celsius). Once your dough has doubled, punch it down hard to release the air, and divide it into 12 equal pieces. Roll each piece into a thin circle, aiming for about 4 inches wide. Spoon about 2 tablespoons of that meat mix right onto the center of each circle. Now for the iconic shape: pinch those edges up together until you form a little square or boat shape, but make absolutely sure the meat filling is exposed right in the middle. Lay them gently on a parchment-lined baking sheet. Bake them for 15 to 20 minutes, or until that crust turns beautifully golden brown. They’ll look amazing coming out! If you’re trying other baked goods that require a nice environment, remember how important temperature control is, just like when making easy homemade oat milk.
Ingredient Substitutions and Notes for Your Esfihas
I get asked all the time if you can swap things out in this recipe because substitution is just part of home cooking, right? Absolutely! While I adore the classic ground beef version, you can certainly play around with the meat base. Also, if you wanted to boost that flavor even further, there are a couple of easy additions that really enhance the Middle Eastern profile of these savory pies. It’s all about making the recipe your own! If you’re ever curious about how small tweaks change things, think about how I use simple syrup—it’s all about precision!
Meat Substitutions in Esfihas Filling
One of my favorite changes, if I’m feeling a bit more rustic, is swapping the beef for ground lamb. Lamb brings such a deeper, richer flavor to the filling. Just remember that lamb is often leaner than the 80/20 beef I recommended, so if you use lamb, you might want to drizzle in an extra teaspoon of olive oil we use in the dough just to maintain that essential moisture level inside your baked Esfihas.
Flavor Variations for Esfihas
If you want a brighter lift, try adding a tiny pinch of dried mint right into the meat mixture when you are combining everything. It pairs wonderfully with the lemon juice. You can also experiment beyond cumin—a small pinch of allspice or even a tiny bit of dried oregano can give your Esfihas a completely new personality. I always say, don’t be afraid to experiment with the spices!
Serving Suggestions for Homemade Esfihas
Now that you’ve pulled these gorgeous, golden Esfihas out of the oven, what are you going to serve them with? These little meat pies are so flavorful on their own, thanks to that zingy lemon and cumin in the filling, but they really shine when paired with something cool and crunchy. They grab onto those fresh flavors so well, which is exactly what you want when balancing warm, savory baked goods.
For me, the number one accompaniment is always something yogurt-based or deeply refreshing, especially if I’m serving them warm straight from the baking sheet. I often whip up a quick Greek yogurt dip seasoned with just a little garlic powder, salt, and maybe a squeeze of lime. It’s simple, cools down the heat, and the acidity plays nicely with the meat.
If you’re serving these as part of a bigger spread, definitely pair them with a vibrant salad. I swear by a crunchy, summery salad to cut through the richness of the ground beef. If you need inspiration for something super fresh, I highly recommend checking out my recipe for a refreshing cucumber feta salad. That salty cheese and cool cucumber is the perfect counterpoint to the warm, spiced meat in your Esfihas.
Honestly, though, the best way to enjoy them is just piled high on a platter while they are still steaming hot, maybe with a small bowl of pickled vegetables on the side for that extra salty, sour crunch. Don’t overthink it; they deserve to be the star!
Storage and Reheating Instructions for Esfihas
These little meat parcels are so great because they actually taste just as good, if not better, the next day! But you have to store them right, or that delicious baked crust turns sad and soft. I usually make a huge batch because I know I’ll be snacking on them for days, but keep things simple by following my non-fussy storage rules.
When it comes to keeping your Esfihas fresh, the container matters way more than you think! Let them cool down completely on a wire rack first—this is crucial. Putting warm pastries into any sealed container traps steam, and steam equals sogginess. Once they’re totally room temperature, store them in an airtight container on the counter. They hold up fantastically well for about three days at room temperature thanks to that sturdy dough.
If you’re planning on keeping them around longer—say, up to three months—the freezer is your friend. Wrap the cooled Esfihas tightly first in plastic wrap, and then tuck them into a sturdy freezer bag. I always try to separate layers with a small square of parchment paper so they don’t fuse into one giant meaty brick. It happens more often than I like to admit!
Best Way to Reheat Your Esfihas
This is the most important secret for day-two Esfihas: Do *not* use the microwave first! That will make them chewy and weird. We are aiming for that crispy, fresh-from-the-oven texture, and the oven is the only way to get it back.
Take them straight from the fridge (or the freezer if you froze them) and put them right onto a baking sheet. You don’t need to thaw them completely if you’re using the oven. Set your oven temperature to about 350 degrees Fahrenheit. They usually only need about 8 to 10 minutes. You’ll know they’re perfect when the crust feels crisp again and the meat filling is piping hot all the way through. That little refreshing bake brings all those wonderful cumin and lemon smells right back!
Can I Make Savory Spiced Meat Ahead of Time?
Oh, yes! You can totally make the meat filling for your Esfihas several days in advance. Just mix everything together and keep it tightly covered in the fridge. The flavors actually meld together nicely overnight! But here’s a reminder: If you prep the filling ahead, make sure to let it sit out on the counter for about 20 minutes before you try to dollop it onto your dough circles. Cold filling can sometimes weigh down the dough.
Frequently Asked Questions About Making Esfihas
I know when I’m trying a new savory pastry recipe, my mind starts racing with all the little ‘what-ifs.’ Don’t worry, I’ve run into most of the common snags over the years, so let’s clear up some of the questions folks usually have about making these fantastic baked Esfihas. Getting these little details right makes a huge difference!
Can I freeze the raw Esfihas before baking?
Oh yes, you absolutely can! This is a lifesaver for busy weekends. After you’ve shaped your Esfihas and put the meat filling in—but before they go into the oven—you can flash freeze them. Lay the shaped pastries on a parchment-lined baking sheet and pop that sheet in the freezer for about an hour until they are solid little rocks. Then, transfer them to a freezer bag. When you want to bake them later, just pull out what you need, place them on a sheet, and add about 5 to 7 extra minutes to the normal baking time since they’re going in frozen. They come out great!
What is the traditional shape for these meat Esfihas?
The most traditional way we shape these is called the ‘boat’ or sometimes referred to as a square shape, and you saw me describe it in the instructions. You want to roll that dough thin, put the filling smack dab in the middle, and then fold/pinch those edges up so that you create a defined border around the filling. The whole point is to leave that delicious, vibrant meat mixture exposed right in the center. It’s not a sealed pocket; it’s an open-faced little flavor boat!
Can I use chicken instead of ground beef in Esfihas?
You certainly can use chicken! Ground chicken or even ground turkey works as a substitute for the ground beef in these savory pies. However, poultry is naturally much leaner than beef, and we rely on that fat content for moisture retention in this baked method. If you swap it out, I highly recommend adding that extra teaspoon of olive oil we talked about into the chicken mixture to help keep things juicy. It’s the best insurance policy against dry poultry!
If you’re looking for other recipes that really maximize fresh zestiness, you might want to check out my tips for making a classic margarita cocktail—it’s all about balancing the bright citrus!
Estimated Nutritional Data for Simple Meat Esfihas
I always tell folks that while we aren’t making these Esfihas for their vitamin count, balancing flavor and keeping them relatively lighter than a fried snack is a win! Since every kitchen has different meat fat percentages and flour brands, remember that this data is just an estimate based on the recipe yielding 12 pieces. Think of it as a good guideline, not gospel!
For those of you tracking things like I sometimes do—especially when trying to balance out heartier meals—this information is helpful for portion control. If you’re looking for more ideas on keeping your main meals lighter without sacrificing taste, you might enjoy browsing some of my 10 healthy dinner recipes for weight loss you’ll love. It shows how small swaps make a big difference!
Here’s the breakdown per single Esfiha:
- Calories: About 280 per piece. A perfect snack size!
- Fat Content: Around 12 grams. That slight amount helps keep the meat filling nice and juicy while baking.
- Protein Power: We’re looking at about 18 grams, thanks to that hearty ground beef.
- Carbohydrates: Roughly 28 grams from the satisfying, soft dough.
This is a fantastic, balanced savory treat! Enjoy them hot, and don’t worry too much about the exact numbers—the flavor is what counts the most!
Share Your Homemade Esfihas Creations
Honestly, the best part of sharing this recipe is seeing what you all create in your own kitchens! I put my heart into perfecting these baked Esfihas, but they always taste best when they’re shared around a table full of family or friends.
So, when you’re done pulling that golden tray out of the oven, I really want to hear all about it! Did you stick to the classic spices, or did you try that dried mint I mentioned? Did your dough rise perfectly in your kitchen temperature?
Please, don’t be shy! Leave a rating right below this section if you loved how easy these were. And if you snapped a picture of those beautiful exposed meat centers, tag me! Seeing your homemade savory pastries makes all the recipe testing worth it. I love seeing how these recipes take on a life of their own in different homes. Happy baking, and enjoy those perfect little bites!
Print
Simple Meat Esfihas
- Total Time: 1 hour 50 min
- Yield: 12 pieces 1x
- Diet: Low Fat
Description
A recipe for making basic baked meat esfihas, a type of savory Middle Eastern meat pie.
Ingredients
- 1 cup warm water
- 1 teaspoon active dry yeast
- 1 teaspoon sugar
- 3 cups all-purpose flour
- 1 teaspoon salt
- 2 tablespoons olive oil
- 1 pound ground beef
- 1 medium onion, finely chopped
- 2 tablespoons tomato paste
- 1 teaspoon cumin
- 1/2 teaspoon black pepper
- 1/4 cup lemon juice
Instructions
- Mix warm water, yeast, and sugar in a small bowl. Let stand for 5 minutes until foamy.
- In a large bowl, combine flour and salt. Make a well in the center and pour in the yeast mixture and olive oil. Mix until a dough forms.
- Knead the dough on a lightly floured surface for 5 to 7 minutes until smooth. Place in an oiled bowl, cover, and let rise in a warm place for 1 hour, or until doubled in size.
- While the dough rises, prepare the filling. In a bowl, combine ground beef, chopped onion, tomato paste, cumin, black pepper, and lemon juice. Mix well.
- Preheat your oven to 400 degrees Fahrenheit (200 degrees Celsius).
- Punch down the risen dough and divide it into 12 equal pieces. Roll each piece into a small ball.
- On a floured surface, roll each ball into a thin circle, about 4 inches in diameter.
- Place about 2 tablespoons of the meat mixture onto the center of each dough circle.
- Pinch the edges of the dough together to form a square or boat shape, leaving the center of the filling exposed.
- Place the esfihas on a baking sheet lined with parchment paper.
- Bake for 15 to 20 minutes, or until the crust is golden brown.
Notes
- You can substitute ground lamb for ground beef in the filling.
- For a brighter flavor, add a pinch of dried mint to the meat mixture.
- If the dough is too sticky, add flour one tablespoon at a time while kneading.
- Prep Time: 30 min
- Cook Time: 20 min
- Category: Snack
- Method: Baking
- Cuisine: Middle Eastern
Nutrition
- Serving Size: 1 esfiha
- Calories: 280
- Sugar: 2
- Sodium: 350
- Fat: 12
- Saturated Fat: 4
- Unsaturated Fat: 8
- Trans Fat: 0
- Carbohydrates: 28
- Fiber: 2
- Protein: 18
- Cholesterol: 55
Keywords: esfihas, meat pies, savory pastry, ground beef, Middle Eastern bread