
Oh my gosh, are you ready for a real treat? I’m talking about ditching the oven and making the absolute best square dessert in all of Canada! Seriously, these traditional, no-bake Nanaimo Bars disappear faster than you can say ‘second layer.’ I love this recipe because there’s zero fuss, but the payoff is huge: a perfect blend of textures that just screams ‘comfort.’ My family looks forward to these every single time I mention making them. It’s my go-to showstopper when I need something amazing whipped up fast!
Why This Classic Nanaimo Bars Recipe Works So Well
I’ve tried fancy upgrades, but honestly, the classic version wins every time. This recipe is magic because it relies on simple building blocks that create something spectacular. Forget about turning on the oven; we don’t need it for this Canadian icon. Check out what makes these so reliable:
- Authentic No-Bake Structure: You don’t have to worry about oven temperatures or hot spots! This minimal effort makes them perfect for stressful holiday baking or when you just want a quick sweet fix. You can find other great no-bake ideas here: no-bake cheesecake recipes.
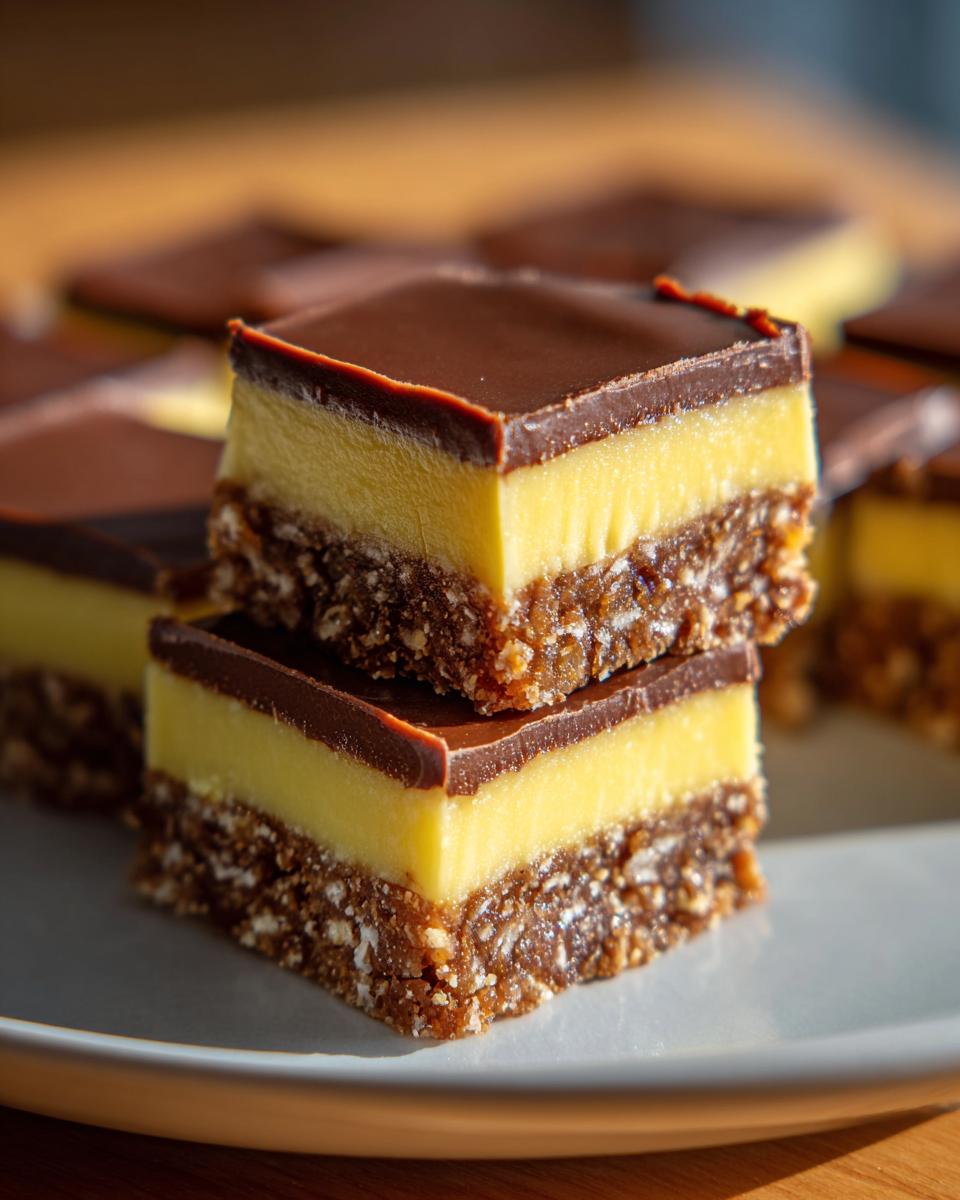
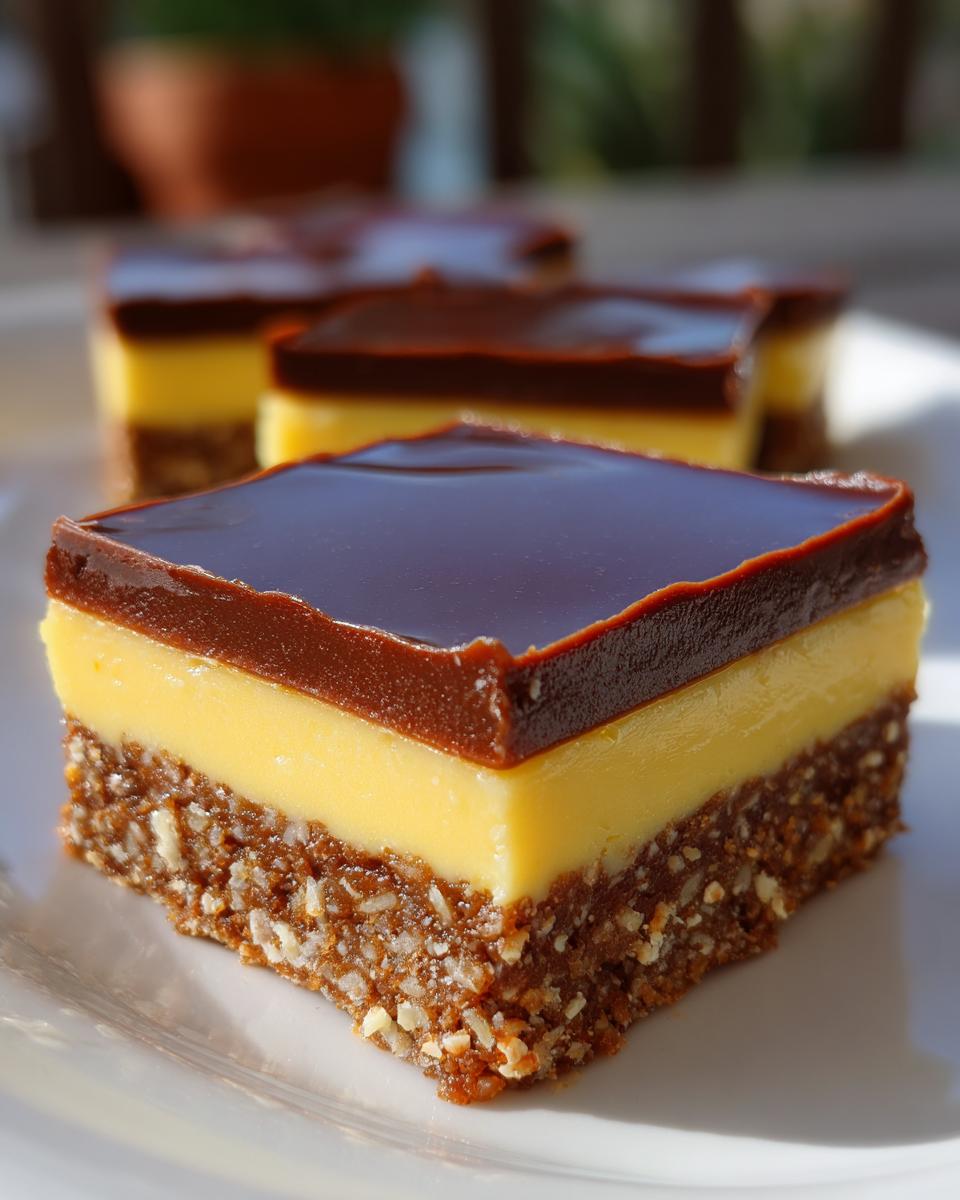
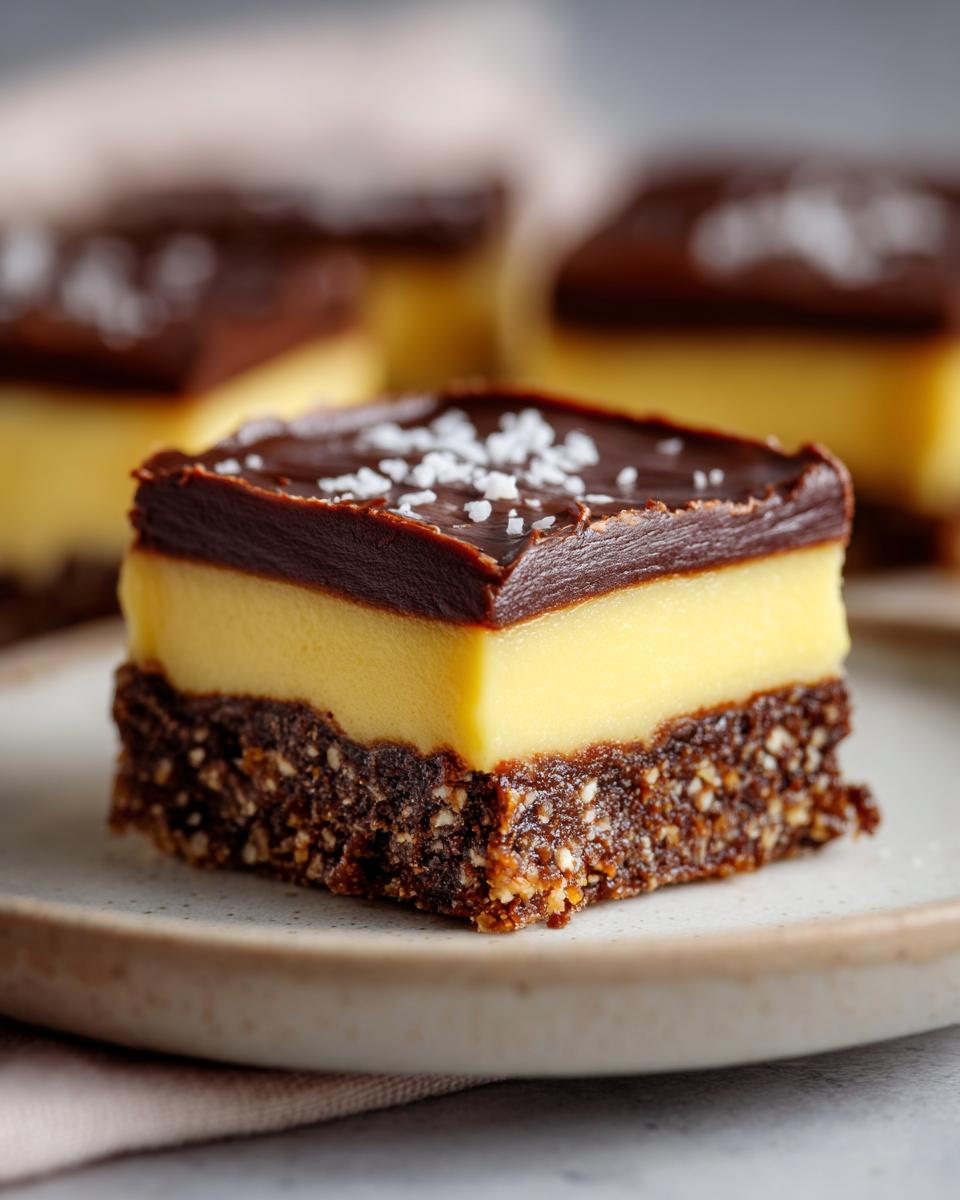
- Perfect Layer Balance in Nanaimo Bars: The contrast is everything! You get that satisfying crack from the chocolate shell, followed by the smooth, cool custard, all sitting on top of a firm, chewy, coconut-laced crumb base. It’s the texture interplay that keeps everyone reaching for another one!

Gathering Ingredients for Your Nanaimo Bars
Okay, grabbing the ingredients is half the fun, right? Since these bars have three distinct layers, I like to keep my mise en place super organized. It stops me from accidentally adding extra butter to the custard or forgetting the cocoa powder in the base—oops! If you measure everything out ahead of time, assembly is a breeze. For extra mixing clarity, I always encourage people to review my quick guide on how to make simple syrup, just to get into that organized mindset!
For the Crumb Base
This is where the chewiness comes from, so pay attention to your crumbs here. You want everything to bind up nicely when it hits that gentle heat.
- 1 cup graham cracker crumbs (And I mean fine! Use a food processor if you need to crush them down nice and small.)
- 1/2 cup unsalted butter
- 1/2 cup shredded coconut
- 1/4 cup granulated sugar
- 2 tablespoons cocoa powder
- 1 egg
- 1 teaspoon vanilla extract
For the Custard Filling
This layer needs to be perfectly smooth, so make sure your butter is actually soft—not melted! We want creaminess, not soupiness.
- 1 cup powdered sugar
- 1/4 cup unsalted butter, softened
- 2 tablespoons milk
- 1 teaspoon vanilla extract
For the Chocolate Topping
This top layer gives you that beautiful snap when you bite in. Adding a little extra butter here is my little secret; it keeps the chocolate from getting too hard and crumbly when it chills. It really helps with slicing later on!
- 1 cup semi-sweet chocolate chips
- 1/4 cup unsalted butter (Yes, add this in with the chips!)
Step-by-Step Instructions for Perfect Nanaimo Bars
This is where the real magic happens, and trust me, it all flows so easily once you have your ingredients ready! Since these are no-bake, the timing is less about hovering over an oven and more about ensuring each layer sets up beautifully before we move to the next. It’s all about patience during the chilling breaks. It reminds me a bit of how slow you have to be when chilling tea for iced drinks, or you ruin the whole flavor profile—I wrote about that mistake here: the one fatal mistake everyone makes!
Preparing the Pan and Base Layer for Nanaimo Bars
First things first: prepare for easy removal! Grab an 8×8 inch pan and line it completely with parchment paper, making sure you leave a nice overhang on two sides. That overhang is your handle later, so don’t skimp on it. Next, in a saucepan over medium heat, melt together the 1/2 cup of butter with the graham crumbs, coconut, sugar, and cocoa powder. Once it’s all melty and combined, take it off the heat immediately and stir in that single egg and the teaspoon of vanilla. Mix it until it looks unified, then press that crumb mixture down into your prepared pan. And listen to me: pack it down firmly! Use the bottom of a glass or a flat spatula to really compact it so the base doesn’t end up crumbly.
Creating and Setting the Custard Filling
While that base cools down just a tiny bit—you don’t want it piping hot—we whip up the center! In a separate bowl, beat together the powdered sugar, your softened 1/4 cup of butter, the milk, and the final teaspoon of vanilla. Beat it until it’s really smooth and creamy; no lumps allowed! Once you’re happy with the texture, spread this glorious yellow filling right over your cooled base layer. Then, pop the whole thing into the fridge for at least 30 minutes. This chill time is non-negotiable; it needs to be firm before we add the chocolate.
Finishing the Chocolate Topping and Cutting Your Nanaimo Bars
Now for the famous cap! Melt your chocolate chips together with the last little bit of butter. You can do this over a double boiler if you’re fancy, or just zap it in the microwave in short bursts, stirring well until silky smooth. Pour that melted chocolate right over your chilled custard layer. Gently spread it out evenly across the top. Back into the fridge it goes! This final chill needs about an hour, or until that chocolate topping is completely hard and set through. Once it’s solid, use those parchment paper handles to lift the whole slab out, and slice it into tidy squares. It’s officially dessert time! Congrats, you just conquered classic Nanaimo Bars!
Tips for Success When Making Nanaimo Bars
Look, these are no-bake, which is wonderful, but that means structure is everything! If you mess up the base, the whole bar turns soupy. I’ve learned a few tricks over the years—and yes, I’ve made a few messes myself—but these tips will guarantee you get those perfect squares every time. You want to avoid the dreaded crumbly bottom or the lumpy filling, and trust me, it’s easy to do once you know the secrets. If you’re looking for a good drink pairing while you wait for the chill time, check out my favorites in this guide to easy cocktail recipes!
Achieving the Perfect Base Texture
The base is all about how you treat those graham crackers and that coconut. Remember what the recipe says about the crumbs? You need them finely ground. If they are too coarse, you end up with loose chunks instead of a dense, chewy pavement for your custard. If you are crushing them by hand, a rolling pin inside a sturdy Ziploc bag works wonders!
The most important part, though, is packing it down. Seriously, don’t be shy here! Once you pour the cooked crumb mixture into the pan, grab a flat-bottomed measuring cup or the back of a sturdy metal spoon and press. Press until your arm hurts a little bit! You’re aiming for a brick-like foundation so that when you cut these gorgeous Nanaimo Bars later on, the whole thing doesn’t crumble apart on the plate.
Smooth Custard and Chocolate Layers
When tackling that middle custard, temperature control is your friend. The butter absolutely *must* be softened, meaning you can press your finger into it easily, but it shouldn’t be greasy or melted at all. If your butter is too warm, you’ll end up with greasy pockets in your filling instead of that light, fluffy texture we crave. Beat it until it looks truly uniform before gradually adding the powdered sugar.
For the chocolate topping, sometimes the chips seize up or get too thick, especially if you’re using a lower-quality brand. If your melted chocolate seems stiff or won’t spread easily over the cool custard, just whisk in a tiny splash—and I mean a tiny splash—of milk, maybe half a teaspoon at a time, until it relaxes back into a glossy, pourable state. This trick saves many a batch of Nanaimo Bars from looking rough on top!
Storage and Make-Ahead Tips for Your Nanaimo Bars
The best way to enjoy these luscious Nanaimo Bars is actually after they’ve had a good, long chill. Since they are completely no-bake, they need that cold time to fully firm up so you can get clean, beautiful squares. Honestly, they taste even better the next day once the flavors have really settled into each other! If you’re making them for a party next week, you’re actually ahead of the game!
Refrigeration and Freezer Life
You absolutely must keep these in an airtight container, which is super important to keep the chocolate shiny and to stop them from smelling like whatever else you’ve got chilling in the fridge—we don’t want onion breath on our custard!
In the refrigerator, they stay perfectly tasty usually for about a week. If you are worried about space or want to save them even longer, they freeze like a dream. Pop a layer of parchment paper between batches if you stack them, and they should be good for up to three months in the freezer. For a frosty treat, check out these great frozen cocktail recipes for pairing ideas, even though these bars themselves don’t need blending!
Variations on Classic Nanaimo Bars
Look, while I’m a traditionalist when it comes to these beautiful Nanaimo Bars, sometimes a person just needs a little shake-up, you know? The structure of these bars is thankfully very dependable, which means we can sneak in some fun flavor tweaks without risking the whole thing collapsing into a sweet puddle. These swaps are usually easy ones—nothing that requires a whole new cooking technique. If you’re thinking about mixing things up, grabbing a refreshing fruit cocktail recipe might inspire your next non-baking adventure!
Crust Flavor Swaps
The base is sturdy, so we have some wiggle room here. If you run out of graham crackers, don’t panic! You can absolutely substitute them with other crushed cookies entirely. Vanilla wafers work phenomenally well; they give you a slightly lighter, sweeter foundation. Shortbread cookies—if you have any sad, broken ones rattling in the bottom of the tin—are even better because they add a nice amount of butter already, which complements the coconut nicely.
Just make sure whatever you swap in is crushed very finely, similar to how you handle the graham crackers. We still need a dense press, so don’t be gentle when packing down your new base!
Custard Flavor Adjustments
This middle layer is where you can really play around with extracts. The traditional yellow filling is lovely and buttery, but sometimes a little lift is exactly what you need. If you love almond flavors, swap out half a teaspoon of that vanilla for almond extract. It gives a really sophisticated, almost marzipan-like hint that pairs wonderfully with the chocolate top.
Another flavor I adore in Nanaimo Bars is lemon. Add about a teaspoon of fresh lemon zest right into the custard mixture when you beat the butter and sugar. The slight tartness cuts through the richness of the chocolate layer so well. It brings a brightness that makes the whole bar feel less heavy!
Serving Suggestions for Nanaimo Bars
These rich, decadent Nanaimo Bars are sweet enough to stand on their own, but everyone loves a perfect pairing! I usually serve them chilled straight from the fridge on a small paper doily—they look so professional that way. For an afternoon treat, you simply must pair them with a strong, black coffee or a nice, robust tea. If you’re looking for something chilly and fun to drink, check out some great ideas here: cold coffee drinks recipes. Honestly, though, one perfect square of this Canadian treat is usually all you need!
Frequently Asked Questions About Nanaimo Bars
I always get questions about these because they seem so simple, but getting that perfect layer structure takes a tiny bit of know-how! These are definitely a staple in Canadian dessert rotation, and I want everyone to succeed with their first batch of these fantastic no bake bars. I even have a great guide for mocktails if you need a fun pairing: non-alcoholic cocktail recipes!
Why is my custard filling too runny in my Nanaimo Bars?
This almost always comes down to the temperature of the butter, so watch that step closely! If your butter is too soft or even slightly melted, it’s just going to liquify when you add the powdered sugar, resulting in sloppy goo instead of firm, spreadable custard. Also, make sure you mix the butter and sugar until they are genuinely fluffy first, THEN add the milk slowly. If you just dump everything in, it might not emulsify correctly, and you’ll struggle to get that classic creamy texture.
Are Nanaimo Bars supposed to be eaten cold?
They absolutely are! You have to eat Nanaimo Bars cold, straight from the fridge, or even slightly chilled from the freezer. That’s what keeps that top chocolate layer snappy and prevents the custard from getting too soft and melty. If you leave them out on the counter for too long, the layers start to mingle, and you lose that wonderful texture separation that makes these squares famous.
Can I substitute the egg in the base of these no bake bars?
That one egg in the base is really important for binding everything together once it heats up and cools down. It helps create that chewy density, almost like a light cake layer. I really advise against swapping it out if you want the authentic texture for these no bake bars. If you absolutely must omit it, you’d probably have to replace it with a tablespoon of a thick binder, like smooth peanut butter or a flax egg substitute, but honestly, for the traditional recipe, stick with the egg!
Nutritional Estimate for This Nanaimo Bars Recipe
Now, I have to be honest with you—these are decadent, wonderful treats, so they aren’t exactly salad! When you’re baking up something this rich with butter, chocolate, and coconut, you’re going to get a happy little calorie count. Remember, this is just an estimate based on the ingredients listed, and it’s totally based on getting exactly 16 nice, even squares out of your pan. If you cut them skinnier, well, then your numbers change!
This recipe yields about 16 bars, and when you look at the breakdown, you see where all that deliciousness comes from:
- Calories: Right around 250 per bar. Totally worth it, trust me!
- Fat: About 15 grams total, which includes about 9 grams of the satisfying saturated fat from all that lovely butter we added to the base and the chocolate.
- Carbohydrates and Sugar: You’re looking at roughly 28 grams of carbs, with about 25 grams being sugar. Quality sugar makes happy bakers!
- Protein: A small boost of about 3 grams per square.
Overall, they look like a rich dessert, which is exactly what they are! I wouldn’t stress too much about the numbers when you’re enjoying a piece of true Canadian classic baking, but it’s good to know what you’re working with.
Share Your Experience Making These Classic Nanaimo Bars
Alright, that’s the whole recipe for the most perfect, traditional Nanaimo Bars you’ll ever make! Now that you’ve tasted perfection, I desperately want to hear about it! Did they stay chilly? Did your family even wait for them to set before digging in? I hope they brought a little bit of that easy, no-fuss joy into your kitchen the way they always do mine.
Don’t be shy! Please leave a star rating right below this section—it really helps other bakers know this classic recipe is the one to trust. If you have any little tips or tricks that worked for *your* kitchen, drop them in the comments below. Seriously, I love learning from you all!
And if you took a picture—because who wouldn’t want to show off these stunning layers?—tag me on social media! Seeing your beautiful, perfectly set Nanaimo Bars makes my day every single time. Happy baking (or, well, happy *no-baking*)!
Print
Classic Nanaimo Bars
- Total Time: 25 min
- Yield: 16 bars 1x
- Diet: Vegetarian
Description
A simple recipe for the traditional no-bake Canadian dessert featuring a crumb base, custard filling, and chocolate topping.
Ingredients
- 1 cup graham cracker crumbs
- 1/2 cup unsalted butter
- 1/2 cup shredded coconut
- 1/4 cup granulated sugar
- 2 tablespoons cocoa powder
- 1 egg
- 1 teaspoon vanilla extract
- 1 cup powdered sugar
- 1/4 cup unsalted butter, softened
- 2 tablespoons milk
- 1 teaspoon vanilla extract
- 1 cup semi-sweet chocolate chips
Instructions
- Line an 8×8 inch pan with parchment paper, leaving an overhang.
- For the base, combine graham cracker crumbs, 1/2 cup butter, coconut, sugar, and cocoa powder in a saucepan. Heat over medium heat until butter melts and mixture is combined.
- Remove from heat and stir in the egg. Mix well.
- Press the base mixture firmly and evenly into the prepared pan.
- For the custard filling, beat the powdered sugar, 1/4 cup softened butter, milk, and 1 teaspoon vanilla extract until smooth and creamy.
- Spread the custard filling evenly over the cooled base layer.
- Chill the bars for at least 30 minutes until the filling is firm.
- For the topping, melt the chocolate chips with the remaining 1/4 cup butter in a double boiler or microwave. Stir until smooth.
- Pour the melted chocolate over the custard layer and spread evenly.
- Refrigerate the bars until the chocolate is completely set, about 1 hour.
- Lift the bars out using the parchment paper overhang and cut into squares.
Notes
- Use finely ground graham cracker crumbs for a smoother base texture.
- Ensure the base layer is packed tightly before adding the custard.
- If the chocolate topping is too thick, add a few drops more milk to thin it slightly before pouring.
- Prep Time: 20 min
- Cook Time: 5 min
- Category: Dessert
- Method: No Bake
- Cuisine: Canadian
Nutrition
- Serving Size: 1 bar
- Calories: 250
- Sugar: 25
- Sodium: 75
- Fat: 15
- Saturated Fat: 9
- Unsaturated Fat: 6
- Trans Fat: 0
- Carbohydrates: 28
- Fiber: 1
- Protein: 3
- Cholesterol: 30
Keywords: Nanaimo Bars, Canadian dessert, no bake bars, chocolate custard squares, graham cracker crust